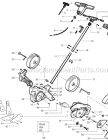
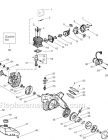
Weed Eater Gas Edger Replacement Parts For Model PE550 Type 2
Find Weed Eater PE550 Type 2 Parts By Symptom
Choose a symptom to view parts that fix it.
Popular Parts for Weed Eater PE550 Type 2


Part Number:530038478
Discontinued
Note: These Parts Are Illustrated for Clarity. Order Complete Assembly.

Part Number:530038479
Discontinued

Part Number:530069844
In Stock
Note: These Parts Are Illustrated for Clarity. Order Complete Assembly.

Part Number:530069832
Usually ships in 7 - 12 business days


Part Number:530036677
Discontinued

Part Number:530069421
Discontinued

Part Number:530036985
Discontinued

Part Number:530015241
Usually ships in 7 - 12 business days

Part Number:530036674
Discontinued

Part Number:583612401
Usually ships in 7 - 12 business days
Part Number:530036673
Discontinued
Part Number:530036982
Discontinued

Part Number:530015999
Discontinued

Part Number:530095103
Discontinued
Part Number:530036983
Discontinued

Part Number:530036981
Discontinued

Part Number:530015774
Usually ships in 7 - 12 business days
Note: 2010-72n and Lower, See Service Reference
Part Number:530036984
Discontinued

Part Number:530036676
Discontinued

Part Number:503210719
Discontinued
Part Number:530095104
Discontinued
Part Number:583612401
Usually ships in 7 - 12 business days
Part Number:530015982
Discontinued

Part Number:530095663
Discontinued

Part Number:530095629
Discontinued


Part Number:530036935
Discontinued

")
Part Number:530037625
Discontinued

Part Number:530095070
Usually ships in 7 - 12 business days

Part Number:530016042
Usually ships in 7 - 12 business days

Part Number:530038308
Discontinued

Part Number:530015886
In Stock
Note: 2010-72n and Lower, See Service Reference
Part Number:530015774
Usually ships in 7 - 12 business days
Note: 2010-72n and Lower, See Service Reference


Part Number:530019199
Discontinued

Part Number:530015997
Discontinued
Part Number:583612401
Usually ships in 7 - 12 business days

Part Number:530038301
Discontinued

Part Number:530016063
Discontinued

Part Number:530053792
Discontinued

Part Number:530054071
Usually ships in 7 - 12 business days

Part Number:530053501
Discontinued


Part Number:530038299
Discontinued
Note: (Incl. 73 & 101)


Part Number:530053544
Discontinued

Part Number:530053626
Discontinued

Part Number:530016040
Discontinued

Part Number:530016280
Discontinued

Part Number:530016275
Discontinued

Part Number:530036934
Discontinued


Part Number:530071258
Discontinued

Part Number:530163408
Discontinued


Part Number:530071396
Discontinued
Note: (Incl. 2 & Spark Arrestor Screen) - incl. #3

Part Number:530042088
Discontinued

Part Number:952030249
Discontinued
Note: RCJ-6Y

Part Number:530015953
Usually ships in 7 - 12 business days

Part Number:530071611
Discontinued
Note: (Incl.5,9,12,15,17,32,60)

Part Number:530036622
Discontinued

Part Number:530015886
In Stock
Note: 2010-72n and Lower, See Service Reference
Part Number:530071611
Discontinued
Note: (Incl.5,9,12,15,17,32,60)

Part Number:530036626
Discontinued
Part Number:530071611
Discontinued
Note: (Incl.5,9,12,15,17,32,60)

Part Number:530016014
Usually ships in 7 - 12 business days

Part Number:530057618
Discontinued
Part Number:530071611
Discontinued
Note: (Incl.5,9,12,15,17,32,60)

Part Number:582144301
Discontinued
Part Number:530071611
Discontinued
Note: (Incl.5,9,12,15,17,32,60)

Part Number:530071833
In Stock
Note: (Incl. 8, 9) - incl. 19, 20

Part Number:530015162
Usually ships in 7 - 12 business days
Note: Piston Pin Retainer


Part Number:530049817
Usually ships in 7 - 12 business days

Part Number:530016038
Discontinued

Part Number:530053920
In Stock
Note: (Incl. 22-24)

Part Number:530037066
Discontinued
Part Number:530053920
In Stock
Note: (Incl. 22-24) - incl. 22-24

Part Number:530036145
Discontinued


Part Number:530015954
Usually ships in 7 - 12 business days

Part Number:530014655
Discontinued

Part Number:530015983
Discontinued

Part Number:530036631
Discontinued
Part Number:530071611
Discontinued
Note: (Incl.5,9,12,15,17,32,60)

Part Number:530036664
Discontinued

Part Number:530037224
Discontinued


Part Number:530626605
Usually ships in 7 - 12 business days

Part Number:530036665
Discontinued

Part Number:530015127
In Stock
Note: Washer 5/16\\\\\\\\\\\\\\\\\\\\\\\\\\\\\\\\\\\\\\\\\\\\\\\\\\\\\\\\\\\\\\\\\\\\\\\\\\\\\\\\\\\\\\\\\\\\\\\\\\\\\\\\\\\\\\\\\\\\\

Part Number:530014832
Discontinued

Part Number:530036922
Discontinued

Part Number:530042072
Discontinued


Part Number:530069418
Usually ships in 7 - 12 business days
Note: (Incl.35) - incl. 35

Part Number:545008006
Discontinued

Part Number:545132401
Discontinued

Part Number:580236101
Discontinued
Note: (Incl. 48,49,50) - incl. 48, 49, 50


Part Number:530036927
Discontinued

Part Number:530015828
Usually ships in 7 - 12 business days
Note: 2009-001n and Higher, Service Reference

Part Number:530071625
Discontinued
Note: (Incl. 55-58, & 63-65) - incl. 55-58, & 63-65

Part Number:530015941
Usually ships in 7 - 12 business days
Note: (Incl. 11,12,39)

Part Number:530019179
Usually ships in 7 - 12 business days

Part Number:530071627
Discontinued
Note: (Incl. 39-41) - incl. 56, 63-65
Part Number:530071625
Discontinued
Note: (Incl. 55-58, & 63-65)

Part Number:530071363
In Stock
Note: (Incl. 6,9,25,46)

Part Number:530036555
Discontinued

Part Number:530015934
Usually ships in 7 - 12 business days


Part Number:530015945
Discontinued

Part Number:530032124
Discontinued
Part Number:530071611
Discontinued
Note: (Incl.5,9,12,15,17,32,60) - incl. 5, 9, 12, 15, 17, 32, 59