


Why Read This Article?
Finish Nailer Repair - Replacing the Driver Guide (Ridgid Part # 79004001022)
Article Breakdown
Finish Nailer Repair - Replacing the Driver Guide (Ridgid Part # 79004001022)
Video

Tools & Materials
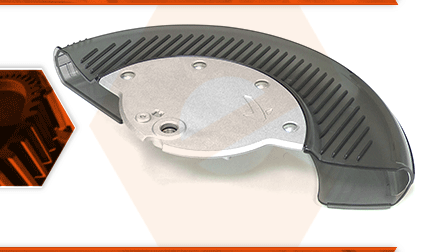
The lower guard assembly consists of the plastic guard, the mounting plate and the pivot bearing. The guard receives lots of wear and abuse. Damage to the plastic portion of the guard is the most common reason that the lower guard is replaced. It is not uncommon for the guard to be cracked or broken by accidentally hitting it with a workpiece.
Let's get started.
REMOVING THE LOWER GUARD
1. There's a spacer on the linkage; be careful not to lose it.
2. As you remove the guard, you also want to be careful to not lose the spring.
3. With the lower guard removed from the saw, remove the linkage.
INSTALLING THE NEW LOWER GUARD
1. Transfer the bumper from the old guard to the new. 2. Reinstall the linkage for the spacer and then the linkage. 3. Secure the linkage with the washer and the screw. 4. Reinstall the guard. 5. Place the spring over the hook on the guard. 6. Place the guard around the blade, and as you bring it up, hook the spring to the tab on the housing. 7. With a guard in place, secure it with the hub and the screw. Make sure that the bearing that's attached to the linkage sits on top of the block on the upper guard. 8. Place the spacer against the saw housing. 9. Place the link over the spacer and then secure it with the washer and the screw.
