


Why Read This Article?
Finish Nailer Repair - Replacing the Driver Guide (Ridgid Part # 79004001022)
Article Breakdown
Finish Nailer Repair - Replacing the Driver Guide (Ridgid Part # 79004001022)
Video
Tools & Materials
- Scrench
- Flat-head screwdriver
- Thin piece of rope
- Chainsaw clutch wrench

Find all of the parts you need on our Poulan chainsaw parts finder page.
Removing the oiler assembly
1. Remove the bar and chain
Loosen and remove the two nuts securing the bar cover.
Now remove the chain and pull the bar away from the chainsaw.
2. Bind the piston
You will need to gain access to the piston by removing the top cover and then the spark plug.
Now insert a small piece of rope into the cylinder -- leaving a small amount sticking out.

3. Remove the clutch
Use a clutch tool to remove the clutch from the clutch drum.

Pull the clutch drum and washers off of the unit.
4. Remove the bar mounting plate
Use a pair of needle-nose pliers to pinch the spring tab and pull the plate away from the chainsaw.
5. Drain any oil still in the reservoir
Remove the oil cap and drain any oil still sitting in the oil reservoir.
![]()
6. Remove the oiler
Loosen and remove the two screws securing the oiler. Then remove the elbow connecting the oil pickup tube.
7. Pull the oil pickup tube off of the unit.
Use a pair of needle-nose pliers to pull out the oil pickup tube.
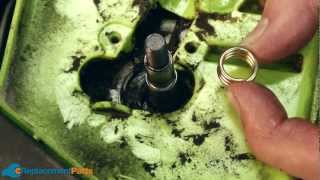
8. Remove the oiler gears
Use a couple of flat-head screwdrivers to pull the gear off of the spindle.

[Back to Top]
Installing the new oiler assembly
1. Install the new oil pickup tube
Gently press the new tube into the body.

2. Install the new gear
Use a flat-head screwdriver to carefully press the new gear onto the spindle.
3. Install the new oil pump assembly
Make sure you attach the correct oil block to the new oil pump.

Slide the pump assembly onto the saw and connect the elbow to the oil pickup tube -- then replace the screws.

4. Reinstall the bar mounting plate
Snap this back into is original position.
5. Reinstall the clutch and drum
Install the inner washer, clutch drum, and outer washer -- in that order.
Use the clutch tool to tighten the clutch back into the clutch drum.
6. Remove the rope binding the cylinder
Simply pull this out of the cylinder.
7. Replace spark plug and top cover
Screw the spark plug back into the cylinder and replace the top cover.
8. Reinstall the bar and chain
Secure the bar back onto the two bolts, put the chain back on the bar, and install the bar cover back into its original position with the two nuts.
[Back to Top]
Conclusion
By using this repair guide, anyone should be able to perform this repair on their own and avoid expensive repair shops. Keeping your chainsaw well-oiled is just as important for safety as it is for performance. Now grab that chainsaw and start cuttin'.
Remember, you can use our power tool parts finder to grab the last minute replacement parts you need for summer.
[Back to Top]
What We're About
