


Why Read This Article?
Finish Nailer Repair - Replacing the Driver Guide (Ridgid Part # 79004001022)
Article Breakdown
Finish Nailer Repair - Replacing the Driver Guide (Ridgid Part # 79004001022)
Video
Tools & Materials
- Screwdriver
- Socket wrench
- Pliers
 Find all of the carburetor repair parts used in this article by browsing our snowblower parts page.
Removing the Carburetor
Find all of the carburetor repair parts used in this article by browsing our snowblower parts page.
Removing the Carburetor
1. Remove the rear snowblower shroud
Remove the bolts with a socket wrench and set the shroud aside.
2. Remove the fuel line
First clamp the fuel line with some fuel line clamps.
Then remove the clip and pull the fuel line away from the carburetor.
3. Remove the primer line
Simply pull this line off of the carburetor.
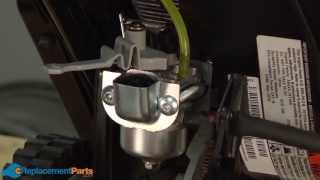
4. Remove the carburetor from the snowblower
Use a screwdriver to remove the two mounting bolts from the carburetor, then detach the spring and pull the carburetor away from the snowblower.
[Back to Top]
Disassembling the Carburetor
1. Remove the backing plate
Disconnect the spring from this plate, then pull the backing plate away from the carburetor.
2. Peel the old gaskets off of carburetor
Use your fingers to remove these gaskets from the carburetor.
3. Clean the outside of the carburetor
Clean any extra grime from the carburetor by spraying the outside with some carburetor cleaner.
4. Remove the carburetor bowl
Use a wrench to remove the carburetor bowl.
Make sure to have a container to catch any gas still in the carburetor.
5. Remove the float and metering needle
Use a pair of pliers to remove the hinge pin that secures the float.
Then pull the float and metering needle away from the carburetor.
6. Remove the main jet
Use a flat-head screwdriver to remove the main jet from the center 'neck'.

7. Remove the emulsion tube
Insert a screwdriver into the carburetor venturi and push the emulsion tube out of the 'neck'.
8. Remove the bowl o-ring
A pick or screwdriver can be used to remove this o-ring.
[Back to Top]
Cleaning the Carburetor
Using Carburetor Cleaner:
1. Spray all the openings and passages of the carburetor
Make sure to cover all of the small openings to ensure all of the dirt and grime has been removed.
2. Spray the emulsion tube, main jet and bowl
These parts need to be cleaned before they can be reassembled.
Using an Ultrasonic Cleaner:
1. Turn it on
You'll want to heat up the water before you can start cleaning your carburetor.
2. Drop the pieces you want to clean into the water
Simply set the carburetor and its loose parts into the Ultrasonic cleaner.
3. Set the amount of time
A couple of minutes per cycle should be plenty.
4. Run 2-3 cycles in this cleaner
Or until the carburetor is no longer releasing dirt into the water.
5. Use compressor air to dry the carburetor and parts
Make sure to completely dry the carburetor and its components before continuing.
[Back to Top]
Reassembling the Carburetor
1. Replace the emulsion tube
Set the emulsion tube back into the 'neck'.
2. Reinstall the main jet
Place the main jet back into the carburetor 'neck' and secure with a screwdriver.
3. Replace the float and metering needle
First, spray some carburetor cleaner on a rag and clean the float and metering needle.
Then place the metering needle back onto the float, set the float back into the carburetor and secure it with the hinge pin.
4. Install new bowl gasket
Simply push this new gasket back into the inside edge of the carburetor bowl.
5. Replace the bowl
Set the bowl back onto the carburetor.
6. Replace the bowl screw
Replace the washer on the bowl screw, then use a wrench to tighten it.
7. Reattach the governor spring to the throttle lever
Hook the end of the spring back to the throttle lever and let the backing plate rest.
8. Thread the mounting bolts through the gasket
Push the gasket onto the mounting bolts.
9. Thread the mounting bolts through the carburetor, gasket, and backing plate
Thread the mounting bolts through the carburetor, followed by the backside gasket, and then the backing plate.
[Back to Top]
Reinstalling the Carburetor
1. Reattach the throttle linkage
Hook the throttle cable back onto the carburetor.
2. Mount the carburetor back onto the snowblower
Use a screwdriver to re-secure the mounting bolts going through the carburetor, to the snowblower.
3. Replace the primer hose
Push this primer hose back onto the top of the carburetor.
4. Replace the fuel line
Use a pair of pliers to slide the fuel line and small hose clamp, back onto the carburetor.
Then remove the large hose clamp from the fuel line.
5. Replace the rear snowblower shroud
To finalize the repair simply re-secure the rear snowblower shroud with the bolts.
[Back to Top]
Conclusion
And that's how easy it is to rebuild a carburetor in a snowblower. Not only will repairing your carburetor make your equipment run smoother, it'll prolong the life of your engine. So, if you use your snowblower frequently, we recommend cleaning and/or rebuilding the carburetor about once per year, or as needed.
Now start 'er up and see how she's running!
We've got a huge selection of power equipment parts and accessories, check them out today!
[Back to Top]
What We're About
