Why Read This Article?
Finish Nailer Repair - Replacing the Driver Guide (Ridgid Part # 79004001022)
Article Breakdown
Finish Nailer Repair - Replacing the Driver Guide (Ridgid Part # 79004001022)
Tools & Materials
- Torx compatible screwdriver
- Needle-nose pliers
- Pen and paper

And remember to make sure you get the right fit for your saw's model and type by visiting our DeWalt miter saw parts page. Removing the Old Handle
1. Remove the top handle
Remove the two screws that secure the top handle and remove the top handle from the saw.

2. Remove the upper handle assembly
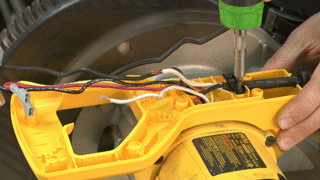
Now remove the screws that secure the upper half of the handle assembly, and set it aside. Note that the screw that passes through the switch is shorter than the others.

3. Remove the switch and wires
Remove the screw that secures the switch.

Then remove the wires from the switch. Set it aside.

4. Remove the wire nut and cord clamp
You'll notice a wire nut securing the white wires in your saw. Remove that to free up the wires.

Then remove the cord clamp and the cord from the saw.

5. Remove the last handle screw
You will see a small screw near the cord clamp. This is the last lower handle screw. Remove it to free the lower portion of the handle from the saw.

6. Remove the lower handle assembly
Now remove the lower handle assembly--taking care to thread the wires out of the handle--and get ready to install your new handle.
 [Back to Top]
Installing the New Handle
1. Thread the wires into the handle
Thread the wires into your new handle and set it into place.

2. Secure the handle
Use the small lower handle screw to set the handle into place while you work.

3. Re-attach the power cord
Place the power cord back into place and secure it with the cord clamp.

4. Route the wires in the handle assembly
You will notice a series of notches in the lower handle assembly. Re-connect the white wires using your wire nut, then thread the wires through the notches to prevent them from being pinched by the handle assembly.


5. Attach the wires
Use the diagram you made earlier to note the position of where the wires attach to the switch. Then use your needle-nose pliers to attach them.

6. Secure the switch
Secure the switch by fastening the switch screw.

7. Replace the upper handle assembly
Reattach the upper handle assembly to the lower assembly--start with the smaller screw that goes through the switch to prevent a mismatch later.

8. Replace the top handle
Then just secure the top handle with the two screws to finalize your repair.
 [Back to Top]
Conclusion
And that's how you can quickly and efficiently install a new handle on your DW703 miter saw. This repair will save you lots of money when compared to a repair shop and should only take about 15 minutes to complete.
Remember to find all the parts you need for your repairs on our DeWalt parts page!
[Back to Top]
What We're About
[Back to Top]
Conclusion
And that's how you can quickly and efficiently install a new handle on your DW703 miter saw. This repair will save you lots of money when compared to a repair shop and should only take about 15 minutes to complete.
Remember to find all the parts you need for your repairs on our DeWalt parts page!
[Back to Top]
What We're About


