


Why Read This Article?
Finish Nailer Repair - Replacing the Driver Guide (Ridgid Part # 79004001022)
Article Breakdown
Finish Nailer Repair - Replacing the Driver Guide (Ridgid Part # 79004001022)
Video

Tools & Materials
- Needle-nose pliers
- Screwdriver

Looking for spares? We've got all of the DeWalt replacement parts you could ever need. Removing the old handle assembly
1. Remove the top black handle
Remove the two screws holding the black handle to the saw.

Then, remove the rest of the screws holding the top handle-half to the bottom handle-half.

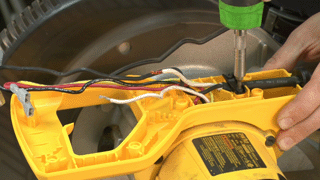
2. Draw a wiring diagram before removing wires
This helps you reattach the wires when replacing the switch. A photograph may also be sufficient.

3. Remove the screw securing the switch
Use a phillip's-head screwdriver to remove the single screw holding the switch to the handle.

4. Remove the wires from switch
Use a pair of needle-nose pliers to pull the wires away from the switch.

5. Unscrew the wire nut from white wires
Turn the wire nut counter-clockwise to remove it from the white wires. Then, set the white wires aside.

6. Remove the screws on the cord clamp
There are two screws holding the cord clamp to the handle-half -- remove these and set them aside.

7. Unfasten the screw holding the bottom handle-half to the body
This screw is located to the side of the cord clamp you just removed.

8. Pull the wires out of the bottom handle-half
Now that everything is disconnected, you can thread the wires out of the bottom handle-half and set it aside.

[Back to Top]
Installing the new handle assembly
1. Thread the wires through the new bottom handle-half
Use the access hole to guide the wires through the new handle-half.

2. Replace the small screw that attaches the handle-half to the saw body
This will secure the handle for the installation process.

3. Reattach the power cord and cord clamp
Press the cord snugly into its original position. Then, replace the cord clamp.
4. Reroute the wires back into their original positions
Press the wires into their proper notches and route them to their original locations.

Note: Refer to the diagram or photo from step 2 for help routing the wires.
5. Twist the white wire ends together -- then replace wire nut
Once you've secured the white wires with the wire nut, press them snugly into the handle.

6. Reattach the wires to the switch
Connect the wires according to the diagram or picture you made earlier. If you skipped over that step, watch the video to the left of this article for a visual guide.

7. Secure the switch
Use the single screw that was removed in step 3 to secure this to the handle-half.

8. Replace upper handle-half
You'll notice that one of these screws is smaller than the rest; this screw should be fastened over the switch. Then, re-secure the rest of the screws on the handle.

9. Replace top black handle
Use the two screws that were removed earlier to complete the repair.

[Back to Top]
Conclusion
And that's how simple and easy it is to replace a handle assembly on a DeWalt miter saw. Other models/brands should use the same basic process to complete the same repair. Upkeep and repairs don't have to be a chore, and by using eReplacementParts.com, anyone can become a repair master.
Find the handle assembly and other popular parts for your DeWalt DW703 Type 1, here.
[Back to Top]
What We're About
