


Why Read This Article?
Finish Nailer Repair - Replacing the Driver Guide (Ridgid Part # 79004001022)
Article Breakdown
Finish Nailer Repair - Replacing the Driver Guide (Ridgid Part # 79004001022)
Safety Guidelines
- Remember to unplug the tool before inspecting or dismantling it.
- A clean workspace can minimize the potential for accidents and prevents dismantled tools from being exposed to dirt.
- Wait for an overheated tool to completely cool down before opening it or inspecting it.
 Actually, what makes most electric power tools "different" from one another depends on how the physical energy is used, or its application. The process of making physical energy with electrical energy is very similar and where most performance issues occur. for most power tools, and happens to be where most maintenance is required
Although there is a lot more to be said about how electric motors work, no one has to be an electrical engineer to understand a motor's basic parts. And understanding what goes on inside of a power tool makes diagnosing problems easier.
If the problem can be pinned down early, then the tool is just a part and a quick repair away from being almost like new again. Even some of the repairs and maintenance required for electric power tools are fast and easy to do.
Actually, what makes most electric power tools "different" from one another depends on how the physical energy is used, or its application. The process of making physical energy with electrical energy is very similar and where most performance issues occur. for most power tools, and happens to be where most maintenance is required
Although there is a lot more to be said about how electric motors work, no one has to be an electrical engineer to understand a motor's basic parts. And understanding what goes on inside of a power tool makes diagnosing problems easier.
If the problem can be pinned down early, then the tool is just a part and a quick repair away from being almost like new again. Even some of the repairs and maintenance required for electric power tools are fast and easy to do.
The Basic Parts of Electric Power Tools
There are many tool parts common to electric power tools. This is because electrically powered tools all use the same principles in their electric motors to make physical energy out of electrical energy.
Below is a short description of what happens to electrical energy inside an electric power tool and the key places inside a power tool to look for wear or damage:
1. The electrical energy enters the tool's Power Cord.
2. The electricity continues along the wires inside the cord's insulation until it reaches where the wires connnect to the tool's Power Switch. When the switch is in the "off" position the electricity can't go any farther because the elctrical circuit is not complete, putting the power tool at rest.
When the switch is in the "on" position, the circuit is completed and the electrical energy can continue past the switch an into the tool's electric motor, putting the tool in operation.
3. The electricity in an electric power tool has a few more important points of contact before it is changed in the tool's electric motor.
After leaving the power switch, the electricity from the tool's power source passes through the tool's Carbon Brushes. These "brushes" are small pieces of carbon that are important contact points between the tool's power source and the actual electric motor in the tool itself.
4. Carbon brushes carry electricity to the electric motor by making direct contact to the motor itself. The part of the motor where the brushes make contact is called the Armature. The precise place where carbon brushes touch the armature is called the commutator.
5. The armature is one major half of the electric motor. The other half is called the Field. The armature is an assembly unit, is shaft-like, and fits through the field. The field is an assembly unit that is ring-like and fits around the armature. Together, the armature and the field make up the motor assembly. They work together to create physical energy with the electrical energy from the tool's power source.
6. From the motor assembly, the physical energy created by the motor is transferred to the tool's motor shaft and applied to the tool's work.
That's enough technical understanding for most tool users to be able to diagnose and fix most of the common problems that power tools run into. Each repair comes with its own pointers and guidelines, but this basic understanding of how electric tools work is a good foundation to start from.
Below is some extra information on each major electric power tool part already described above, when and why they break down, and how to troubleshoot tool failure early.
[Back to top]
Power Cords
There's a lot lot to know about power cords that can help prevent damage to a power tool and the cord itself. First, power cords come in two designs for most power tools: 2-wire and 3-wire.
2-wire power cords protect the tool user from electrical shock with a system of double insulation. They end in two-pronged plugs and come in a variety of gauges.
3-wire power cords also protect tool users from shock. The third wire of the cord is a ground wire that directs any extra charge in the power tool away from the tool and away from the user. 3-wire cords end in three-pronged outlet plugs and also come in a variety of gauges.
Most power tool cords are between 12 and 18 gauge, but the most common is 16 gauge.
"Gauge" is short for American Wire Gauge (AWG), and is a system of measuring the diameter of cord or bundle of electrical wires.
As the gauge number goes up the diameter of the wire goes down and cords become smaller (thinner). As the gauge number goes down the diamter of the wire goes up and cords become larger (thicker). So, a 14 gauge cord is larger (thicker) than a 16 gauge cord, because the diameter of the 14 gauge cord is larger than the diameter of the 16 gauge cord.
Damaged , Worn, or Cut:
This is really easy to check for because most of the signs are visible. It's time for a new power cord if the insulation or any other part of a tool's cord is cut, damaged or heavily worn. Damaged cords short in and out or just deliver less power to the power tool, which can be evern worse.
What to look for:
Check power cords often for damage and make mental note to check the tool for any decrease in performance or power when it's in use.
 Heat Damage:
If tool isn't getting enough voltage from a power cord it can overheat. This is because the tool's electric motor will start pulling more amps (amperture) to compensate, and more amps means more heat. This kind of overheating won't normally hurt the power cord, but it will damage the tool's electric motor, starting with the armature. There are three major reasons why a power cord will make a tool overheat by supplying less power:
#1. The cord is damaged, cut or worn.
Damaged cut and worn cord should be replaced to prevent damage to the rest of the tool.
#2. The wiring in the power outlet does not match the requirements of the tool.
Electric power tools should always be operated on outlets that match their specifications. A tool's amperture rating indicates how many amps a tool can handle without overheating and what kind of outlet to use for a tool.
And,
#3. Because there is too much extension cord in use. If too much extension cord is being used, the power supply can be very weak by the time the electricty gets to the tool. Luckily, charts like the one below show exactly how much extension cord should be used for each tool. Using a tool's amperature rating and the gauge of its cord with this chart will show the length limits for that tool's cord:

What to look for:
Watch the tool for heat buildup. Check the tool's amperture rating, the type of outlet being used, and the length of cord in use if there is excessive heat building up in the tool.
If the tool has already overheated then the electric motor may already be damaged. An overheated motor may emit sparks, smoke, have a sharp decrease in performance, have a hard time starting up (if at all), or all of the above.
For a "Power Cord Repair" articl--Click here.
[Back to top]
Power Switches
Switches complete and disrupt an electrical current by using contacts, or electrical contacts. There are different kinds of switches that do this in different ways, but the idea is the same for each kind of power switch.

It's worth mentioning one specific kind of switch, the variable speed switch. These are often called VSR switches, which stands for Variable Speed Range. Variable speed switches on power tools progress through "steps" as they are depressed more. Each increasing step is usually designed to increase the speed or power of the tool. These switches provide more control to the tool user, but can wear down a little faster.
Everyday Wear:
When the switch is "off," the contacts are not touching, and when the switch is "on," the contacts touch and complete the circuit. For most types of switches this going back and forth between connecting and not connecting creates friction, and wear.
Depending on the frequency of use, most power tool switches will need to be replaced in the tool's lifetime because of simple, everyday wear.
What to look for:
If a power tool's switch has wear damage it will not complete the electrical circuit when in the "on" position and the tool will not start. If the damage isn't very bad yet, the tool may start up only sometimes.
Wear damage on the switch will not be visible, so the best way to test a switch for wear or other damage is with a multimeter.
Replacing a switch or switch assembly before it gets bad will stop the switch from going out completely.
Moisture Damage:
The second reason a switch might go out is because of moisture damage. Power switches can short out when water or other moisture gets into the switch assembly.
What to look for:
Look for sparks in the switch assembly when the tool is switched to "on." Sparks mean that the switch is shorting out or has already shorted out.
After shorting out, a switch will not be able to activate the tool at all and will have to be replaced. Heat Damage:
Many parts of a power tool can be damaged if the tool gets too hot, but the most sensitive component usually becomes damaged first. Sometimes the part of a power tool that is most vulnerable to overheating is the power switch, depending on the tool.
If a tool won't start up after overheating it may be because the power switch was fried. It could be something else, but checking the switch first is a good idea.
What to look for:
If a switch has been damaged by an overheating tool it will show signs of melting, burning or discoloration when the switch assembly is inspected. Below is an example of power switch heat damage. In this case, a loose connection generated head and melted part of the plastic switch casing in the circled area:

Fried power switches will have to be replaced, but it's a pretty easy and quick fix that will keep the power tool running down the road.
For a "Power Switch Repair" article--Click here.
[Back to top]
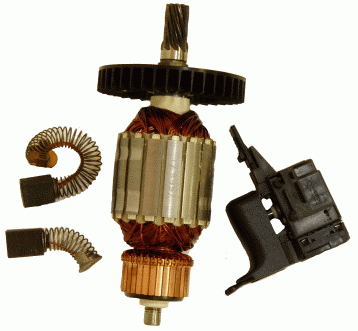
Carbon Brushes
Carbon brushes make direct contact to a power tool's electric motor to complete the tool's electric circuit while the tool is operating. They are almost always retangular or square with one end connected to the wiring coming from the switch, and the other end making contact with the motor.
Carbon brushes touch part of the motor assembly called the armature. The part of the armature that carbon brushes touch is called the commutator and is located on one end of the armature (usuallly the end closest to the power switch assembly).
Carbon switches are held into place by brush holders which make sure that the brush makes contact with the armature at the correct angle. Brushes also have springs to make sure that the brush applies the right abmount of pressure to the amature when making contact.

Everyday Wear:
A tool's armature assembly spins while the tool is operating (including the commutator) which means that carbon brushes wear down naturally with regular use.
Replacing worn brushes is important to maintain a good electrical current running through the tool.
What to look for:
Worn down brushes will make it hard for a tool to start up, but it will be off-and-on. One minute it will work fine, and the next minute it won't work at all. This is because the brush is alternately connecting and not connecting with the armature—completeing and disrupting the circuit.
(Hint: This can look a lot like a power switch failure at first, but if the switch checks out ok (which is the right place to start), then a bad or worn brush is the next part that should be inspected.)
Brushes will normally have a contoured wear pattern on its contact end that matches the contour of the commutator where it touches the armature. When wear on the brush passes the wear line marked on it, it is time for a replacement.
Heat Damage:
An overheating power tool will wear carbon brushes down faster and damage the surviving portion of the brush, making it less conductive.
The tool will work off-and-on, like with worn brushes, so checking the power switch is the first step in figuring out the source of the problem and what needs to be replaced.
What to look for:
Brushes that have overheated can show a few different signs. The first signs of an overheated brush are dark burn marks on the brush itself and a heavy contoured wear pattern.
Discoloration can also appear on the wiring connected to the brush. The shade of discoloration can range from silver to copper or gold, depending on the power tool. See the example of wire discoloration below:

Chipping Damage:
Carbon brushes are sometimes chipped by a damaged or worn armature. Chips n a brush means that there will be gaps in conductivity when the armature spins, making it so the tool only works off-and-on when the gaps line up just right.
Again, this problem might look like a power switch issue until the switch checks out ok.
What to look for:
A chipped brush should be easy to identify just by looking at it. If the brush really is chipped, taking a look at the armature for chips is a good idea while the tool is dismantled.

Installing a new brush into a tool with a chipped or worn armature will probably just cause the new brush to be chipped as well. Checking an armature for chips and wear is explained below under Armature. "Burr" Formation:
Sometimes "burrs" will form on the contact end of carbon brushes because of bad wear or chips on the commutator where the brush touches the armature.
A burr can cause the same problems as other brush issues by preventing the brush from sliding into its brush holder correctly. Luckily, most carbon brush burrs only need to be filed down a little to be fixed. But a new burr might just form again if the worn armature that caused it isn't replaced.
What to look for:
Just look for the burr and file it down. Checking the armature for wear or chips is a good idea while inside the tool. For a "Brush Diagnosis" article--Click here. [Back to top] Armatures Motor assemblies can include more than just an armature and a field, but armatures and fields are the two major components of motor assemblies. An armature is the first major half of the motor assembly. An armature is a shaft-like assembly piece that spins as the tool operates. Armatures connect to the tool's brushes at one end of the armature called the commuator, which is the copper, segmented section on the left-hand end of the armature assembly pictured below.

Commutators are important because they are the site of contact between the electrical current in the tool and the tool's motor assembly. The commutator is located at one end of the armature shaft. Most armatures also include fans to remove dust from the tool and to keep it cool.
Most aramtures pretty tough. A tool's brushes are much more likely to wear down before a tool's armature suffers heavy wearing or chipping, but overheating the tool will speed up armature wear a great deal.
Wear-Damage and Chipping:
Commutators are segmented, with each segment divided by a groove.

If a place between the grooves is chipped or worn down low, then the comutator will not be able to deliver consistent power to the rest of the armature and motor assembly.
Chipped or worn armatures (commutators) can chip brushes in turn, increase a brush's wear, or develop a burr on a carbon brush.
If the armature is worn or damaged in this way, replacing carbon brushes will not fix the problem until the armature itself is replaced. A damaged armature must be replaced.
What to look for:
Always look for wear-damage and chipping on the armature's commutator, where it touches the brush.
Worn armatures will have low grooves where the commutator is separated into segments. Chipped armatures will will be missing segments of the commutator or have pieces of segments missing.

Worn-down or damaged commutators cause the same kind of conduction problems as worn or damaged brushes and will show the same off-and-on service problems.
(Hint: If hitting or shaking a tool seems to help it turn on, it's probably a chip in the commutator or brush. When struck, the armature spins a little, lining up its gapped or chipped area(s) differently.)
Heat Damage:
Sometimes the armature suffers from overheating the most. The signs of a fried armature are very obvious.
What to look for:
Heat, sparks, and smoke. An armature meltdown will be pretty dramatic, and with good reason. Enough head has to be collected in the motor assembly to melt the insulation surrounding the wires of the armature assembly.
Discoloration and melted insulation will be plain as day on the armature assembly if it has indeed suffered a meltdown. This means that the armature must be replaced for the tool to work again.
The example picture below is of an overloaded field assembly, but the damage to an overloaded armature looks very similar. Sometimes the wire damage is more than just discoloration, as wires can break, chip, and become misshapen:

Tips for preventing this kind of overheating can be found above in the Power Cords section of this article.
[Back to top]
Fields
Fields are the other major half of the motor assembly in a power tool. Together, a field assembly and an armature assembly work together to create physical energy. A field assembly is a ring-like piece that fits around the armature. The armature spins inside the field when the tool is in operation. There are two major reasons why a power tool field will fail.


Broken Armature:
The first reason a field assembly might fail is because of a broken or overheated armature. What happens to one part of the motor assembly quickly affects the rest of the motor assembly.
Overload:
The second reason a power tool field might fail is from overload. Using a power tool for a work load that exceeds its specifications will cook a field assembly in a hurry.
What to look for:
A damaged field will act up a lot like a damaged armature. Look for heat, sparks, and smoke coming out of the dust vents of the tool. Also look for a sharp decrease in the tool's performance.
The field assembly should be replaced in both of the above situations, but both can be prevented. Replacing damaged armatures and following the workload specifications of the power tool will prevent most field failures.
Heat damage for both armatures and fields will look like the example of an overloaded field assembly below. Sometimes the wire damage is more than just discoloration, as wires can break, chip, and become misshapen:
[Back to top]
Conclusion
A "broken" power tool is usually just one diagnosis and repair away from being better than ever. In fact, there are even a few parts of power tools that are designed to wear down and be replaced, like brushes.
Hard-working power tools can be saved from an extended visit to the tool shed or scrap heap by savvy workmen who know what kinds of problems to look for. The best news is that many of the repairs needed to address the issues in this article are fast, easy, and can be done right on a work site.
The information covered in this article about how electric power tools work makes troubleshooting and fixing problems easier. Getting the jump on a tool breakdown can prevent future problems and cut costs in the long run.
For a "Diagnosing Electric Power Tool Parts" article--Click here.
Visit eReplacementParts.com for tool repair information and resources, like our repair forum and discussion boards. Visit our Home Page to get started using our comprehensive parts inventory to find the electric power tool parts you need.
[Back to top]
What we're about.
