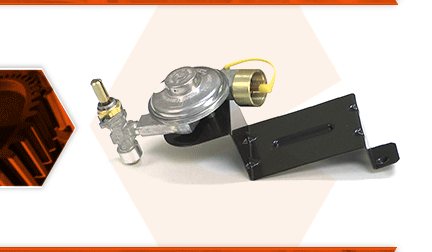
The valve and regulator assembly consists of a pressure regulator and the gas control valve. The pressure regulator reduces the high-pressure gas from propane cylinder down to the proper pressure needed for the burner. The control valve allows you to turn the gas on and vary the burner flame. The regulator or valve can become restricted or plugged by debris. The internal components (such as the O-rings) can eventually fail. This can lead to insufficient gas flow or the loss of flame control.
Let's get started.
REMOVING THE VALVE AND REGULATOR 1. Remove the control knob.
a. Pull the control knob away from the valve stem.
b. Use a wrench to remove the nut securing the valve assembly to the control bracket.
2. Remove the burner tube assembly.
a. Open the grill lid.
b. Remove the cooking grates.
c. Remove the bolt securing the burner tube assembly to the cookbox.
d. Slide the burner tube away from the valve and regulator assembly.
e. Lift the burner tube assembly out of the cookbox.
3. Remove the side handle.
a. On the side of the grill containing the valve and regulator, remove the two screws securing the side handle to the frame.
b. Spread the frame slightly.
c. Remove the side handle from the grill.
d. Remove the table tray.
4. Remove the valve and regulator.
a. Disengage the valve assembly from the control bracket.
b. Disengage the regulator bracket from the leg frame.
c. Remove the valve and regulator assembly.
INSTALLING THE NEW VALVE AND REGULATOR
5. Install the valve and regulator.
a. Remove the brass nut from the valve stem on the new regulator and valve assembly.
b. Align the valve stem with the opening on the control bracket.
c. Position the tab on the regulator bracket between the two screw holes on the frame leg.
d. Adjust the new valve and regulator assembly until the base of the valve stem is evenly seated against the back of the control bracket.
e. Install and tighten the brass nut to secure the valve stem to the control bracket.
f. Install the control knob onto the valve stem.
REASSEMBLING THE UNIT
6. Reinstall the side handle.
a. Install the table tray.
b. Install the side handle.
c. Secure the side handle with the two screws.
7. Reinstall the burner tube.
a. Align the burner inlet with the opening in the cookbox.
b. Slide the burner tube toward the valve assembly (until the burner inlet engages the orifice on the valve).
c. Align the burner tube mounting bracket with the mounting hole on the cookbox.
d. Secure the burner tube with the screw.
8. Reinstall the cooking grates.
a. Install the two cooking grates into the cookbox.
b. Close the lid.


