Why Read This Article?
Finish Nailer Repair - Replacing the Driver Guide (Ridgid Part # 79004001022)
Article Breakdown
Finish Nailer Repair - Replacing the Driver Guide (Ridgid Part # 79004001022)
Tools & Materials
- A correctly sized tooth file.
- A flat file.
- A raker filing gauge.
- Additional equipment depends on method used (See article).
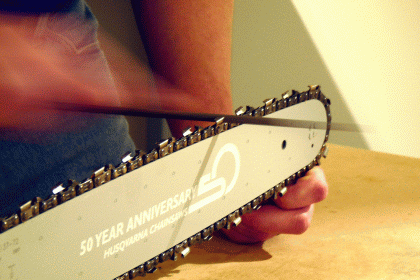
Chainsaw owners use several methods to sharpen their chains.
This article explains the basics of chain sharpening, and it also explains in detail how to sharpen a chainsaw chain using three different methods:
- using a round file
- using a round file and a file gauge
- and using a chainsaw sharpening jig
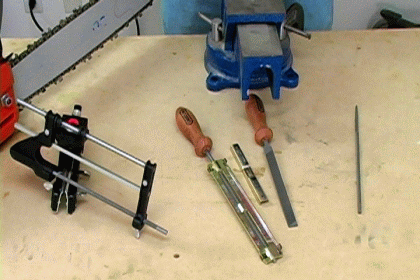 Chainsaw Chain Sharpening Basics
The teeth on a chainsaw's chain have two important angle measurements that are necessary to know before attempting to file them:
Top Plate Angle-
Looking down on a cutting tooth from above, the top plate angle is the horizontal angle of the cutting tooth.
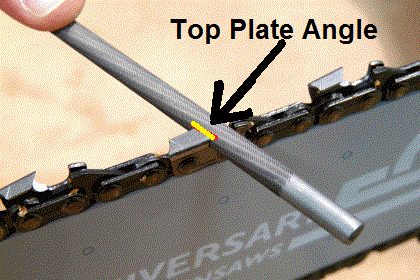
This angle can vary between about 15º and 35º.
Tilt Angle -
Again looking down on a cutting tooth from above, the tilt angle is the vertical angle at which the cutting side of the tooth is slanted.
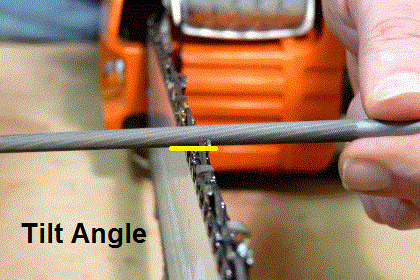
On most chainsaw chains, the tilt angle is 0º, meaning perfectly perpendicular to the chainsaw bar.
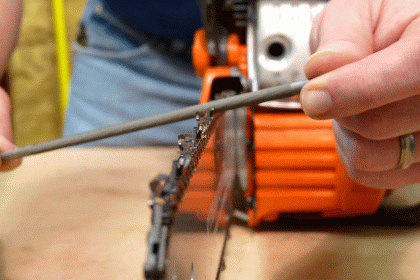
However, some chainsaw chains have a tilt angle that can vary as much as 10º.
A chainsaw chain's tilt and top plate angles can be found in the chain's manufacturer information. If the hard copy of that information is unavailable, try checking the chain manufacturer's website for the measurements.
In addition to knowing a chain's tooth angles, there are two more important guidelines for all methods of chainsaw sharpening:
File from the inside-out-
When facing the flat side of a chainsaw bar, half of the teeth on the chain face toward the chainsaw user, and half of them face the opposite direction.
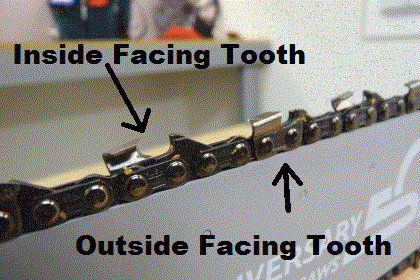
Teeth facing a chainsaw user are inside-facing teeth, and the others are outside-facing teeth.
This of course is subjective to the position of the chainsaw user. When flipping the saw around or walking around to its opposite side, the teeth that were previously inside-facing teeth become outside-facing teeth, and vice versa
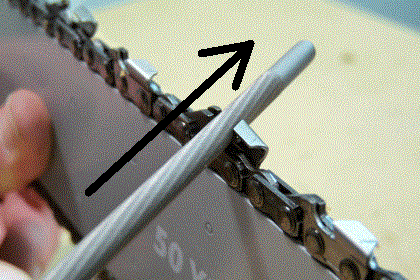
Chainsaw chain teeth must always be sharpened from the inside face of the tooth out, never from the outside face of the tooth in.
Teeth on the chain alternate their facing sides every other tooth. This means that sharpening must be performed on every other tooth for each side of the saw, flipping the saw or stepping around it between sides.
File Size-
Last, it is important to choose the right size of file to use.
As a chain's pitch size increases, so does the size of the correct file that should be used to sharpen the chain. Information on the correct size sharpening file for your chain is available from the chain manufacturer.
For more technical information about chainsaw chains, have a look at our article, Chainsaw Chain Measurements, Sizes, and Types.
Applying these basic sharpening principles is the best way to approach the three sharpening methods that we explain below.
[Back to top]
How to Sharpen a Chainsaw Chain with a Round File
Sharpening a chainsaw chain with a round file is the least accurate sharpening method to use. However, this method continues to be popular because the file is the only piece of equipment needed.
To properly sharpen a chainsaw chain with a round file, the file must be held perfectly parallel to each tooth's tilt and top plate angles while being filed.
Filing by hand is difficult enough as it is, but this method also requires that the tilt and top plate angles be maintained visually throughout the procedure by the person sharpening.
It is impossible to know for sure that the tooth angles and file depth are being maintained when sharpening this way, and because of this, it is possible to do more damage than good to the chain.
1. Place the saw in a vise.
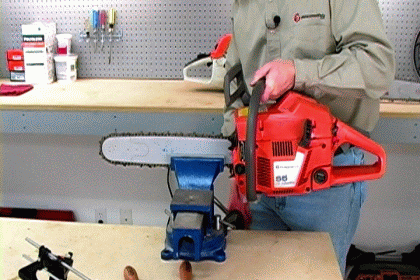
Clamp the jaws of a table vise around the the bar of the chainsaw. This will stabilize the saw while sharpening its chain.
 [Back to top]
2. Position the file on a tooth.
Place the file on an inside-facing tooth and set it so that it is parallel to the tooth's tilt and top plate angles.
3. File the tooth.
While maintaining the file position over the tooth, make filing strokes away from your body.
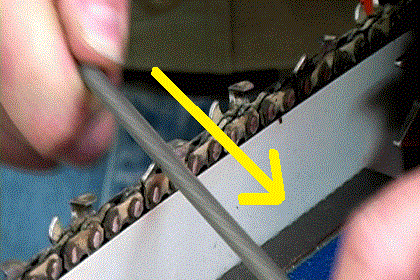
If the file was positioned correctly in the first step, the direction of your strokes should proceed from the inside face of the tooth towards its outside face. [Back to top]
4. Proceed to other teeth on that side.
Follow the same procedure for each inside-facing tooth on that side of the chain. Advance the chain by hand between each tooth to position them in the best filing position.
5. Flip the saw around and sharpen the other side.
The saw can either be flipped around in the vise or the sharpener can walk around to the other side of the saw.
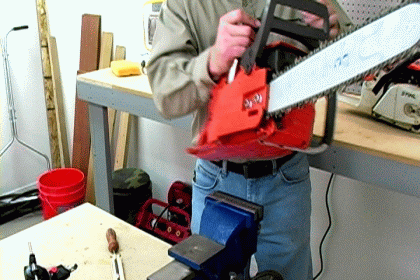
It is not recommend that outside-facing teeth be sharpened with strokes made in the direction of the sharpener. [Back to top] 6. File each tooth's raker height with a raker gauge and flat file.
This last step is the same for all methods of sharpening.
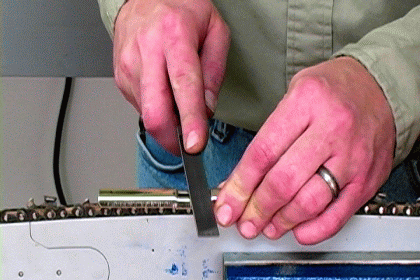
The raker height of each chainsaw chain tooth must be filed with a flat file. A raker file gauge makes doing this fast and easy, since the gauge protects the sharp edge of the tooth from the file.
We suggest that sharpening with an unguided round file be used only as a last resort, and that it be done carefully when it must be done.
Using one of the two additional methods described below will ensure a better sharpening job for your saw.
[Back to top]
How to Sharpen a Chainsaw Chain with a File Guide
The addition of a file guide or file holder makes sharpening with a round file much more accurate. File guides have markings on them that allow the person doing the sharpening to monitor the file's tilt and top plate angles.
File guides also ensure that the file is held at the proper depth for the cutting teeth. Not only do file holders make sharpening more accurate, but they also speed up the process.
1. Place the saw in a vise.
Clamp the jaws of a table vise around the the bar of the chainsaw. This will stabilize the saw while sharpening its chain.
 [Back to top]
2. Position the file and holder on a tooth.
Set the file and its guide over an inside-facing tooth on the chain.
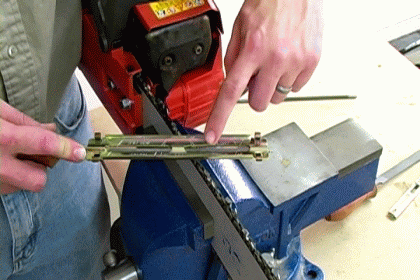
Use the markings on the file guide to visually line up the file at the correct angle for the tooth. [Back to top] 3. File the tooth.
While maintaining the file position over the tooth, make filing strokes away from your body.
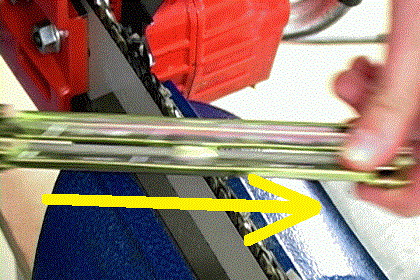
If the file was positioned correctly in the first step, the direction of your strokes should proceed from the inside face of the tooth towards its outside face. [Back to top] 4. Proceed to other teeth on that side.
Follow the same procedure for each inside-facing tooth on that side of the chain. Advance the chain by hand between each tooth to position them in the best filing position.
5. Flip the saw around and sharpen the other side.
The saw can either be flipped around in the vise or the sharpener can walk around to the other side of the saw.

It is not recommend that outside-facing teeth be sharpened with strokes made in the direction of the sharpener. [Back to top] 6. File each tooth's raker height with a raker gauge and flat file.
This last step is the same for all methods of sharpening.

The raker height of each chainsaw chain tooth must be filed with a flat file. A raker file gauge makes doing this fast and easy, since the gauge protects the sharp edge of the tooth from the file. [Back to top] How to Sharpen a Chainsaw Chain with a Sharpening Jig This last method demonstrates the use of a specialty sharpening device that makes chainsaw sharpening much easier. Even if you only own one chainsaw, investing in a jig like this one may be worth the expense. This is because sharpening jigs ensure a precisely sharpened-chain. They also greatly reduce the amount of time it takes to perform the procedure. The jig we use in this example is just one type of jig available on the market, however, setting up and using most jigs will follow similar steps to those that we describe below. 1. Place the saw in a vise.
Clamp the jaws of a table vise around the the bar of the chainsaw. This will stabilize the saw while sharpening its chain.
 [Back to top]
2. Prepare the jig for sharpening.
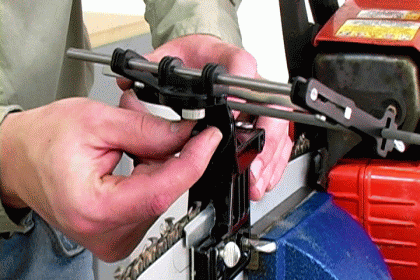
The jig will fit conveniently on the saw's bar without disrupting the movement of the chain, and it will have several adjustment knobs and screws for aligning the sharpening file at the correct depth, top plate angle, and tilt angle.
Every jig will be a little different.
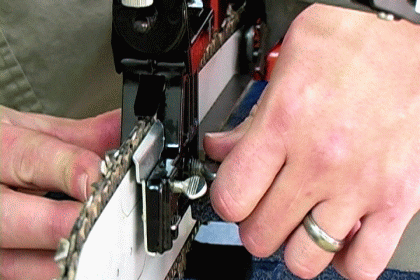
Set up the jig to match the manufacturer sharpening specifications of your saw's chain.
 [Back to top]
3. Sharpen the first tooth.
You'll notice that the design of the jig lends itself for the file to rub against the the chainsaw tooth on each back stroke.
Because round files only file in one direction, allowing the file to rub against the tooth on the back stroke will not file the tooth any more, nor will it damage the tooth. However, this extra friction may cause the file to wear more quickly.
Considering the time and effort saved with the sharpening jig, a little extra expense to replace those inexpensive round files a bit more often will be worth it.
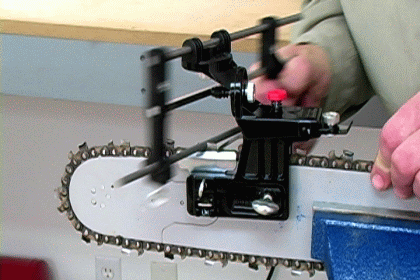
Sharpening with a jig goes so quickly that it's important to make sure not to over-sharpen.
[Back to top]
4. Proceed to other teeth on that side.
Advance the chain by hand. The design of the jig will allow the chain to advance without having to move the jig.
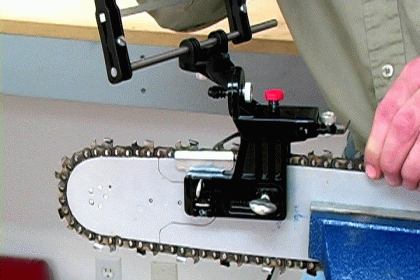
Sharpen all of the inside-facing teeth on that side of the chain. [Back to top] 5. Flip the saw around and sharpen the other side.
The saw can either be flipped around in the vise, or the sharpener can walk around to the other side of the saw to finish the second half of the job.

The jig will have to be removed and repositioned when switching sides. [Back to top] 6. File each tooth's raker height with a raker gauge and flat file.
This last step is the same for all methods of sharpening.

The raker height of each chainsaw chain tooth must be filed with a flat file. A raker file gauge makes doing this fast and easy, since the gauge protects the sharp edge of the tooth from the file.
[Back to top]
Conclusion
Sharpening a chainsaw chain will extend the life of your chain, but chains are made to only last through so many sharpenings before they need to be replaced.
In addition to the professional maintenance information that we provide, eReplacementParts.com also offers a full inventory of Replacement Chainsaw Chains when the time comes to replace yours.
Use our easy search features to find the perfect chain for your saw and to find other replacement Chainsaw Parts available at our warehouse.
[Back to top]
What we're about.


