


Why Read This Article?
Finish Nailer Repair - Replacing the Driver Guide (Ridgid Part # 79004001022)
Article Breakdown
Finish Nailer Repair - Replacing the Driver Guide (Ridgid Part # 79004001022)
Video

Tools & Materials
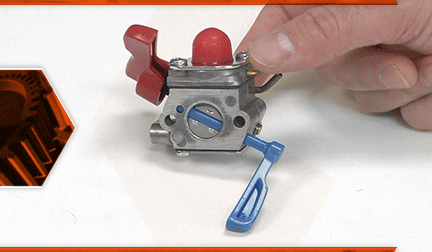
The carburetor brings fuel and air together in the perfect ration for combustion. The carburetor has many tiny passages that route fuel through it. If dirt or corrosion plugs these passages, the engine will run poorly (or not start at all). A carburetor can be cleaned and rebuilt, but often, it is faster and less expensive to simply replace it.
Let's get started.
REMOVING THE CARBURETOR 1. Drain the fuel.
a. Drain any excess fuel from the fuel tank.
2. Remove the air filter.
a. Depress the tab on the side of the air filter cover to disengage the catch.
b. Pivot the air filter cover away from the air filter base.
c. Remove the air filter cover from the blower.
d. Remove the air filter from the base.
3. Remove the carburetor.
a. Remove the two screws securing the air filter base (and the carburetor) to the engine.
b. Remove the air filter base from the carburetor.
c. Note the location of the two fuel lines (on the carburetor) to simplify reinstallation.
d. Use long-nosed pliers to disconnect the fuel lines from the carburetor.
e. Remove the carburetor from the unit.
INSTALLING THE NEW CARBURETOR
4. Install the carburetor.
a. Connect the two fuel lines to the new carburetor (in their original configuration).
b. Thread the mounting screws through the air filter base.
c. Install the carburetor onto the mounting screws (on the air filter base).
d. Install the air filter base (and carburetor) onto the engine.
e. Secure the air filter base (and carburetor) with the screws.
REASSEMBLING THE UNIT
5. Reinstall the air filter.
a. Install the air filter into the air filter base.
b. Align the hinge-tab on the air filter cover with the hinge-slot on the air filter base.
c. Pivot the air filter cover into position (over the air filter) and press the cover firmly against the base to engage the locking tab.
