


Why Read This Article?
Finish Nailer Repair - Replacing the Driver Guide (Ridgid Part # 79004001022)
Article Breakdown
Finish Nailer Repair - Replacing the Driver Guide (Ridgid Part # 79004001022)
Video

Tools & Materials
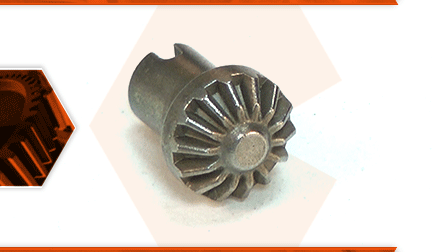
There are two bevel gears that allow you to adjust the chain tension on your chainsaw. One of the gears has a post with a slot in it, which allows it to be rotated by a screwdriver. It mates to a second bevel gear that attaches to the adjustment screw. When the bevel gears are turned, they rotate the adjustment screw, which moves the adjuster. The gears can wear over time. They will wear faster if the chain is over-tensioned.
Let's get started.
REMOVING THE BEVEL GEAR 1. Remove the chain brake.
a. Use a wrench to loosen the two bar nuts.
b. Use a screwdriver to rotate the chain adjustment screw counterclockwise to reduce tension from the chain.
c. Remove the two bar nuts.
d. Remove the chain brake assembly from the saw.
2. Remove the bar and chain.
a. Carefully remove the chain from the front of the bar.
b. Remove the chain from the rear sprocket.
c. Remove the bar from the saw.
3. Remove the slotted bevel gear.
a. Lay the chain brake assembly on your workbench so that the metal brake band faces up.
b. Remove the two screws securing the metal cover plate to the tensioner assembly.
c. Remove the metal cover plate.
d. Remove the adjuster assembly from the brake housing.
e. Remove the slotted bevel gear from the brake housing. This can be done by simply inverting the housing on your workbench (and the gear should fall out freely).
INSTALLING THE NEW BEVEL GEAR
4. Install the bevel gear.
a. Install the new slotted bevel gear into the chain brake housing.
b. Use a small screwdriver (as necessary) to seat the new gear into the channel on the housing.
REASSEMBLING THE UNIT
5. Reinstall the adjuster.
a. Install the adjuster assembly into the chain brake housing. The plastic collar should fit snugly into the channel on the housing and the tensioner pin should face away from the workbench.
b. Install the metal cover plate onto the chain brake housing.
c. Secure the metal cover plate with the two screws.
6. Reinstall the bar and chain.
a. Install the bar onto the bar studs.
b. Slide the bar toward the rear of the saw.
c. Carefully install the rear portion of the chain around the sprocket and drum.
d. Install the front portion of the chain onto the bar, ensuring that the chain aligns with the groove along the top of the bar, as well as the sprocket at the tip of the bar.
e. Slide the bar toward the front of the saw until the chain seats snugly onto the bar.
7. Reinstall the chain brake assembly.
a. Install the chain brake assembly onto the saw (the bar studs should align with the openings on the housing).
b. Use a screwdriver to rotate the tensioner screw (as-needed) until the chain tensioner pin engages with the slot on the bar.
c. Install (but do not fully tighten) the bar nuts onto the bar studs.
8. Tension the chain.
a. Grasp and raise the distant end of the bar and chain assembly (opposite the engine).
b. While holding the bar in a raised position, use a screwdriver to rotate the tensioner screw until the chain begins to tighten against the bar.
c. Lift the chain away from the bar assembly and inspect the gap between the two components.
d. The chain is tensioned correctly when you are able to raise the chain slightly away from the bar without creating a visible gap between the guide links and the top of the bar.
e. Once the chain is properly adjusted, tighten the bar nuts to secure the assembly.
