


Why Read This Article?
Finish Nailer Repair - Replacing the Driver Guide (Ridgid Part # 79004001022)
Article Breakdown
Finish Nailer Repair - Replacing the Driver Guide (Ridgid Part # 79004001022)
Video

Tools & Materials
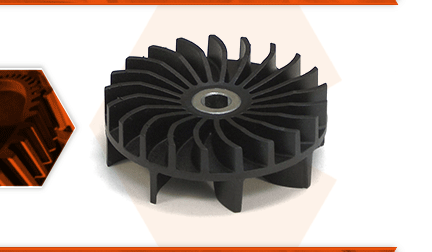
Your planer is equipped with a blower fan that assists with the exhaust of the wood shavings. The fan is attached to motor, and is surrounded by the fan housing. The fan is made of plastic and can be damaged by a large wood chip or a knot that comes free from the workpiece.
Let's get started.
REMOVING THE FAN 1. Remove the top cover.
a. Remove the (4) screws securing the top cover.
b. Lift the top cover away from the planer.
2. Remove the dust shroud.
a. Remove the (3) red thumb-bolts securing the dust shroud to the planer.
b. Lift the dust shroud slightly (within the housing).
c. Disengage the dust shroud from the fan housing.
d. Remove the dust shroud from the planer.
3. Remove the adapter.
a. Use a small screwdriver to depress the lock pin on the adapter.
b. Rotate the adapter counterclockwise to disengage the internal "twist-lock."
c. Pull the adapter away from the dust shroud.
4. Remove the outer fan housing.
a. Remove the (2) screws securing the outer half of the fan housing to the inner half.
b. Disengage the (3) clips securing the outer fan housing to the cover assembly.
c. Remove the outer fan housing from the unit.
5. Remove the fan.
a. Carefully insert a screwdriver through the blades of the fan (to prevent the fan from rotating).
b. Remove the nut securing the fan to the motor shaft.
c. Remove the fan from the unit.
INSTALLING THE NEW FAN 6. Install the fan.
a. Install the new fan onto the motor shaft.
b. Insert a screwdriver through the blades of the new fan (to prevent the fan from rotating).
c. Secure the fan with the nut.
7. Install the outer fan housing.
a. Install the outer half of the new fan housing and align the mounting holes with the holes on the inner housing.
b. Engage the (3) locking clips.
c. Secure the outer half of the fan housing with the (2) screws.
REASSEMBLING THE UNIT
8. Reinstall the dust shroud.
a. Install the dust shroud into the planer.
b. Align the open indicator on the dust shroud with the mark on the fan housing.
c. Press the dust shroud toward the fan housing to engage the two components.
d. Pivot the dust shroud down (toward the cutter head).
e. Secure the dust shroud with the (3) red thumb-bolts.
9. Reinstall the adapter.
a. Partially install the adapter onto the dust shroud outlet tube; use one edge of the adapter itself to depress the metal lock pin.
b. Align the adapter with the twist-lock tab (opposite the metal pin) and press the adapter onto the outlet tube.
c. Rotate the adapter (clockwise) to secure it to the dust shroud (the metal lock pin should engage the mounting hole on the adapter).
10. Reinstall the top cover.
a. Install the top cover onto the planer.
b. Secure the top cover with the (4) screws.
