


Why Read This Article?
Finish Nailer Repair - Replacing the Driver Guide (Ridgid Part # 79004001022)
Article Breakdown
Finish Nailer Repair - Replacing the Driver Guide (Ridgid Part # 79004001022)
Video

Tools & Materials
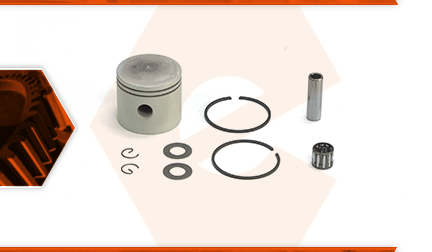
The piston kit includes all the parts you need to service the piston. It includes a new piston, piston rings, a wrist pin, a needle bearing, two washers, and two new wrist pin retainers. The most common reason to replace the piston is low compression. This could be caused by dirt or dust wearing the piston rings. It can also be caused by a lean-running engine, or a fuel that doesn't have enough oil in it. When there is damage to the piston, there will usually also be damage to the cylinder. The cylinder should be carefully inspected whenever piston damage is discovered.
Let's get started.
REMOVING THE PISTON KIT 1. Remove the rear engine cover.
a. Use a screwdriver to remove the screws that secure the back cover to the blower.
b. Disconnect the spark plug wire.
c. Remove the back cover from the blower.
2. Remove the air filter base.
a. Unscrew the knob that secures the air filter cover.
b. Remove the air filter cover and the air filter itself.
c. Use a screwdriver to remove the screws that secure the air filter base.
d. Pull the air filter base away from the unit.
3. Remove the carburetor.
a. Use pliers to disconnect two fuel lines that are connected to the carburetor.
b. Remove the carburetor gasket.
c. Use a screwdriver to remove the screws that secure the isolator.
d. Pull the isolator away from the unit.
e. Remove the isolator gasket.
4. Remove the muffler.
a. Use a screwdriver to remove the screws that secure the muffler.
b. Pull the muffler away from the unit.
c. Remove the muffler gasket.
5. Remove the cylinder.
a. Use a spark plug wrench or a properly sized socket wrench to remove the spark plug.
b. Use a screwdriver to remove the screws that secure the heat shield to the cylinder.
c. Pull the heat shield away from the cylinder.
d. Use a screwdriver to remove the screws that secure the cylinder to the crankcase.
e. Pull the cylinder away from the crankcase.
f. Use a scraper to scrape away what is left of the cylinder gasket. (Be careful to keep debris out of the crankcase.)
6. Remove the piston components.
a. Use needle-nose pliers to remove the wrist pin retainer.
b. Use needle-nose pliers to remove the wrist pin.
c. Pull the old piston away from the unit.
d. There are two washers on either side of the needle bearing. The washers often fall into the engine during disassembly, so make sure to account for both of the washers before proceeding.
e. Push the needle bearing out of the connecting rod.
INSTALLING THE NEW PISTON KIT
7. Install the piston kit.
a. Align the gap on the new piston rings (from the kit) with the groove on the new piston.
b. Secure both piston rings on the new piston.
c. Notice the arrow on top of the new piston. It should point toward the muffler (if the muffler were installed on the unit).
d. Use pliers to install one of the new wrist pin retainers onto the piston (to the left side of the arrow).
e. Apply two-cycle oil to the needle bearing.
f. Install the new needle bearing into the connecting rod.
g. Insert the wrist pin into the new piston until it is even with the shoulder inside the piston.
h. Place the piston over the needle bearing on the connecting rod.
i. Install the first washer.
j. Push the wrist pin through the piston until it is even with the needle bearing.
k. Install the second washer.
l. Push the wrist pin all the way in.
m. Use needle-nose pliers to install the second wrist pin retainer.
REASSEMBLING THE UNIT
8. Reinstall the cylinder.
a. Install the new cylinder gasket.
b. Apply two-cycle oil to the new piston.
c. Make sure the gaps on the piston rings are aligned with the pins.
d. Insert the cylinder over the piston.
e. Use a screwdriver to secure the screws that hold the cylinder to the crankcase.
9. Reinstall the carburetor.
a. Reinstall the isolator gasket.
b. Reinstall the heat shield.
c. Use a screwdriver to secure the screws that secure the heat shield.
d. Reinstall the isolator.
e. Use a screwdriver to secure the screws that secure the isolator.
f. Reconnect the fuel lines and the throttle cable to the carburetor.
g. Secure the carburetor gasket.
h. Secure the air filter base (and the carburetor) to the cylinder with the two screws.
10. Reinstall the muffler.
a. Install the screws into the muffler.
b. Install the muffler gasket onto the muffler (using the screws to hold it in position).
c. Install the muffler assembly.
d. Secure the muffler with the screws.
11. Reinstall the air filter.
a. Place the air filter into the base.
b. Install and secure the air filter cover.
12. Reinstall the rear motor cover.
a. Place the rear cover back onto the unit.
b. Align the spark plug wire with the opening and the retaining clip on top.
c. Route the spark plug wire in front of the clip on the bottom of the rear cover.
d. Use a screwdriver to secure the screws that hold the rear cover.
13. Reinstall the spark plug.
a. Install the spark plug.
b. Use a spark plug wrench (or a properly sized socket wrench) to secure the spark plug.
c. Reinstall the spark plug boot.
