


Why Read This Article?
Finish Nailer Repair - Replacing the Driver Guide (Ridgid Part # 79004001022)
Article Breakdown
Finish Nailer Repair - Replacing the Driver Guide (Ridgid Part # 79004001022)
Video

Tools & Materials
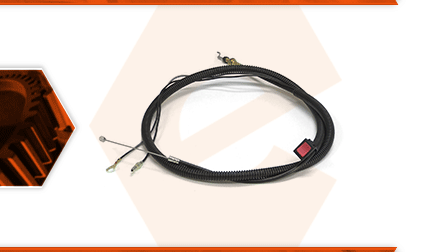
The control cable assembly consists of the throttle cable, the ignition wires and switch, and a length of wire loom to protect them. The control cable assembly will fix a broken cable, a broken or cut ignition wire, and a bad ignition switch.
Let's get started.
REMOVING THE CONTROL CABLE 1. Remove the clamp.
a. Remove the (1) screw securing the cable clamp assembly to the motor housing.
b. Remove the cable clamp from the fuel line and the throttle cable. 2. Disconnect the ignition wires.
a. Use wire cutters to cut the cable tie securing the ignition wires to the control cable.
b. Disconnect the primary ignition wire by separating the two halves of the bullet terminal.
c. Remove the screw securing the second ignition wire to the motor housing. (This screw is easily accessed through the opening on the motor cover). 3. Disconnect the throttle linkage.
a. Use long-nosed pliers to disconnect the throttle linkage from the carburetor. 4. Disconnect the clips.
a. Unclip the control cable from the retaining clip on the base of the blower.
b. Unclip the control cable from the retaining clip on the blower tube. 5. Remove the front handle (throttle trigger) assembly.
a. Loosen the thumbscrew securing the front handle assembly to the handle bracket.
b. Remove the front handle assembly from the handle bracket. 6. Separate the two halves of the front handle (throttle trigger) assembly.
a. Remove the (5) screws securing the two halves of the front handle.
b. Lift the top half of the throttle trigger assembly away from the lower half.
c. Remove the rocker switch assembly from the handle. 7. Remove the throttle cable from the front handle (throttle trigger) assembly.
a. Remove the cruise control lever from the trigger handle.
b. Lift the throttle trigger out of the housing.
c. Disconnect the throttle cable from the throttle trigger. INSTALLING THE NEW CONTROL CABLE 8. Install the rocker switch.
a. Install the rocker switch into the handle assembly. (The offset portion of the switch should be closest to the handle portion of the trigger assembly.)
b. Tuck/route the switch wires into the grooves on the handle assembly. 9. Install the throttle cable.
a. Connect the throttle cable to the throttle trigger.
b. Install the cruise control lever onto the throttle trigger.
c. Install the trigger assembly into the handle housing. The large post (in the handle housing) should pass through the openings on both the throttle trigger and the cruise control lever (it is the pivot point for both). The lower (smaller) post should align with the elongated slot on the bottom of the cruise control lever.
d. Install the throttle sheathing into the channel along the handle housing. e. Install the wire loom into the handle housing. (The teeth on the wire loom should engage the slots on the handle housing.). 10. Reinstall the top half of the handle housing.
a. Install the top half of the handle housing.
b. Secure the handle housing with the (5) screws. REASSEMBLING THE UNIT 11. Reinstall the front handle assembly.
a. Install the front handle onto the mounting bracket. b. Secure the front handle to the bracket with the thumbscrew.
12. Route the control cable.
a. Loosely route the control cable along its path from the throttle handle assembly to the motor and carburetor.
b. Secure the control cable to the blower tube with the retaining clip.
c. Secure the control cable to the blower base with the retaining clip.
13. Reinstall the ignition wires.
a. Reconnect the primary ignition wire at the bullet terminal. b. Position the ring terminal at its mounting location beneath the motor housing.
c. Use long-nosed pliers to guide the mounting screw through the eyelet on the ring terminal and into the threaded hole on the motor frame.
d. Use a torx driver to secure the screw (and the ignition wire) to the motor frame.
e. Secure the new control cable and the ignition wire (bundle) with a new cable tie. 14. Reconnect the throttle linkage to the carburetor.
a. Use long-nosed pliers to connect the throttle linkage to the carburetor.
15. Reinstall the clamp.
a. Install the cable clamp over the throttle cable and the fuel line.
b. Secure the cable clamp to the motor with the screw.
