


Why Read This Article?
Finish Nailer Repair - Replacing the Driver Guide (Ridgid Part # 79004001022)
Article Breakdown
Finish Nailer Repair - Replacing the Driver Guide (Ridgid Part # 79004001022)
Video
Tools & Materials
- Two wires for testing the drill motor.
- Other tools for dismantling the drill.
Safety Guidelines
- Remove the battery before dismantling the drill.
- Double check that the switch is wired correctly after reassembly.
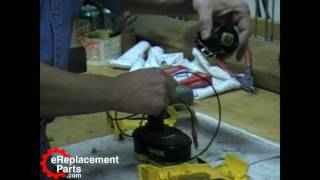
1. Remove the drill's battery and dismantle the drill.
2. Disconnect the wires leading from the switch to the drill motor. Sometimes this means completely removing the switch.

3. Now that the motor is isolated from the switch, connect one of the motor wires to one of the battery contacts using one of the two wires set aside for this test.

4. Connect the second wire to the other battery contact.
(Note: It does not matter which motor wire is connected to which battery contact. The orientation is not important because it is a DC motor and will only determine which direction the motor spins.)
5. Hold the motor firmly in one hand, and then complete the electrical circuit between the battery and the motor by connecting the second wire to the the second motor wire.
If the motor does not spin once the second connection is made, then the drill motor is most likely fried and needs to be replaced.
If the motor does spin after completing the electrical circuit, that's a good indication that the motor is a healthy one. If the motor tests out OK but the drill is still having trouble starting up, the problem is most likely caused by a faulty power switch, not the motor.

The power switch will have to be reconnected to the drill after the motor has been tested. It is important to reinstall the switch wires correctly after performing this test.
The example drill used in this article has a very simple wiring configuration in its power switch. Drawing a switch wiring diagram is especially useful for switches with complicated wiring configurations.
For more about Wiring Diagrams--Click here.
If you're testing your drill's motor, chances are that some kind of part replacement is on the horizon. You can begin your part search on our Home Page, or by using the "Model Number Search" at the top of this page. eReplacementParts.com is proud to offer "How-To" resources like this article and a huge parts inventory to make tool diagnosis and repair easy.
[Back to top]
What we're about.
