Why Read This Article?
Finish Nailer Repair - Replacing the Driver Guide (Ridgid Part # 79004001022)
Article Breakdown
Finish Nailer Repair - Replacing the Driver Guide (Ridgid Part # 79004001022)
Tools & Materials
- Drill/driver (low speed) or screwdriver.
Safety Guidelines
- Always remember to disconnect a tool from its power source before dismantling it or performing repairs.
- A clean workspace can minimize the potential for accidents and prevents dismantled tools from being exposed to dirt.
- Drawing wiring diagrams is very important when working with electrical wiring.
- Especially when working with DC current, mixing up wires can be dangerous to the tool or repairman.
 For a "Power Switch Diagnosis" article--Click here.
It is extremely important to understand that the design of power tool switches varies greatly from switch to switch, and so, the steps for replacing power switches also vary greatly from tool to tool, depending on what kind of switch it has. Differences in switch design also add different levels of complication and difficulty to each unique power switch replacement.
Again, this article will only focus on steps that are common to most switch replacements, as well as some hints and pointers for replacing power switches in general. Take a look at our other repair articles that detail specific switch replacements.
Here we use the DeWALT dw987 Cordless Drill as our walkthrough example for this repair. The switch replacement for the dw987 is a simple one, and will give us a good place to start from when talking about other, more complicated repairs.
General Steps for a Power Switch Repair
We're going to use the DeWALT dw987 as an example below to demonstrate general steps for replacing power tool switches. Even though this is a specific repair example, the steps for this repair have been generalized to apply to most switch replacements.
For a "Diagnosing Electric Power Tools" article--Click here.
This guide will also explain some specific steps that only apply to replacing a switch in the dw987, and it will be made clear below which steps are for general application and which steps apply only to the dw987.
After preparing a safe, clean work area and double checking that the tool is disconnected from its power source,
1. Access the Inside of the Power Tool
-
- Remove screws and other fasteners holding the tool's housing together.
- This usually involves splitting the tool's case (or part of its case) down the middle.
- Keep hardware organized as you go, and take some mental notes about how the tool is put together, especially if its design is unfamiliar.
- The specifics of accessing a power tool's inner components will be a little different for each tool.
Getting inside the DeWALT dw987 only involves removing a handful of screws along the housing of the drill.
[Back to top] 2. Remove Other Parts as Necessary
-
- Many power switches can be fully accessed just by removing the tool casing, while some tools will need more parts to be disassembled.
- This step will vary greatly from tool to tool.
-
- Push down the selector lever and carefully remove the dw987's transmission by wiggling it slowly back and forth. Do not try to force the transmission out.
- Set the transmission aside until it's time to reassemble the tool.
[Back to top]
3. Free Up the Switch Assembly
-
- This will vary greatly from tool to tool.
- Remove screws and other fasteners securing the switch assembly to the tool.
- Remove other tool parts preventing the switch from being removed.
-
- Remove the forward/reverse lever from the drill's switch assembly.
- Make a mental note about its orientation for reassembly later.
A forward/reverse lever is just one small example of a component that may have to be removed from a switch assembly before it can be removed and replaced. As always, keeping track of how each component is situated can save time when it comes time to put the tool back together.
[Back to top]
4. Closely Examine the Switch's Wiring and Draw a Diagram
This is the most important step for every power switch replacement.
-
- After the switch assembly is freed up, inspect its wiring configuration closely.
- Mark switch wires with masking tape when necessary to avoid mixing them up.
- Draw a diagram of the tool's wire configuration leading into and out of the switch assembly.
- Note how many wires lead in and out of the switch, their positions, and note each wire's colors. Include these notes on the diagram.
This is the most important step in a switch replacement, because switches differ from each other most by how they're wired, making each switch replacement unique. Power switches can have 2-wire, 3-wire, and 4-wire setups with other variations between them. Also, the types of wire terminals on switches can vary greatly. Below are some pictured examples of different types of switches.
Drawing a switch diagram can prevent two common switch repair disasters:
1. Mixing up the wires. Crossing wires is especially hazardous when working with DC current like with cordless power tools. If the switch wires are crossed, operating the tool will quickly cause the battery to overheat, destroying the battery and/or tool.
2. Spending time to look up a switch diagram unnecessarily.
[Back to top]
Example: Examining the Switch Wiring on the DeWALT dw987:
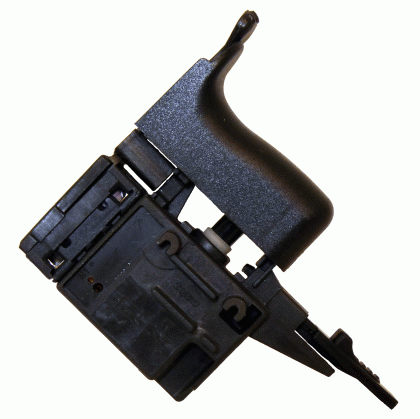
The switch for the DeWALT dw987 is an example of an extremely simple switch replacement. The switch for the dw987 drill is a variable speed range switch (VSR switch) that is also compatible in several other DeWALT cordless power tools.
Most switches will have two or more wires leading out both ends, wires coming from the tool's power source and wires heading toward the motor.
This VSR switch does not have any wires leading from its battery power source like most switches, because the switch assembly plugs directly into the battery. This makes this switch installation much easier than most, and also makes drawing the diagram for this switch much more simple.
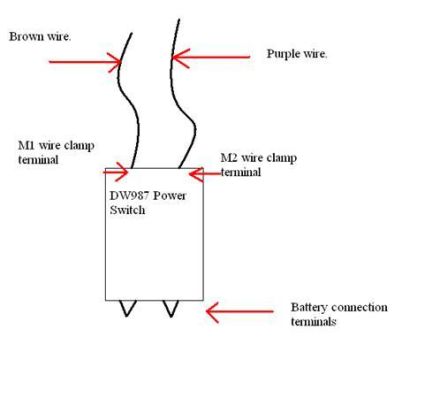
This VSR switch has two wires leading from the switch assembly to the drill's motor. The color and position of these wires should be included in the switch diagram in order not to mix them up when installing the new switch.
The wires for the dw987's switch use a clamping system that makes it so they simply snap into their places on the switch assembly. Many switch repairs require soldering to ensure better connections, but with a clamping system like this, this repair is made easier again
Here is what the VSR switch for the dw987 looks like:
Example: Examining the Switch Wiring on the DeWALT dw987:
 The switch for the DeWALT dw987 is an example of an extremely simple switch replacement. The switch for the dw987 drill is a variable speed range switch (VSR switch) that is also compatible in several other DeWALT cordless power tools.
Most switches will have two or more wires leading out both ends, wires coming from the tool's power source and wires heading toward the motor.
This VSR switch does not have any wires leading from its battery power source like most switches, because the switch assembly plugs directly into the battery. This makes this switch installation much easier than most, and also makes drawing the diagram for this switch much more simple.
This VSR switch has two wires leading from the switch assembly to the drill's motor. The color and position of these wires should be included in the switch diagram in order not to mix them up when installing the new switch.
The wires for the dw987's switch use a clamping system that makes it so they simply snap into their places on the switch assembly. Many switch repairs require soldering to ensure better connections, but with a clamping system like this, this repair is made easier again
Drawing a diagram of the switch wiring is extremely important. Try not to be tempted into thinking that making a diagram is a "skipable," elementary step. This recommendation comes from our on-site repairmen, who have been repairing power tools professionally for over fifteen years, and they still draw a diagram for each switch repair.
[Back to top] 5. Remove the Old Switch and Install the New Switch.
-
- Remove the wires from the old switch and remove the old switch from the tool.
- Install wires into the new switch following your diagram.
- Situate the new switch into its place in the power tool.
- Make sure that all wires are positioned correctly, that they will stay in place, and that they won't be pinched by the tool's case when it's reassembled.
- The way that wires are removed and installed will vary greatly from switch to switch.
Example: Installing the New Switch on the dw987: The final product should reflect what the old switch looked like before it was removed.
[Back to top] 6. Reassemble the Power Tool With Care
-
- Reassemble the tool carefully. This is where good organization from the beginning pays off.
- Avoid excessive wear on hardware and other components, since most tools will need to be disassembled more than once in their lifetimes.
- Take extra care with plastic tool components.
- Take extra care with other sensitive components, like transmissions.
The threaded screw locations on the casings of plastic power tools can be easily stripped by metal screws. Before installing the screws, carefully back them up in reverse to allow the threads to line up straight. A lot of wearavoided this way. on the threads of a plastic casing can be If other sensitive parts of a tool had to be removed in order to access the switch assembly (such as a transmission, in the case of the dw987), a little extra care may be needed for reassembly. Example: Reassembling the dw987:
-
- This tool has a plastic casing, so extra care should be taken when returning its screws to their positions. Back the screws up a little and allow the threads to ling up.
- Once it's time to reinstall the drill's transmission, a couple more steps are needed.
- Reinstall any remaining screws.
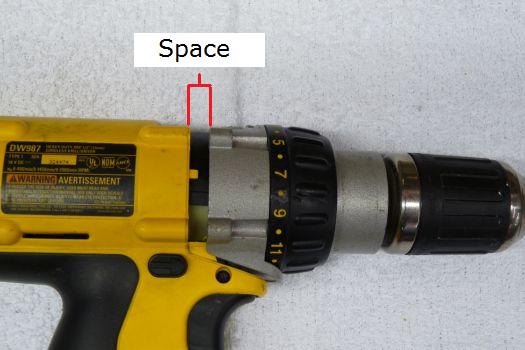
Correctly reinstalling the dw987's transmission involves a couple of extra steps. First, the transmission should be partially reinstalled, until it makes contact with handle portion of the drill. It should look like this, with a spacebetween the transmission and the motor housing:

In order to lock the transmission into place, the motor must be turned until it lines up with the gears of the transmission. Turn the motor by reinstalling the battery and gently pulling the trigger, so that the motor can turn slowly (thanks to the VSR switch). The transmission should slide into position when with little effort once the motor lines up.
Once the transmission is back in place, the tool is only a few screws away from being reassembled, and it's on to the last step.
[Back to top] 7. Test the Basic Functions of the Tool It's always a good idea to check all the basic features of a tool after it is reassembled, just to catch any little problems or possible oversights early on. Cycle through its basic modes and features and maybe even put it to work a little. Example: Testing the dw987: Test the basic features of the dw987 by:
-
- Running it forwards and backwards.
- Adjusting the torque.
- Running it at different speeds.
- Maybe even drive a couple of screws or drill some holes.
If everything checks out, then this power switch repair is complete. [Back to top] Conclusion This guide uses the DeWALT dw987 as a walkthrough example for basic power switch repair guidelines. Yes, each power switch repair is different, and some are more involved than others, but the steps in this guide are common to most power tool and machinery switch repairs. For more specific switch repair questions, please see our specific switch repair articles, join our repair forum, and comment on our discussion boards. If you're looking to replace your tool's power switch, you can begin your search on our Home Page, or by using the "Model Number Search" at the top of this page. eReplacementParts.com offers easy search features and fast shipping options, so you can get the power switch you need, apply this article's repair steps, and get your tool or machine up and running again.
[Back to top] What we're about.


