


Why Read This Article?
Finish Nailer Repair - Replacing the Driver Guide (Ridgid Part # 79004001022)
Article Breakdown
Finish Nailer Repair - Replacing the Driver Guide (Ridgid Part # 79004001022)
Video
Tools & Materials
- Pliers
- Flat-head screwdriver
- Fuel-line clamps
- Sturdy piece of wire
- Other tools may be needed to remove panels and/or shrouds
 You'll find in-tank filters on hand-held equipment such as trimmers, hedge clippers, and stick edgers. In-line filters help clean fuel in larger equipment such as lawn mowers, tillers, and riding mowers.
Check out our lawn equipment parts page to find filters for all your yard equipment.
Replacing an In-Tank Filter
You'll find in-tank filters on hand-held equipment such as trimmers, hedge clippers, and stick edgers. In-line filters help clean fuel in larger equipment such as lawn mowers, tillers, and riding mowers.
Check out our lawn equipment parts page to find filters for all your yard equipment.
Replacing an In-Tank Filter
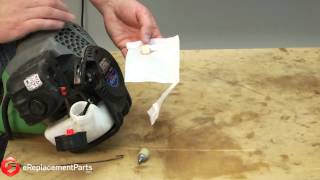
1. Remove the fuel cap
Remove the fuel cap to gain access to the filter.

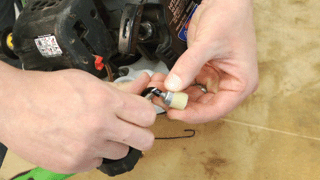
2. Retrieve the filter
Now you can retrieve the filter. Take a piece of coat hanger or a similarly stiff bit of wire and fashion a hook in one end and a loop in the other.
Use the hooked end to grab the fuel line and pull the filter from the tank.
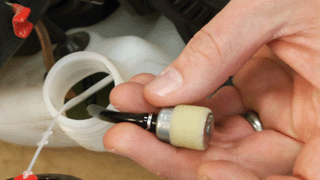
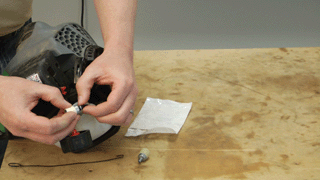
3. Remove the filter
Now you can remove the filter. Use a flat-head screwdriver to slide the retaining clamp down the fuel line. Then the filter should slide right off.
4. Install the new filter
Slide the new filter onto the fuel line. Then use your screwdriver to position the clamp firmly over the filter nipple.
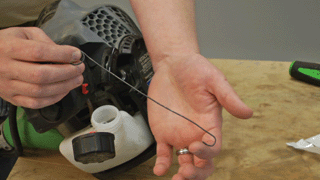
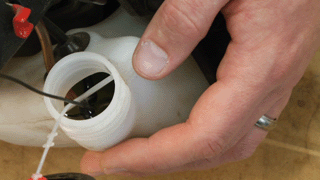
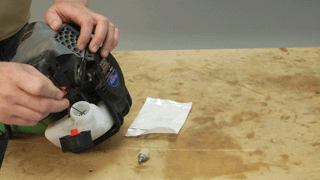
5. Situate the filter in the tank
Drop the filter back into the tank, then use your wire tool to make sure it's sitting on the bottom where it can filter the fuel.
 [Back to Top]
Replacing an In-Line Filter
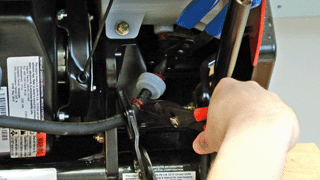
We used a snow blower for this repair. Depending on your lawn equipment, you may have to remove shrouds and panels to access the filter. In the case of this blower, we removed one shroud.
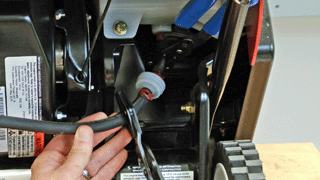
1. Clamp the fuel lines
Use a set of fuel-line clamps--or another pair of clamps you can lock down and leave--to clamp the fuel lines above and below the filter. This will prevent fuel from leaking out of the lines.
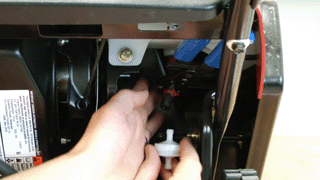
2. Remove the filter clamps
Now you can use your pliers to slide the clamps securing the filters out of the way.
3. Remove the filter
With the filter clamps out of the way, you can slide the filter off each of the fuel lines.

4. Install the new filter
Press the new filter into each of the fuel lines. Then slide the filter clamps back into place over the filter nipples with your pliers.
5. Remove the fuel line clamps
Now just remove the fuel line clamps you installed earlier to finalize the repair.

Don't forget to replace any covers and/or shrouds you may have removed earlier.
[Back to Top]
Conclusion
And that's how you can replace in-tank or in-line fuel filters in about 10 minutes. This repair will help breathe new life into poorly performing outdoor equipment and will give you the skills to perform filter maintenance on your entire arsenal of lawn equipment.
Don't forget to see all of the parts we carry for your trimmers here.
[Back to Top]
What We're About
