


Why Read This Article?
Finish Nailer Repair - Replacing the Driver Guide (Ridgid Part # 79004001022)
Article Breakdown
Finish Nailer Repair - Replacing the Driver Guide (Ridgid Part # 79004001022)
Video
Tools & Materials
- adjustable square
- level or straight edge
- wrenches
 To demonstrate this procedure, we use the Porter Cable 3802L Miter Saw as an example.
Although each miter is slightly different, the steps below will help with adjustments on most miter saw designs.
How to Adjust the Miter Angle on a Miter Saw
To demonstrate this procedure, we use the Porter Cable 3802L Miter Saw as an example.
Although each miter is slightly different, the steps below will help with adjustments on most miter saw designs.
How to Adjust the Miter Angle on a Miter Saw
The miter angle adjustment on a miter saw squares the fences of the saw perpendicularly to the faces of the saw blade.
In short, the fences must be loosened, adjusted into position using a square, and then secured again into position.
The Porter Cable 3802L has a split, two-piece fence. For miter saws with split fences, both sides of the fence must be aligned with the saw blade.
1. Remove the fence slide from the left fence.
Because they help secure the fences to the saw, any fence slides will have to be removed first.
On the PC 3802L, a clamp lever secures a fence slide to its left fence. Unscrew the clamp and lift the fence slide off the fence.
[Back to top]
2. Loosen the bolts holding the left fence to the saw.
Beginning the adjustment means first adjusting just one side of the fence.
Using a wrench, loosen the bolts holding the left fence to the saw.
In addition to having a split fence, the left fence on the PC 3802L Miter Saw can also have two pieces. One piece of the left fence is a primary fence, and the second is a slide support.
Bolts must be loosened on both pieces of the left fence, three bolts on the top of the the primary fence and two bolts underneath the saw holding the slide support.
[Back to top]
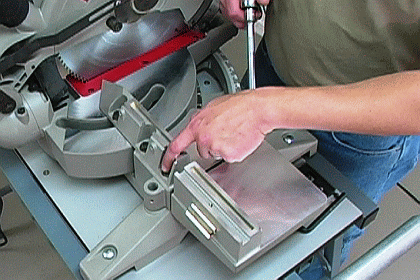
3. Adjust the left fence to the saw blade with a square.
Adjustable combination squares are great tools for this kind of adjustment.
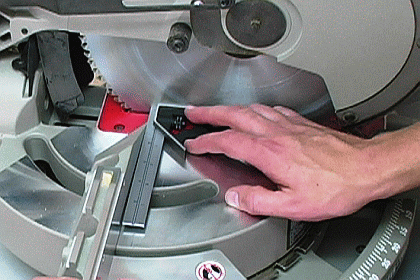
Set one side of the square against the face of the saw blade. Then, move the left fence around until it is flush with the square.
[Back to top]
4. Secure the left (primary) fence bolts.
First, tighten just one of the left fence bolts on the primary fence now that it is adjusted into position. If the fence has more than two bolts, tighten one of the end bolts first.
The fence will often move out of adjustment a little when the first bolt is tightened.
Before continuing on to the other bolts, check the fence alignment one more time. If the fence moved with the first bolt tightening, just wiggle it back into place with the help of the square.
After double-checking the fence alignment, continue by tightening the bolt that is farthest from the first bolt that you tightened first. This will ensure that the fence does not move any more as the remaining bolt is tightened.
Finally, finish tightening any remaining bolts.
[Back to top]
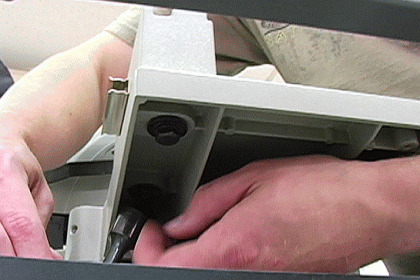
5. Use the fence slide to align the slide support with the primary fence.
Now that the primary fence on the left side is aligned and secured down, the fence slide can be used to quickly align the slide support to the primary fence's new adjustment.
This is important because slide support also serves as part of the overall saw fence and must also be in alignment with the blade.
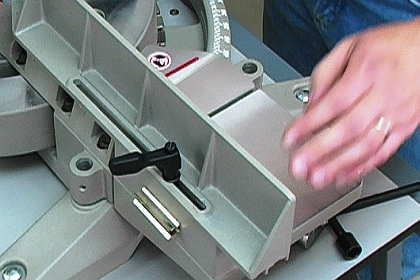
Simply installing the fence slide will align the slide support with the primary fence.
After it is aligned, tighten up the two bolts holding the slide support to the saw.
[Back to top]
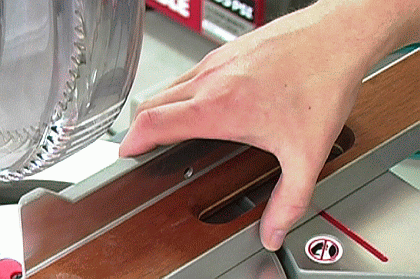
6. Use a straight edge to align the right-side fence.
The right side fence can be quickly aligned with the help of a straight edge.
Now that the left fence and slide support are aligned, their position can be used to adjust the right fence.
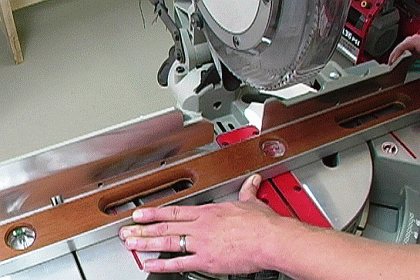
Place a straight edge against the recently-adjusted left fence, loosen the right fence bolts holding it to the saw, and then adjust the right fence against the straight edge.
This is faster and easier than using the combination square.
After the adjustment is made, secure the right fence into its adjusted position by tightening its bolts down with a wrench.
[Back to top]
This completes the miter angle adjustment for the miter saw.
How to Adjust the Bevel Angle on a Miter Saw
A miter saw's bevel angle can also vibrate out of adjustment while the saw is in use.
To be correctly adjusted, a bevel angle screw on the saw must be turned until the saw blade makes a vertical 45 degree angle when tilted into its bevel position.
 The bevel angle adjustment is made on most miter saws with an adjustment screw similar to the one on the PC 3802L (pictured above).
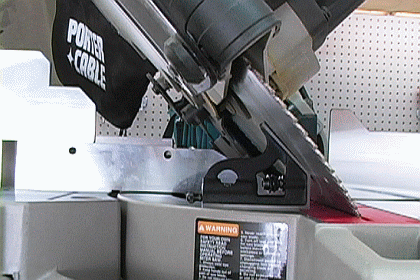
1. Position a combination square under the tilted saw blade.
The bevel angle adjustment is made on most miter saws with an adjustment screw similar to the one on the PC 3802L (pictured above).
1. Position a combination square under the tilted saw blade.
This is another handy use for the combination square.
After removing the square's slide rule, its 45 degree angle side can be rested against the saw blade to show how much the blade must be adjusted.
 [Back to top]
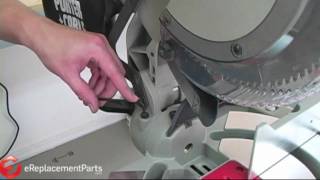
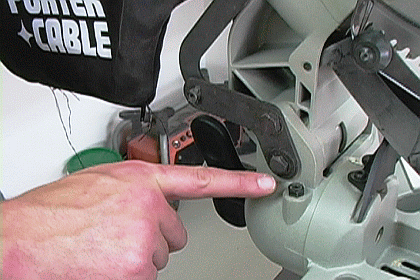
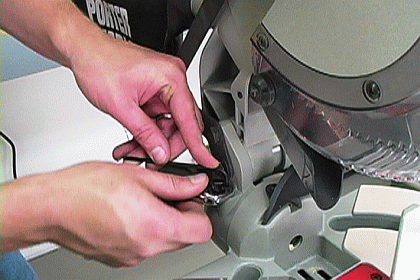
2. Loosen the outer adjustment screw with a wrench.
Most miter saw adjustment screws will be similar to the one on the PC 3802L. It has two parts, a center screw turned by an Allen key, and an outer screw.
The center screw is the one that actually adjusts the blade. The outer screw only secures the center screw down after it is adjusted.
Before adjusting the center screw, it must be freed up by loosening the outer screw with a wrench. [Back to top] 3. Adjust the blade by turning the center screw.
Make small adjustments to the center screw by turning it with an Allen key.
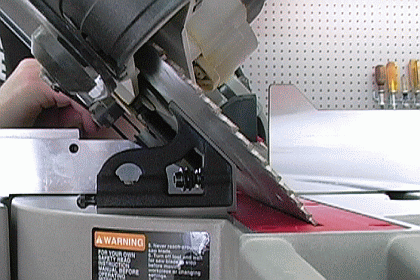
Keep an eye on the combination square. The blade is properly adjusted when it touches the length of the square face.
[Back to top]
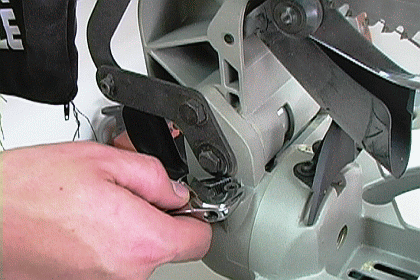
4. Secure the center screw by tightening the outer screw.
Now, the carefully-adjusted center screw can be tightened into place.
Tighten the outer screw with a wrench.
While tightening the outer screw, place an Allen key in the center screw to keep it from turning. Otherwise, tightening the outer screw down can easily ruin the new bevel alignment.
[Back to top]
Conclusion
Making miter saw adjustments is fast and easy, especially since the procedure doesn't require any parts replacement.
However, a damaged or broken miter saw fence, fence slide, or slide support can prevent a saw from being adjusted properly, and, therefore, running properly.
In the case of a failed fence, replacing the fence is necessary before adjusting the saw.
eReplacementParts.com is pleased to provide replacement miter saw fences and other other miter saw parts with our streamlined ordering and shipping services.
Visit our Miter Saw Parts page to get started with your miter saw repair, or just type your saw's model number in the search field at the top of this page.
[Back to top]
What we're about.
