Why Read This Article?
Finish Nailer Repair - Replacing the Driver Guide (Ridgid Part # 79004001022)
Article Breakdown
Finish Nailer Repair - Replacing the Driver Guide (Ridgid Part # 79004001022)
Tools & Materials
- #10 torx bit and drill/driver (low speed), or
- #10 torx key
Safety Guidelines
- Slowly back screws up a little before replacing them in the tool housing. This will prevent damage to the plastic threads.
Steps for Removing a Drill's Transmission 1. Removing the Transmission Housing Screws
Remove the four screws on the dw987 around its transmission using a #10 torx bit. This will free the transmission case up from the motor housing.
* * * *
2. Removing the Transmission of the DeWALT dw987:
Push down the selector lever and carefully remove the dw987's transmission by wiggling it slowly back and forth. Do not try to force the transmission out.
Set the transmission aside until it's time to reassemble the tool.
Removing the transmission from the grip portion of a cordless drill is common for cordless drill switch repairs. This is a great example of an additional part that may need to be removed before moving on with a power switch replacement.
[Back to top]
Steps for Replacing a Drill's Transmission
1. Partially Reinstall the Transmission:
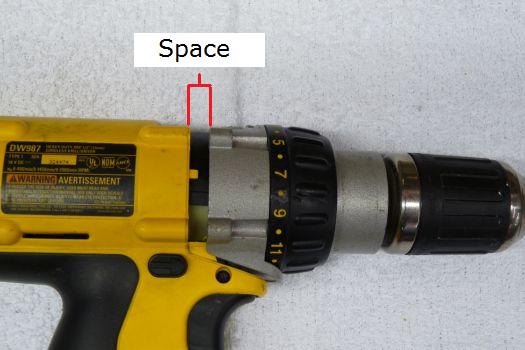
Correctly reinstalling the dw987's transmission involves a couple of extra steps. First, the transmission should be partially reinstalled, until it makes contact with handle portion of the drill. It should look like this, with a space between the transmission and the motor housing:
 2. Realign the Transmission:
In order to lock the transmission into place, the motor must be turned until it lines up with the gears of the transmission.
Select the "1" setting on the clutch sleeve. Turn the motor by reinstalling the battery and gently pulling the trigger, so that the motor can turn slowly (thanks to the VSR switch). The transmission should slide into position when with little effort once the motor lines up. 3. Reinstall the Transmission Case Screws:
Once the transmission is back in place, the tool is only a few screws away from being reassembled, and it's on to the last step.
This tool has a plastic casing, so extra care should be taken when returning its screws to their positions, including the transmission casing screws. Back the screws up a little and allow the threads to ling up. 4. Test the Basic Functions of the Drill/driver:
It's always a good idea to check all the basic features of a tool after it is reassembled, just to catch any little problems or possible oversights early on. Cycle through its basic modes and features and maybe even put it to work a little.
If everything checks out, then the transmission has been reinstalled correctly. Please view our video that demonstrates these steps. Removing your drill's transmission for a repair or parts replacement? Click here for our complete DeWALT Parts catalog to find the parts you need. [Back to top] What we're about.
- Test the basic features of the dw987 by:
- Running it forwards and backwards.
- Adjusting the torque.
- Running it at different speeds.
- Maybe even drive a couple of screws or drill some holes.


