


Why Read This Article?
Finish Nailer Repair - Replacing the Driver Guide (Ridgid Part # 79004001022)
Article Breakdown
Finish Nailer Repair - Replacing the Driver Guide (Ridgid Part # 79004001022)
Video

Tools & Materials
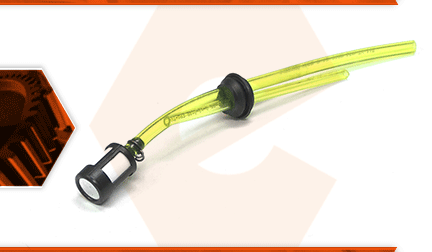
The fuel line kit consists of two new fuel lines, the tank grommet and the fuel filter. The fuel line kit is a fast and easy way to service your small engine when the fuel lines harden and crack or when the tank grommet starts to leak.
Let's get started.
REMOVING THE FUEL LINE KIT 1. Remove the air cleaner assembly.
a. Loosen the thumbscrew and remove the air filter cover.
b. Remove the air filter.
c. Loosen the two bolts securing the air cleaner base (and the carburetor) to the engine.
d. Pull the air cleaner base (and carburetor) away from the engine slightly and remove the two bolts (along with the metal bracket) from the air cleaner base.
2. Disconnect the fuel lines from the carburetor.
a. Use long-nosed pliers to disconnect the two fuel lines from the carburetor.
3. Remove the fuel line kit.
a. Use a small screwdriver to pry the grommet out of the fuel tank.
b. Raise the fuel line assembly out of the fuel tank until clamp (connecting the fuel filter to the fuel line) is accessible.
c. Use long-nosed pliers to remove the fuel line clamp.
d. Disconnect the fuel filter from the fuel line.
e. Remove the fuel line assembly from the unit.
f. Remove the fuel filter from the fuel tank.
INSTALLING THE NEW FUEL LINE KIT
4. Install the fuel line kit.
a. Remove the clamp securing the (new) fuel filter to the new fuel line kit.
b. Remove the fuel filter.
c. Install the fuel lines into the fuel tank (through the opening for the grommet).
d. Align the new grommet with the opening on the fuel tank and use a small screwdriver to seat the edges of the grommet.
e. Use a wire hook to retrieve the fuel line through the fuel tank fill spout. (This is the line containing the clamp for the fuel filter).
f. Install the new fuel filter onto the fuel line.
g. Secure the fuel filter with the clamp.
h. Tuck the fuel filter back into the fuel tank.
5. Connect the fuel lines.
a. Connect the two new fuel lines to the carburetor.
REASSEMBLING THE UNIT
6. Reinstall the air cleaner assembly (and carburetor).
a. Install the air filter base (using the exposed mounting screws) onto the carburetor assembly.
b. Install the carburetor gasket onto the carburetor (using the screws to hold the gasket in place).
c. Install the entire assembly (air cleaner bracket, air cleaner base, carburetor, and gasket) onto the engine (using the mounting screws to keep everything aligned).
d. Use a hex wrench to tighten the mounting screws and secure the air cleaner assembly and carburetor to the engine.
7. Reinstall the air filter cover.
a. Install the air filter.
b. Install the air filter cover.
c. Tighten the thumbscrew to secure the air filter cover.
