


Why Read This Article?
Finish Nailer Repair - Replacing the Driver Guide (Ridgid Part # 79004001022)
Article Breakdown
Finish Nailer Repair - Replacing the Driver Guide (Ridgid Part # 79004001022)
Video

Tools & Materials
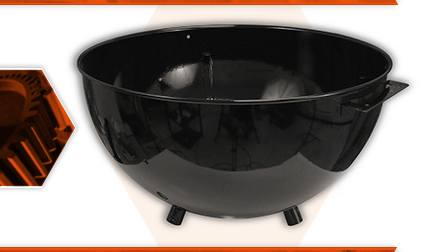
The bowl is the lower part of your barbecue's kettle. It is made of steel with a durable baked-porcelain finish. Most problems with the bowl are the result of accidental damage, such as the grill falling over, or something hitting it. If the porcelain finish is cracked, the bowl may begin to rust.
Let's get started.
REMOVING THE BOWL 1. Remove the lid.
a. Lift the lid away from the bowl assembly.
2. Remove the grates.
a. Remove the cooking grate from the bowl.
b. Remove the briquet holders from the bowl.
c. Remove the charcoal grate from the bowl.
3. Remove the charcoal bin.
a. Pivot the charcoal bin to the open position.
b. Disengage the locking clip from the back of the charcoal bin.
c. Disengage the lower shelf from the bottom of the charcoal bin.
d. Remove the charcoal bin from the grill.
4. Remove the table.
a. Remove the (4) screws securing the table to the grill.
b. Lift the table assembly away from the grill.
5. Remove the ash catch pan.
a. Lift and slide the lock-lever (handle) of the ash catcher pan (counterclockwise) to disengage it from the upper ring.
b. Remove the catch pan from the grill.
6. Remove the lid bale.
a. Remove the two nuts securing the (sides of the) lid bale to the bowl.
b. Remove the bolt securing the (center of the) lid bale to the bowl.
c. Remove the lid bale from the bowl.
7. Disconnect the ignition wires.
a. Disconnect the two wires from the terminals on the igniter.
8. Disconnect the gas line.
a. Use long-nosed pliers to remove the retainer clip securing the orifice to the burner tube.
b. Separate the orifice from the burner tube.
9. Remove the burner tube.
a. Remove the two screws (and nuts) securing the burner tube bracket to the bowl.
b. Pull the burner tube and bracket away from the bowl.
10. Remove the damper (cleaning) kit.
a. Pass a large screwdriver through the side of the ash catcher ring toward the center of the bowl (on its underside).
b. Insert the screwdriver between the two hub lobes at the center of bowl (beneath the H-washer; above the cleanout lever).
c. Rotate the screwdriver while simultaneously rotating the cleanout lever, until the tab on the cleanout lever aligns with the slot on the hub lobes.
d. Slide the cleanout lever out of the assembly.
e. Remove the damper assembly (the fins and hardware) from inside the bowl.
11. Remove the bowl.
a. Remove the (4) bolts and washers securing the bowl to the grill frame.
b. Lift the bowl assembly out of the frame.
12. Remove the ash catcher ring.
a. Place the bowl upside-down on your workbench.
b. Use a screwdriver (or your fingers) to disengage the three locking tabs securing the ash catcher ring to the bottom of the bowl.
c. Remove the ash catcher ring from the bowl.
INSTALLING THE NEW BOWL
13. Install the bowl.
a. Install the new bowl into the grill frame. (The opening for the burner tube should face the regulator assembly.)
b. Secure the bowl with the (4) washers and bolts.
REASSEMBLING THE UNIT
14. Reinstall the damper (cleaning) kit.
a. Install the damper assembly (the fins) into the bowl. (Fin number 3 should be centered between the two holes where the lid bale attaches.)
b. Place something heavy (such as your tool kit) in the center of the grill to temporarily hold the damper in place.
c. Install the H-washer onto the lobes of the center mounting bracket (on the underside of the bowl).
d. Install the cleanout handle through the openings on the lobes of the center mounting bracket. (Be sure to align the tab on the cleanout handle with the slot on the bracket, or the handle wont pass through both lobes.)
e. Rotate the cleanout handle to lock the assembly in place. (You can usually hear or feel the assembly snap as it engages.)
15. Reinstall the ash catcher ring.
a. Position the ash catcher ring on the bottom of the bowl, ensuring that the clean-out lever passes through the slot on the ring.
b. Align the notches on the ash catcher ring with the legs on the bottom of the bowl.
c. Press firmly on the ash catcher to engage the three locking tab.
16. Reinstall the lid bale.
a. Install the lid bale on the side of the new bowl.
b. Secure the lid bale with the two nuts (on the sides), and the bracket and bolt (in the center).
17. Reinstall the burner tube.
a. Install the burner tube through the opening in the new bowl.
b. Secure the burner tube bracket to the bowl with the two bolts, washers, and nuts.
c. Reconnect the orifice to the burner tube.
d. Secure the orifice to the burner tube with the retainer clip.
18. Reinstall the ignition wires.
a. Install the white ignition wire to the white connector on the igniter.
b. Install the black ignition wire to the black connector on the igniter.
19. Reinstall the ash catcher pan.
a. Install the ash catcher pan onto the ring.
b. Verify that the handle of the ash catcher pan engages the locking slot on the ring.
20. Reinstall the table.
a. Install the table onto the frame of the grill.
b. Secure the table with the (4) screws.
21. Reinstall the charcoal bin.
a. Install the charcoal bin onto the lower shelf.
b. Reconnect the locking clip to the top (back) of the charcoal bin.
22. Reinstall the grates.
a. Install the charcoal grate.
b. Install the briquet holders.
c. Install the cooking grate.
23. Reinstall the lid.
a. Install the lid onto the bowl assembly.
