


Why Read This Article?
Finish Nailer Repair - Replacing the Driver Guide (Ridgid Part # 79004001022)
Article Breakdown
Finish Nailer Repair - Replacing the Driver Guide (Ridgid Part # 79004001022)
Video

Tools & Materials
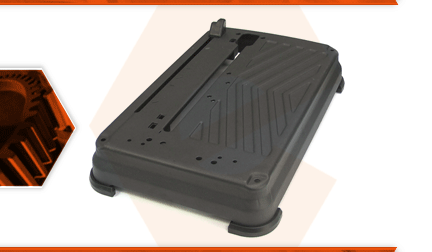
The base is your cutoff saw's foundation. All of the saw's major components are attached to it, including the cutter-head, the fence, and the vise. The most common issue with the base is damage caused by dropping the saw. This can result in a bent base or a misaligned saw.
Let's get started.
REMOVING THE BASE
1. Begin by removing the top hold-down clamp.
2. Tip the saw onto one side.
3. On the underside of the saw, remove the two bolts that secure the front of the vise.
4. Remove the retaining ring that secures the vise jaw.
5. Remove the two screws that secure the cutter-head to the base.
6. Separate the base from the cutter-head.
7. Remove the fins.
8. Unlock the clamp.
9. Remove the bolts.
10. Remove the old base.
INSTALLING THE NEW BASE
1. Place the fence onto the base, aligning the lock pin with one of the holes. 2. Place the cam lock back onto the fence. 3. Tip the base up to reinstall the clamp. 4. Start each of the bolts by hand, and then use a hex wrench. 5. Once the bolts are nearly tightened, turn the clamp for the proper clamping force. 6. Reinstall the base to the cutter-head. 7. You'll notice there are two sets of holes that the saw can be mounted to. You want to use the upper set of holes. There are alignment pins that will first align with the base. 8. Secure the base with the screws. 9. Align the vise with the base. 10. Reattach the rear block with the screws. 11. Reattach the vise jaw with the washer and the retaining ring. 12. Reinstall the top clamp.
