


Why Read This Article?
Finish Nailer Repair - Replacing the Driver Guide (Ridgid Part # 79004001022)
Article Breakdown
Finish Nailer Repair - Replacing the Driver Guide (Ridgid Part # 79004001022)
Video

Tools & Materials
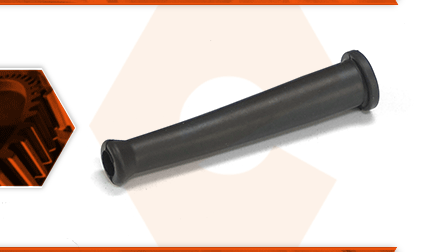
The power cord passes through the cord protector as it goes into the tool's handle. The cord protector gives extra support to the cord, preventing it from kinking and rubbing against the handle. The cord protector is made of rubber and will eventually harden and crack. Once it does, the cord can tend to kink near the handle. This can lead to broken wires. Left unprotected, the cord can also rub against the handle housings, eventually rubbing through the insulation, leaving bare wires.
Let's get started.
REMOVING THE CORD PROTECTOR 1. Remove the handle cover.
a. Remove the (3) screws securing the handle cover to the motor housing. b. Remove the handle cover from the unit.
2. Remove the cord protector.
a. Pull the cord assembly and switch away from the housing.
b. Use a small screwdriver disengage the trap-door connectors on the switch and disconnect each of the cord wires from the switch.
c. Use a screwdriver pry open the plastic cord clamp and remove the clamp from the power cord.
d. Remove the cord protector from the cord.
INSTALLING THE NEW CORD PROTECTOR
3. Install the cord protector.
a. Install the new cord protector onto the power cord. b. Install the cord clamp onto the cord and align the clamp with the original indents on the cord.
c. Use pliers to lock the cord clamp onto the power cord.
d. Re-connect the cord wires to the switch.
e. Install the switch and cord assembly into the handle housing.
f. Tuck the cord clamp into the recess on the handle housing.
g. Align the cord protector with the slot on the housing.
REASSEMBLING THE UNIT
4. Reinstall the handle cover.
a. Install the handle cover.
b. Secure the handle cover with the (3) screws.
