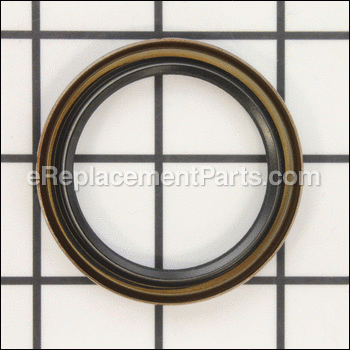

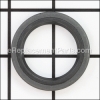
This is a Genuine OEM replacement part for use with a variety of Lawn and Garden Equipment. This item is made out of Metal and Rubber Material. It is Sold Individually. The purpose of this part is to create an air tight Seal so the oil does not leak from Crankcase.
When replacing this you would need a Set of Wrenches, Pliers and a Screwdriver.
You would need to remove the PTO shaft assembly from the unit. Then you want to remove the cotter key and pull the pin out. This will allow all the guts to slide off of the shaft.
Seal-oil 795387
OEM part for: Briggs and Stratton, Husqvarna, Toro
Part Number: 795387
$7.88
Usually ships in 7 - 12 business days
7 - 12 business days
Jump To:
Product Description ?
- Classification: Part
- Weight: 0.01 lbs.
- Shipping: Ships Worldwide
Frequently Purchased Together ?

Compatibility
This Seal-oil will fit the following 4881 machines. Confirm this part works with your model, and view the detailed model diagrams and repair help we have to offer.
Husqvarna
Toro
Briggs and Stratton
Show More Compatible ModelsThis item works with the following types of products:
- Lawn Mower Parts
- Lawn Tractor Parts
- Engine Parts
This part replaces obsolete part #: 791892, 690947
Customer Part Reviews ?
Average Rating (out of 5):
Click to filter by ratings:
5 stars
7
4 stars
0
3 stars
1
2 stars
0
1 stars
0
< PREV
- 1
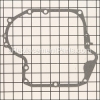
Base and gasket replacement
Great repair, total time for repair 45 minutes. Word of caution, the drive shaft oil requires alignment for ease of installation. Use a little grease to hold shaft in place. So easy a cave man could do it..
Guest -
August 20, 2023
Verified Purchase
worked as expected
arrived quick
troy -
August 5, 2022
Verified Purchase
Easy ordering, fast shipping,
Correct part!!!!
Guest -
November 14, 2020
Verified Purchase
Fast delivery
Great price and it was here in no time thank you
Guest -
May 11, 2020
Verified Purchase
Worked as excepted
Had a little problem going over the crank shaft but watch and took my time and the repair went great
Tommy -
April 14, 2020
Verified Purchase
Fitted like it was made for it !
Seem to do the job
Joseph -
November 11, 2019
Verified Purchase
easy works great
great condition arrived quickly no problem
Guest -
May 21, 2019
Verified Purchase
shipping was a problem
I ordered the parts with the promise and 'payment' of two day delivery - instead they came five days later. I needed help to install the parts which was delayed for over a week. You were recommended by the installer who has had great success with you. I now need a drive belt however I ordered it from another source. I realize that delivery is beyond your control once it leaves your warehouse but I need the belt as soon as possible.
Guest -
August 13, 2019
Verified Purchase
Questions & Answers ?
Our customer Service team is at the ready daily to answer your part and product questions.

Ask our Team
We have a dedicated staff with decades of collective experience in helping customers just like you purchase parts to repair their products.
Does this fit my product?Questions & Answers for Seal-oil
No questions have been asked yet
Customer Repair Instructions ?
All our customer repair instructions are solicited directly from other customers just like you who have purchased and replaced this exact part.
Crankcase gasket was leaking
chris - July 26, 2016
👍 12 of 12 people found this instruction helpful
Tool Type
Lawn Tractor
Difficulty
Medium
Time
1-2 hours
Tools Used
Screwdriver, Socket set, Wrench Set, Nutdriver, Impact driver, torque wrench,scraper for gasket removal
Parts Used
Removed engine from riding mower, turned it upside down, don't set it on fan, pushes crankshaft up enough it holds crankcase cover up so it won't seat, removed crankcase cover, cleaned and replaced gasket, replaced and torqued bolts, then reinstalled and filled with oil. Replaced PTO shaft seal while I was there. No leaks!
Did you find this story helpful?
Thanks for voting and helping fellow customers!
Oil Leak
Kent - February 6, 2017
👍 4 of 4 people found this instruction helpful
Tool Type
Lawn Tractor
Difficulty
Medium
Time
More than 2 hours
Tools Used
Screwdriver, Pliers, Socket set, Wrench Set, Nutdriver, Impact wrench to remove electric clutch.
Removed Engine, removed oil pump, removed oil pan, spent a great deal of time removing the old gasket taking care to prevent pieces from entering the engine. Removed seal, reinstalled new seal, reinstalled new gasket, replaced oil pan, replaced oil pump and o-ring, reinstalled engine, installed new drive belt, started and checked for leaks and proper operating. Everything fit perfectly and now with a new dry drive belt the mower is once again moving forward and backward at the desired speed without the essence of burning belt and oil.
A note of caution, when reinstalling the oil pan over the non chamfered crankshaft the seal is very easily damaged. It requires assistance in the form of carefully manipulating the seal over the crankshaft. I used a jewelers hex screwdriver but any small blunt object to guide the seal without cutting would suffice. Also scribing a reference mark on the the governor arm and shaft ensures it goes back on in the proper position. If you forget to do this you must reference technical data for proper installation to prevent engine overspeed damage. Simple procedure but too long to write in space provided.
A note of caution, when reinstalling the oil pan over the non chamfered crankshaft the seal is very easily damaged. It requires assistance in the form of carefully manipulating the seal over the crankshaft. I used a jewelers hex screwdriver but any small blunt object to guide the seal without cutting would suffice. Also scribing a reference mark on the the governor arm and shaft ensures it goes back on in the proper position. If you forget to do this you must reference technical data for proper installation to prevent engine overspeed damage. Simple procedure but too long to write in space provided.
Did you find this story helpful?
Thanks for voting and helping fellow customers!
Oil sump gasket failed blowing fine oil mist out collecting on cylinder body.
John - June 16, 2018
👍 2 of 2 people found this instruction helpful
Tool Type
Lawn Tractor
Difficulty
Hard
Time
More than 2 hours
Tools Used
Screwdriver, Socket set, Wrench Set, Torque wrench
Parts Used
1 Removed engine from lawn tractor.
2 On workbench, removed oil pump cover & pump. Split oil sump from engine.
3 Cleaned off old gasket & removed shaft oil seal. Discarded 10 old mounting bolts.
4 Installed new gasket & oil seal.
5 Mounted sump back on engine using 10 new bolts provided with gasket kit.
6 Used torque wrench to tighten bolts per instructional sheet.
7 Reinstalled oil pump & cover. Suggestion: Purchase new o-ring also when ordering parts.
8 Changed oil filter & added oil at this time
looking for initial leaks.
9 Reassembled engine back on mower. Note: Verify governor setting.
10 Started at low speed, ran engine to operating temperature then full throttle to assure no leaks.
Did you find this story helpful?
Thanks for voting and helping fellow customers!
Hard Starting
Clifford - May 23, 2016
👍 2 of 2 people found this instruction helpful
Tool Type
Lawn Tractor
Difficulty
Easy
Time
30-60 minutes
Tools Used
Screwdriver, Socket set, Wrench Set, Impack Driver
We removed the engine from tractor. Removed pan from engine to inspect cam shaft. The compression was ok reinstall. Remove and replace oil seal Remove old pan gasket and replace pan gasket and reinstalled. Taking care to install oil seal on shaft. Remove valve cover and remove and replace both push rods. Reassemble and install back on tractor. Start and check for leaks and operation. Have 28years in small engine repair
Did you find this story helpful?
Thanks for voting and helping fellow customers!
Oil leak
Anthony - July 5, 2017
👍 1 of 1 people found this instruction helpful
Tool Type
Lawn Tractor
Difficulty
Medium
Time
More than 2 hours
Tools Used
Screwdriver, Pliers, Socket set, Adjustable Wrench, impact wrench
Parts Used
Disconnected the engine from frame. Turned it upside down. Removed the crank case bolts. Lifted up the crank case. Replaced the gasket. Put it all back in reverse.
Did you find this story helpful?
Thanks for voting and helping fellow customers!
Bottom crank seal leaked.
Clarence - June 7, 2020
Tool Type
Lawn Tractor
Difficulty
Medium
Time
15-30 minutes
Tools Used
, Oil seal driver
Parts Used
Removed engine from frame . usded STP on seal and shaft sleeve. Used pipe to drive in seal.
Did you find this story helpful?
Thanks for voting and helping fellow customers!
Using oil
Tommy - April 14, 2020
Tool Type
Lawn Tractor
Difficulty
Hard
Time
More than 2 hours
Tools Used
Screwdriver, Pliers, Power Drill, Socket set, Wrench Set, Nutdriver, Cylinder hone
Rebuild the engine by replacing the rings
Did you find this story helpful?
Thanks for voting and helping fellow customers!
governor was broke
J.K. - October 23, 2019
Tool Type
Lawn Tractor
Difficulty
Easy
Time
More than 2 hours
Tools Used
Screwdriver, Pliers, Socket set, Wrench Set, Adjustable Wrench
took motor out , made repairs ..
Did you find this story helpful?
Thanks for voting and helping fellow customers!
connecting rod went bad
Kevin - August 30, 2019
Tool Type
Lawn Tractor
Difficulty
Easy
Time
More than 2 hours
Tools Used
Screwdriver, Pliers, Power Drill, Socket set, Wrench Set, Nutdriver, Adjustable Wrench, torque wrench-ring compressor-feeler gauge
completely disassembled engine except for crank and flywheel and reassembled using new parts and gaskets I also reseated the valves while the head was off
Did you find this story helpful?
Thanks for voting and helping fellow customers!
Blown oil sump seal on 27 hp Briggs and straton motor
Joel - July 29, 2019
Tool Type
Engine
Difficulty
Medium
Time
More than 2 hours
Tools Used
Screwdriver, Pliers, Power Drill, Socket set, Wrench Set, Hoist to lift motor
Removed motor from mower. Drained oil. Disassembled and removed oil sump pan. Replaced crank seal cleaned surfaces. Installed new gasket on oil sump pan. Reassembled and torqued new bolts to correct spec. Reassembled mower. Added oil and new filters. Started engine. Reassembled mower deck and belts after confirming no leaks. Total time on this project from start to finish approximately 5 hours performed with all the correct tools and mechanical knowledge.
Did you find this story helpful?
Thanks for voting and helping fellow customers!
Load More Install Stories
OEM stands for Original Equipment Manufacturer and means the part you’re buying is sourced directly from the manufacturer who made your product. At eReplacementParts, we sell only genuine OEM parts, guaranteeing the part you’re purchasing is of better design and of higher quality than aftermarket parts.
Our product descriptions are a combination of data sourced directly from the manufacturers who made your product as well as content researched and curated by our content & customer service teams. This content is edited and reviewed internally before being made public to customers.
Our customer service team are at the ready daily to answer your part and product questions. We have a dedicated staff with decades of collective experience in helping customers just like you purchase parts to repair their products.
All our part reviews are solicited directly from other customers who have purchased this exact part. While we moderate these reviews for profanity, offensive language or personally identifiable information, these reviews are posted exactly as submitted and no alterations are made by our team.
All our customer repair instructions are solicited directly from other customers just like you who have purchased and replaced this exact part. While we moderate these reviews for profanity, offensive language or personally identifiable information, these reviews are posted exactly as submitted and no alterations are made by our team.
Based on data from past customer purchasing behaviors, these parts are most commonly purchased together along with the part you are viewing. These parts may be necessary or helpful to replace to complete your current repair.
All our installation videos are created and produced in collaboration with our in-house repair technician, Mark Sodja, who has helped millions of eReplacementParts customers over the last 13 years repair their products. Mark has years of experience in selling and repairing both commercial and residential products with a specialty in gas-powered equipment.
This data is collected from customers who submitted a repair instruction after replacing this exact part. Customers can rate how easy the repair was to complete and how long it took. We aggregate this data to provide a repair rating that allows customers to quickly determine the difficulty and time needed to perform their own repair.