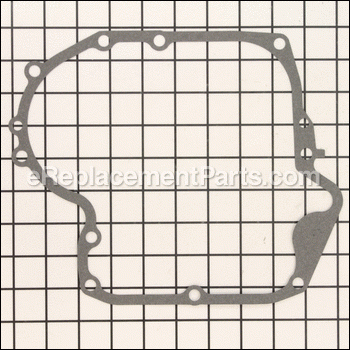
Genuine OEM replacement part used on a variety of Engines. This item is made with Composite Material and it is sold individually. Its purpose is to make an air tight seal so that no air/oil leakage occurs. Over time this gasket will deteriorate and will need to be replaced. The gasket measures .015 Thick.
Gasket-crkcse/015 697110
OEM part for: Briggs and Stratton, Toro, Lawn Boy
Part Number: 697110
Jump To:
Frequently Purchased Together ?
Compatibility
This part will fit the following 3021 machines
Toro
Lawn Boy
Briggs and Stratton
This item works with the following types of products:
- Lawn Tractor Parts
- Engine Parts
Customer Part Reviews ?
- 1
- 2
Questions & Answers ?
Our customer Service team is at the ready daily to answer your part and product questions.

Ask our Team
We have a dedicated staff with decades of collective experience in helping customers just like you purchase parts to repair their products.
Does this fit my product?Questions & Answers for Gasket-crkcse/015
Customer Repair Instructions ?
All our customer repair instructions are solicited directly from other customers just like you who have purchased and replaced this exact part.
Hard to start
Tool Type
Lawn Mower
Difficulty
Medium
Time
More than 2 hours
Tools Used
Screwdriver, Pliers, Socket set, Wrench Set, Nutdriver, Adjustable Wrench, allen wrench
Broken Connection Road in Briggs & Stratton 20hp Intek Craftsman Lawn Tractor Mower engine
Tool Type
Lawn Tractor
Difficulty
Medium
Time
30-60 minutes
Tools Used
Power Drill, Socket set, Wrench Set, Nutdriver
Disconnect Starter and Electrical Wire.
Remove Engine shroud.
Remove Intake manifold w/carb. Remove muffler.
Lower mower deck and unbolt mower transmission and blade pulley from crankshaft.
Unbolt and remove Engine from lawn tractor chassis.
Drain Oil.
Unbolt and remove cylinder head & remove push rods.
Unbolt and remove bottom crankcase cover.
Remove cam shaft.
Remove broken Connection Rod (note connection rod orientation on crankshaft, it will only work one way).
Push Piston up and out the cylinder.
Inspect engine case, crankshaft, piston and cylinder for any damage or scoring.
Remove retainer clip from connection rod piston pin and press out pin far enough to remove old connection rod and attach new one. Push connection rod pin back into place and replace retainer pin clip.
Check piston rings for any damage and replace if necessary.
Hone piston cylinder.
Using a piston ring compressor tool, compress piston rings on piston.
Lubricate piston cylinder. (I use Lucas Assembly Lube but regular oil will work) and slide piston back into the cylinder making sure the connection rod is orientate correctly.
Lubricate crankshaft with oil and attached connection rod. Torque to required specs.
Reinstall camshaft making sure to align timing mark on camshaft and crankshaft.
Remove and clean engine block and cover of ALL old gasket material.
Remove oil pump cover on the crankcase cover and remove oil pump gear and drive pin.
Place new crankcase gasket on engine block and replace crankcase cover. Torque to specs.
Align oil pump drive shaft with camshaft slot, replace gear and replace oil pump cover.
Remove and clean cylinder and cylinder head of ALL old head gasket material.
Place new cylinder head gasket on engine block, replace cylinder head and Torque to specs.
Remove OHV cover.
Loosen rocker arms until you are able to replace push rods.
Rotate engine until engine timing is at TDC. Adjust rocker arms to correct gap setting between rocker arm and valve.
Replace engine to lawn tractor (reverse of removal procedure).
ADD NEW OIL.
When you start using tractor again, do NOT run under full load for the first 5 to 10 hours. Change oil and filter (if equipped) after 10 hours.
head gasket blew out but decided to do a complete rebuild
Tool Type
Lawn Tractor
Difficulty
Medium
Time
More than 2 hours
Tools Used
Screwdriver, Socket set, Wrench Set, Nutdriver, ring expander, cylinder hone, ring compressor, torque wrench
Blown Head Gasket and bad compression rings
Tool Type
Lawn Tractor
Difficulty
Medium
Time
1-2 hours
Tools Used
Screwdriver, Socket set, Wrench Set, None
Oil leak
Tool Type
Lawn Mower
Difficulty
Medium
Time
1-2 hours
Tools Used
Pliers, Socket set, Wrench Set
Parts Used
Unhooked wiring and fuel line.
Removed muffler.
Removed pto clutch.
Removed transmission drive pulley.
Removed engine mounting bolts.
Removed engine.
Removed engine sump pan.
Cleaned old material from sump.
Installed new gasket
Installed and torqued sump.
Installed oil pump with new o-ring.
Reinstalled engine.
Reinstalled engine mounting bolts.
Reinstalled transmission drive pulley.
Reinstalled pto clutch.
Reinstalled muffler.
Hooked wiring and fuel line back up.
Reinstalled throttle cable.
Filled engine with oil.
Leaked oil
Tool Type
Lawn Tractor
Difficulty
Medium
Time
1-2 hours
Tools Used
Socket set, Wrench Set, Item to drive the oil seal in to place.
Parts Used
connecting rod went bad
Tool Type
Lawn Tractor
Difficulty
Easy
Time
More than 2 hours
Tools Used
Screwdriver, Pliers, Power Drill, Socket set, Wrench Set, Nutdriver, Adjustable Wrench, torque wrench-ring compressor-feeler gauge
Engine smoking
Tool Type
Lawn Tractor
Difficulty
Expert
Time
More than 2 hours
Tools Used
Screwdriver, Pliers, Socket set, Wrench Set, Nutdriver, valve spring compressor
Intake push rod bent
Tool Type
Lawn Tractor
Difficulty
Medium
Time
1-2 hours
Tools Used
Screwdriver, Socket set, Wrench Set, Nutdriver, Feeler gage, spark plug gap tool
It was pretty simple after I determined that my problem was the push rods. I removed the bent rod installed the new one I purchased from eReplacementParts.com. Adjusted the valves(You can find several youtube videos to guide you through this procedure). The engine started right up and I mowed about two hours with it this weekend.
I wish I could tell you why the push rod bent, but I can't. If anyone has an explnation I would love to here it.
Mower blades destroyed by rocks in the yard.
Tool Type
Lawn Tractor
Difficulty
Hard
Time
More than 2 hours
Tools Used
Screwdriver, Pliers, Socket set, Wrench Set, Nutdriver, Adjustable Wrench
Replacing the cam shaft was easy (after watching a youtube video) for tips on how to remove and re-install the sump pump shaft.
OEM stands for Original Equipment Manufacturer and means the part you’re buying is sourced directly from the manufacturer who made your product. At eReplacementParts, we sell only genuine OEM parts, guaranteeing the part you’re purchasing is of better design and of higher quality than aftermarket parts.
Our product descriptions are a combination of data sourced directly from the manufacturers who made your product as well as content researched and curated by our content & customer service teams. This content is edited and reviewed internally before being made public to customers.
Our customer service team are at the ready daily to answer your part and product questions. We have a dedicated staff with decades of collective experience in helping customers just like you purchase parts to repair their products.
All our part reviews are solicited directly from other customers who have purchased this exact part. While we moderate these reviews for profanity, offensive language or personally identifiable information, these reviews are posted exactly as submitted and no alterations are made by our team.
All our customer repair instructions are solicited directly from other customers just like you who have purchased and replaced this exact part. While we moderate these reviews for profanity, offensive language or personally identifiable information, these reviews are posted exactly as submitted and no alterations are made by our team.
Based on data from past customer purchasing behaviors, these parts are most commonly purchased together along with the part you are viewing. These parts may be necessary or helpful to replace to complete your current repair.
All our installation videos are created and produced in collaboration with our in-house repair technician, Mark Sodja, who has helped millions of eReplacementParts customers over the last 13 years repair their products. Mark has years of experience in selling and repairing both commercial and residential products with a specialty in gas-powered equipment.
This data is collected from customers who submitted a repair instruction after replacing this exact part. Customers can rate how easy the repair was to complete and how long it took. We aggregate this data to provide a repair rating that allows customers to quickly determine the difficulty and time needed to perform their own repair.

