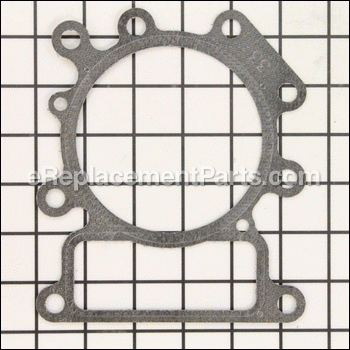
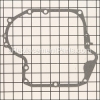
Gasket-cylinder Head 794114
Part Number: 794114
Order within the next 11 hours
and your part ships today!
and your part ships today!
*This part replaces obsolete part #: 699168.
Product Information
Description:
| This item is a genuine Briggs & Stratton replacement part that has been sourced from the original manufacturer to be used with small engines. The gasket is used to seal the connection between the cylinder and the head. This item is available as an individual replacement part. |
Frequently Purchased With
Compatibility
the 150+ compatible machines
This part is compatible with the following machines:
Briggs and Stratton
31F707-0112-E1 Engine
31F707-0112-E2 Engine
31F707-0112-E3 Engine
31F707-0114-E1 Engine
31F707-0129-E1 Engine
31F707-0129-E2 Engine
31F707-0130-E1 Engine
31F707-0132-E1 Engine
31F707-0132-E2 Engine
31F775-0116-E1 Engine
31F777-0110-E1 Engine
31F777-0111-E1 Engine
31F777-0113-E1 Engine
31F777-0115-E1 Engine
31F777-0123-E1 Engine
31F777-0124-E1 Engine
31F777-0125-E1 Engine
31F777-0126-E1 Engine
31F777-0131-E1 Engine
31F777-0136-B1 Engine
31F777-0161-E1 Engine
31F777-0162-E1 Engine
31F777-0284-E1 Engine
31F777-0317-E1 Engine
31F777-0318-E1 Engine
31F777-0403-E1 Engine
31M777-0101-E1 Engine
31M777-0111-E1 Engine
31M777-0112-E1 Engine
31M777-0167-E1 Engine
31M777-0215-E1 Engine
31M777-0234-E1 Engine
31M777-0234-E2 Engine
31M777-0237-E2 Engine
33M677-0110-G5 Engine
33M677-0117-G1 Engine
33M677-0121-B1 Engine
33M677-0122-B1 Engine
33M677-0123-G1 Engine
33M677-0124-B1 Engine
33M677-0149-B1 Engine
33M677-0151-B1 Engine
33M677-1398-B1 Engine
33M677-1494-B1 Engine
33M677-1594-G5 Engine
33M677-2124-G5 Engine
33M677-2494-G5 Engine
33M777-0036-G1 Engine
33M777-0111-B1 Engine
33M777-0111-E1 Engine
33M777-0112-B1 Engine
33M777-0114-B1 Engine
33M777-0116-G1 Engine
33M777-0117-B1 Engine
33M777-0118-G1 Engine
33M777-0119-B1 Engine
33M777-0120-B1 Engine
33M777-0121-B1 Engine
33M777-0123-B1 Engine
33M777-0124-B1 Engine
33M777-0125-B1 Engine
33M777-0126-G5 Engine
33M777-1400-B1 Engine
33M777-1495-B1 Engine
33M777-1506-B1 Engine
33M777-1583-B1 Engine
33M777-2116-G5 Engine
33M777-2117-G1 Engine
33M777-2117-G5 Engine
33M777-2401-G5 Engine
33M777-2495-G5 Engine
33M777-3036-G5 Engine
33M777-4583-G5 Engine
33M977-0001-G1 Engine
33M977-0002-G5 Engine
33M977-0003-G5 Engine
33M977-0004-G5 Engine
33M977-0005-G5 Engine
33M977-0006-G1 Engine
33M977-0007-G1 Engine
33M977-0008-G1 Engine
33M977-0009-G1 Engine
331707-0115-B1 Engine
331707-0115-G1 Engine
331777-0119-B1 Engine
331777-0546-B1 Engine
331777-0546-E1 Engine
331777-0815-B1 Engine
331777-0819-B1 Engine
331777-0896-B1 Engine
331777-0901-B1 Engine
331777-0946-B1 Engine
331777-0946-B2 Engine
331777-0946-B4 Engine
331777-0946-G1 Engine
331777-0956-B1 Engine
331777-1107-B1 Engine
331777-1192-B1 Engine
331777-1372-B1 Engine
331777-1372-B2 Engine
331777-1372-G1 Engine
331777-1372-G2 Engine
331777-1457-G1 Engine
331777-1523-B1 Engine
331777-1523-G5 Engine
331777-1557-G1 Engine
331777-1557-G5 Engine
331777-1558-G1 Engine
331777-1558-G5 Engine
331777-2372-G1 Engine
331777-2372-G5 Engine
331777-2457-G5 Engine
331777-4372-G5 Engine
331977-0001-G1 Engine
331977-0100-B1 Engine
331977-0101-B1 Engine
331977-0102-G5 Engine
331977-0102-G6 Engine
331977-0103-B1 Engine
331977-0103-B2 Engine
331807-0026-G1 Engine
331807-0116-B1 Engine
331807-3026-G5 Engine
331877-0036-E1 Engine
331877-0036-G1 Engine
331877-0110-G5 Engine
331877-0113-B1 Engine
331877-0113-B2 Engine
331877-0114-G1 Engine
331877-0114-G2 Engine
331877-0115-B1 Engine
331877-0117-G1 Engine
331877-0118-G1 Engine
331877-0119-B1 Engine
331877-0120-B1 Engine
331877-0141-G1 Engine
331877-0141-G2 Engine
331877-0142-B1 Engine
331877-0142-B2 Engine
331877-0143-G1 Engine
331877-0143-G2 Engine
331877-0144-B1 Engine
331877-0145-B1 Engine
331877-0146-B1 Engine
331877-0146-B2 Engine
331877-0147-B1 Engine
331877-0148-B1 Engine
331877-0149-G5 Engine
331877-0151-G5 Engine
331877-0238-G1 Engine
Products Compatibility
This item works with the following types of products:
- • Engine
Questions & Answers for Gasket-cylinder Head
what is the torque put on a new gasket cylinder head 794114
james
asked on 2022-08-31
Hi James,
Thank you for your question. Use 20 foot pounds on the cylinder head. If you have any questions, please let us know. We are open 7 days a week. We look forward to hearing from you!
eReplacementParts Team August 31, 2022
Repair Instructions: Submitted by Customers Like You
3 of 3 people found this instruction helpful
Tool Type:
Lawn Tractor
Parts Used:
Repair Difficulty:
Medium
Time Spent Repairing:
More than 2 hours
Tools Used:
Screwdriver, Socket set, Wrench Set, Torque wrench
Blown head gasket.
Removed the head and cleaned the surface. Removed the pan gasket and cleaned the surface. Torqued head and reset the push rods to specs. Replaced shear key and reset the magneto gap.
Did you find this story helpful?
Thanks for voting and helping fellow customers!
2 of 2 people found this instruction helpful
Tool Type:
Lawn Mower
Parts Used:
Repair Difficulty:
Medium
Time Spent Repairing:
More than 2 hours
Tools Used:
Socket set, Wrench Set, Torque wrench, feeler gauges
Carbon build up in combustion chamber.
1. Remove overhead valve cover.
2. Remove push rods.
3. Remove old spark plug.
4. Remove intake and exhaust manifolds.
5. Remove engine head bolts and head.
Used solvent to clean carbon (baked in coke) from head, valves, piston head and exhaust port. Cleaned gasket surfaces and installed head, push rods, intake and exhaust manifolds. Checked valve clearances and installed valve rocker cover with gasket and sealant. This was a 21 hp B&S Intek engine. This must be done every 2 to 3 grass cutting seasons (book says every 300 hours) to keep these engines from burning oil and for them to run smoothly.
Did you find this story helpful?
Thanks for voting and helping fellow customers!
1 of 1 people found this instruction helpful
Tool Type:
Lawn Tractor
Parts Used:
Repair Difficulty:
Medium
Time Spent Repairing:
30-60 minutes
Tools Used:
Socket set, Wrench Set
Head gasket was blown.
Disassembled the top of the engine and removed the head. Replaced the gasket and reassembled. Works great now!
Did you find this story helpful?
Thanks for voting and helping fellow customers!
1 of 1 people found this instruction helpful
Tool Type:
Lawn Tractor
Repair Difficulty:
Medium
Time Spent Repairing:
More than 2 hours
Tools Used:
Screwdriver, Socket set, Nutdriver, Torque wrench
Blown head gasket
1. Disassembled engine cover components.
2. Removed head.
3. Replace head defective head gasket.
4. Cleaned components.
5. Installed new head gasket.
6. Re-assembled engine and torqued head bolts.
7. Started and tested engine, good repair!
2. Removed head.
3. Replace head defective head gasket.
4. Cleaned components.
5. Installed new head gasket.
6. Re-assembled engine and torqued head bolts.
7. Started and tested engine, good repair!
Did you find this story helpful?
Thanks for voting and helping fellow customers!
Tool Type:
Lawn Tractor
Repair Difficulty:
Medium
Time Spent Repairing:
More than 2 hours
Tools Used:
Screwdriver, Socket set, Wrench Set, Nutdriver, ring expander, cylinder hone, ring compressor, torque wrench
head gasket blew out but decided to do a complete rebuild
I removed the engine from lawn tractor and disassembled and inspected and cleaned and organized parts. I honed the cylinder lightly because it was still in great condition, but I felt it needed that for the new ring set. The old rings were fine, but the engine is 14 years old so while I had it apart, I felt that was best. Everything went back together as expected and the engine runs really well. the only thing that is noteworthy was torquing the bolts and being very careful putting the sump on, so you don't damage the crank seal.
Did you find this story helpful?
Thanks for voting and helping fellow customers!
Tool Type:
Lawn Mower
Parts Used:
Repair Difficulty:
Medium
Time Spent Repairing:
More than 2 hours
Tools Used:
Socket set, Wrench Set, Nutdriver, Inch-pound torque wrench
Blown head gasket
1. Removed engine compartment hood.
2. Removed the 4 screws attaching the top engine air flow housing.
3. Removed 4 valve cover bolts.
4. Removed exhaust pipe and intake manifold from cylinder head.
5. Removed all cylinder head bolts.
6. Removed the cylinder head and push rods.
7. Removed the old head gasket
8. Carefully clean the head and valve cover gasket surfaces. Use a brass wire wheel in a drill.
9. Wipe head and valve cover matting surfaces with lacquer thinner to remove all oil.
Install the head gasket and slip on the head, adding 2 bolts to support it while you reinstall the push rods. Make sure the aluminum rod is on the intake valve. Make sure the metal caps are still on the top of each valve stem.
10. Snug head bolts then vhf torque to 20 foot pounds. Alternate bolt tightening.
11. Check intake and exhaust valve clearances.
12. Install all other gaskets and valve cover, exhaust pipe, and intake manifold.
13. Reinstall the air shroud.
14. 1einstall the hood.
15. Drain old oil add new. Change oil filter.
Did you find this story helpful?
Thanks for voting and helping fellow customers!
Tool Type:
Lawn Tractor
Parts Used:
Repair Difficulty:
Easy
Time Spent Repairing:
More than 2 hours
Tools Used:
Screwdriver, Pliers, Power Drill, Socket set, Wrench Set, Nutdriver, Adjustable Wrench, torque wrench-ring compressor-feeler gauge
connecting rod went bad
completely disassembled engine except for crank and flywheel and reassembled using new parts and gaskets I also reseated the valves while the head was off
Did you find this story helpful?
Thanks for voting and helping fellow customers!
Tool Type:
Engine
Parts Used:
Repair Difficulty:
Medium
Time Spent Repairing:
30-60 minutes
Tools Used:
Screwdriver, Pliers, Socket set, Adjustable Wrench
head gasket
removed head, installed gasket, re-installed, done
Did you find this story helpful?
Thanks for voting and helping fellow customers!
Tool Type:
Lawn Mower
Repair Difficulty:
Medium
Time Spent Repairing:
More than 2 hours
Tools Used:
Screwdriver, Pliers, Socket set, Wrench Set, Nutdriver, Adjustable Wrench
Lawnmower connecting rod broke due to low oil.
Remove and disassemble engine.
Remove broken rod and pieces and check for any other damage.
Refinish Crank journal with emery cloth.
Attach new rod to piston and install in engine.
Reassemble all components and use new gaskets where needed.
Remove broken rod and pieces and check for any other damage.
Refinish Crank journal with emery cloth.
Attach new rod to piston and install in engine.
Reassemble all components and use new gaskets where needed.
Did you find this story helpful?
Thanks for voting and helping fellow customers!
Tool Type:
Lawn Tractor
Parts Used:
Repair Difficulty:
Hard
Time Spent Repairing:
More than 2 hours
Tools Used:
Screwdriver, Socket set, Wrench Set, Nutdriver, gear puller, torque wrench
Engine was smoking under load
Replaced piston rings, replaced push rods and guide, cleaned and lapped valves, adjusted valves, and replaced carburetor. I did not put enough torque on the flywheel bolt and sheared off 2 keys before looking for information online and most information said to torque bolt to 120 ft. lbs. and then go a little further. Did this, problem was solved, and engine runs great.
Did you find this story helpful?
Thanks for voting and helping fellow customers!
show more
Reviews
5 Reviews
Average Rating (out of 5):
Click to filter by ratings:
5 stars
5
4 stars
0
3 stars
0
2 stars
0
1 stars
0
< PREV
- 1
Bornagain Tech
Received quality part. Was easy to order and I called to verify that this was the part I needed. The staff verified for me.
Guest -
April 27, 2023
Verified Purchase
Fixed it!
Head gasket was correct part and it fixed the blue smoke coming from my mower.
Guest -
October 13, 2021
Verified Purchase
part came quickly and was what i needed
head gasket for lawn tractor
Guest -
August 26, 2020
Verified Purchase
A big thanks to guys behind the counter
Been going to e replacement parts for many years. Love hove. They always have the parts I need
Randy -
March 16, 2020
Verified Purchase
Replacement gasket
Prompt delivery of correct gasket. My son installed it easily. No more oil burning.
Charles -
May 7, 2019
Verified Purchase
Verified Purchase
eReplacementParts Team
< PREV
- 1
Product Information

