


Why Read This Article?
Finish Nailer Repair - Replacing the Driver Guide (Ridgid Part # 79004001022)
Article Breakdown
Finish Nailer Repair - Replacing the Driver Guide (Ridgid Part # 79004001022)
Video

Tools & Materials
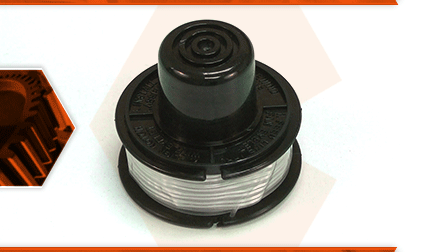
The spool holds the trimmer line, and when tapped to the ground, feeds out more line. The new spool comes with line already wrapped around it, so it is ready to use. The spool will wear over time from being tapped against the ground. You might also replace the spool simply so you don't need to wrap new trimmer line when it runs out.
Let's get started.
REMOVING THE SPOOL 1. Remove the bump cap.
a. Depress the two locking tabs on the sides of the bump cap.
b. Remove the bump cap from the trimmer head.
2. Remove the spool.
a. Pull the spool assembly away from the trimmer head.
INSTALLING THE NEW SPOOL
3. Install the spool.
a. Carefully remove the protective tape from the new spool.
b. Unwind approximately 6 inches of line from the new spool.
c. Secure the length of trimmer line in the lock-notch on the spool (to prevent the line from unraveling further).
d. Thread the trimmer line (from inside to outside) through the eyelet on the trimmer head assembly.
e. Install the spool assembly onto the trimmer head.
f. Pull the exposed trimmer line to disengage the line from the lock-notch on the spool.
REASSEMBLING THE UNIT
4. Reinstall the bump cap.
a. Position the bump cap over the spool.
b. Align the locking tabs on the bump cap with the slots on the hub.
c. Press firmly on the bump cap to engage the locking tabs.
