


Why Read This Article?
Finish Nailer Repair - Replacing the Driver Guide (Ridgid Part # 79004001022)
Article Breakdown
Finish Nailer Repair - Replacing the Driver Guide (Ridgid Part # 79004001022)
Video

Tools & Materials
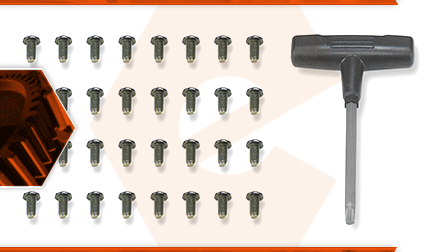
The knives in your planer are secured with blade holders and a series of screws. The screws pass through the blade holders into the cutter head. The screw set consists of 24 blade screws and the wrench to install them. Over time, the screw heads can be stripped out, either from repeated removal, or a screw that is stuck in the cutter head (due to corrosion). Removing a screw with a stripped head can be challenging, so it is a good idea to replace a screw at the first sign the head is wearing.
Let's get started.
REMOVING THE BLADE SCREWS 1. Remove the top cover.
a. Remove the (4) screws securing the top cover.
b. Lift the top cover away from the planer.
2. Remove the dust shroud.
a. Remove the (3) red thumb-bolts securing the dust shroud to the planer.
b. Lift the dust shroud slightly (within the housing).
c. Disengage the dust shroud from the fan housing.
d. Remove the dust shroud from the planer.
3. Remove the blade screw set.
a. Use a Torx driver (or the wrench supplied with the planer) to remove the (8) screws securing the first blade holder to the cutter head.
INSTALLING THE BLADE SCREW SET
4. Install the blade screw set.
a. Verify that the blade holder and blade are aligned with the cutter head.
b. Thread two of the new blade screws into the cutter head (one at each end of the blade holder).
c. Install the remaining (6) new screws into the cutter head.
d. Tighten all of the new blade screws to secure the blade holder and blade to the cutter head.
5. Rotate the cutter head. (And Repeat.)
a. Depress the cutter head lock lever.
b. Use a wrench or screwdriver to carefully rotate the cutter head until the second blade holder (and screwset) is accessible.
c. Release the cutter head lock lever and verify that the cutter head is locked in position.
d. Repeat these steps to remove and install all of the screws included with the kit.
REASSEMBLING THE UNIT 6. Reinstall the dust shroud.
a. Install the dust shroud into the planer.
b. Align the "open" indicator on the dust shroud with the mark on the fan housing.
c. Press the dust shroud toward the fan housing to engage the two components.
d. Pivot the dust shroud down (toward the cutter head).
e. Secure the dust shroud with the (3) red thumb-bolts. 7. Reinstall the top cover.
a. Install the top cover onto the planer.
b. Secure the top cover with the (4) screws.
