


Why Read This Article?
Finish Nailer Repair - Replacing the Driver Guide (Ridgid Part # 79004001022)
Article Breakdown
Finish Nailer Repair - Replacing the Driver Guide (Ridgid Part # 79004001022)
Video
Tools & Materials
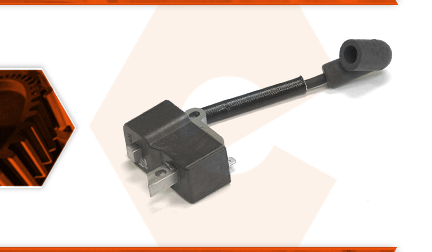
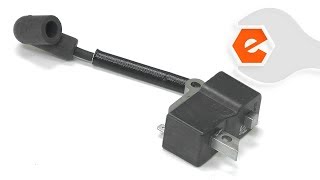
The ignition module works with the flywheel to produce the electric current needed for the spark plug. The flywheel has a couple of magnets mounted on it at specific locations. As the magnets pass by the ignition module, they induce an electric current within the ignition module's windings. This current is sent to the spark plug at the precise time it is needed to ignite the air-fuel mixture inside the cylinder.
Let's get started.
REMOVING THE IGNITION MODULE 1. Remove the air filter.
a. Loosen the knob securing the airbox cover.
b. Remove the airbox cover from the saw.
c. Pull the wire retaining bar down and away from the air filter.
d. Lift the air filter out of the saw.
2. Remove the starter assembly.
a. Remove the screws securing the starter to the saw.
b. Remove the starter assembly from the saw.
3. Remove the top cover.
a. Remove the screws securing the top cover to the saw.
b. Lift the top cover away from the saw.
4. Disconnect the spark plug.
a. Disconnect the spark plug boot from the spark plug.
5. Remove the flywheel cover.
a. Remove the flywheel cover from the saw.
6. Remove the ignition module.
a. Use long-nosed pliers to disconnect the wire connector from the top of the ignition module.
b. Remove the two screws securing the ignition module to the saw. (The upper screw also secures the second killswitch wire to the motor.)
c. Remove the ignition module.
INSTALLING THE NEW IGNITION MODULE
7. Install the ignition module.
a. An ignition gapping gauge is recommended to accurately complete this step. However, if you do not have an ignition gapping gauge (measuring #.014 or .35mm), it is generally acceptable to use one thick business card, or two thin business cards as substitutes.
b. Place the ignition gapping gauge over the magnets on the flywheel.
c. Align the new ignition module with the mounting holes on the motor and allow the contacts on the ignition module to engage the magnets on the flywheel.
d. Loosely install the two screws to hold the ignition module in place. The upper screw should also pass through the eyelet on the killswitch wire.
e. Press and hold the ignition module firmly against the flywheel (with the ignition gapping gauge positioned between the two components).
f. Tighten the two mounting screws.
g. Remove the ignition gapping gauge.
h. Reconnect the wire connector to the terminal on the top of the new ignition module.
REASSEMBLING THE UNIT
8. Reinstall the flywheel cover.
a. Install the flywheel cover over the flywheel (the cover should snap into place when properly aligned).
b. Route the wires from the ignition module through the slot on the flywheel cover.
9. Reconnect the spark plug.
a. Connect the spark plug boot to the spark plug.
10. Reinstall the starter assembly.
a. Install the starter assembly.
b. Pull the starter rope slightly (as necessary) to align the internal components.
c. Secure the starter assembly with the screws.
11. Reinstall the top cover.
a. Install the top cover.
b. Secure the top cover with the screws.
12. Reinstall the air filter.
a. Install the air filter into the airbox assembly.
b. Secure the air filter with the wire retainer.
13. Reinstall the airbox cover.
a. Install the airbox cover.
b. Tighten the knob to secure the airbox cover.
