


Why Read This Article?
Finish Nailer Repair - Replacing the Driver Guide (Ridgid Part # 79004001022)
Article Breakdown
Finish Nailer Repair - Replacing the Driver Guide (Ridgid Part # 79004001022)
Video

Tools & Materials
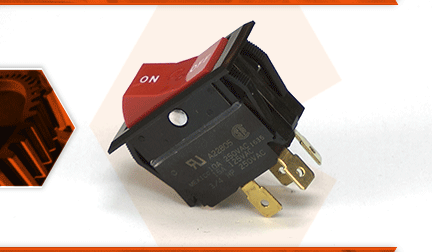
The rocker switch is used to turn the router on and off. After many years of use, the switch can wear out and no longer work. Sometimes, a worn switch will work intermittently before failing completely. Replacing a worn switch is a common repair that is necessary to maintain the router's longevity.
Let's get started.
REMOVING THE ROCKER SWITCH 1. Remove the top cap.
a. Remove the (4) screws securing the top cap.
b. Remove the top cap.
2. Remove the rocker switch.
a. Lift the rocker switch assembly out of the motor housing.
b. Note the location of the switch wires for re-installation.
c. Disconnect the four wires that attach to the bottom of the switch. (The wires contain terminals that slide over the switch's contacts. Use long-nosed pliers, as necessary, to disconnect the wires.)
3. Remove the plastic trim.
a. Use a small screwdriver to depress the tabs on the underside of the switch and carefully slide the plastic trim off the switch housing.
INSTALLING THE NEW ROCKER SWITCH
4. Install the plastic trim.
a. Install the plastic trim onto the new switch. (The side of the trim with the raised tab should face the "on" side of the rocker switch.)
5. Install the rocker switch.
a. Connect the wires to the new rocker switch (in the same position as the original wires).
b. Tuck the wire connectors (along with the switch wires) into the motor housing (before installing the rocker switch).
c. Install the rocker switch into the motor housing.
REASSEMBLING THE UNIT
6. Reinstall the speed control lever.
a. Install the speed control lever onto the motor housing (the notch on the lever fits over the tab on the speed control module).
7. Reinstall the top cap.
a. Install the top cap.
b. Secure the top cap with the (4) screws.
