

Planer: Motor Spins but the Cutter Head Doesn't
If the motor spins but the cutter head doesn't, check the belt, pulley, key, sprocket, chain, and gears. Save time and money and perform the repair yourself, with our help. Review our list of parts for instructions on how to locate the issue and fix it with ease. Refer to your owner's manual for detailed instructions on your model.

Belts
The belt is attached around the drive motor pulley and the cutter head pulley. If the belt is broken, or stretched, it will not be able to transfer power from the motor to the cutter head. When the belt is stretched, it will usually make a squealing sound.
To check the belt, remove the side cover. If the belt is broken, it will be noticeable right away and you will need to install a new one. If the belt is loose, and your model has a belt tensioner, try tightening the belt by pulling the tensioner back, then tightening the bolt. If the belt is stretch too far, replace it.
Install a new belt cover the pulley and adjust and tighten. For models that do not have a tensioner, replacing the belt can be very tricky as clearances are tight. Once you have maneuvered the belt into place, place it over the small pulley first, then use a screwdriver to pry it over the larger pulley. Place the tip of the screwdriver on the pulley nut, only for leverage to avoid damaging any parts. Once the belt is on the pulley a little way, you can continue to feed the belt on the pulley by walking it on. When the belt is on, reinstall the side cover. ... Read more
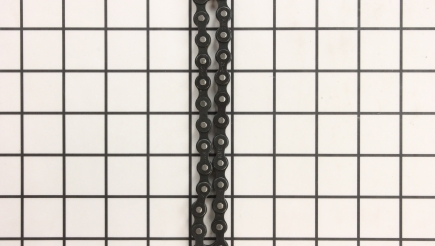
Chains
If your cutter head is driven by a chain, and the chain breaks, then the cutter head will not spin when the motor does. To check the condition of the chain, remove the side panel and gear box cover. If the chain is broken, remove it. Take out the retaining clips that supports the sprockets, followed by the sprockets. Insert the sprockets into the chain and then get them started on the shafts – one at a time, making sure to align the keyways. Then, slide all of the way back. Install the retaining clips, the gear box cover and side panel. ... Read more

Gears
The gear case is located behind the chain and sprockets and is driven by the cutter head shaft, driving the sprocket and chain assemblies for the feed rollers. If a tooth has broken off of a gear, and is lodged between another gear, or the housing has become warped, it can prevent the gears from turning and cause the cutter head to stop rotating as the two are matted together. To inspect the gear box, remove the side panel and gear box cover. Remove the clips holding the sprockets and gear assemblies in place, followed by the chain and sprockets. Take out the gear box from the planer and inspect it for any damage. Spin the gears and examine very carefully for breaks, cracks, chips and missing teeth. Check for roughness when spinning. Install a new gear box if you have determined it is the cause. Reinstall the chain and sprocket assemblies back onto the feed roller shafts and secure the retaining ring. Reinstall the gear box cover and side cover. ... Read more

Pulleys
The pulleys are located on the motors shaft and another located on the cutter head shaft. They are attached by a belt. If one of these pulleys wear out, or break, they will not be able to transfer power. To check the condition of the pulleys, remove the side cover. Then, remove the belt. There may be a tensioner to release, or models without a belt tensioner, you will have to pry and walk the belt off. Wiggle and spin the pulleys to check for anything abnormal that will cause the pulley to malfunction as replace as needed.
Remove the nut securing the pulley onto the shaft and replace the pulley. Some pulleys may be attached by a set screw. Remove this screw to take off the pulley and the keyway. Install a new pulley with the keyway. Some pulleys are pressed on, therefore you may need to heat it up and use a puller to remove. Then, heat up the new pulley and tap it in place on the shaft. Reinstall the belt and adjust the tensioner and tighten. For models without a tensioner, start the belt on the smaller pulley first and use a screwdriver to pry it over the larger pulley. You can place the end of the screwdriver on the pulleys nut for leverage only. Once it is on a little way, you can walk it on the rest of the way by turning the pulley and pushing the belt on. Reinstall the side cover. ... Read more
Remove the nut securing the pulley onto the shaft and replace the pulley. Some pulleys may be attached by a set screw. Remove this screw to take off the pulley and the keyway. Install a new pulley with the keyway. Some pulleys are pressed on, therefore you may need to heat it up and use a puller to remove. Then, heat up the new pulley and tap it in place on the shaft. Reinstall the belt and adjust the tensioner and tighten. For models without a tensioner, start the belt on the smaller pulley first and use a screwdriver to pry it over the larger pulley. You can place the end of the screwdriver on the pulleys nut for leverage only. Once it is on a little way, you can walk it on the rest of the way by turning the pulley and pushing the belt on. Reinstall the side cover. ... Read more

Keys
Keyways lock shafts together with pulleys and sprockets for rotational movement. If a keyway breaks, there will be no rotational movement and therefore a new keyway will need to be install. Remove the side cover and gear box cover. Examine the pulleys and sprockets for broken or missing keyways. A lot of sprockets are machined with the keyway as part of the sprocket.
To replace one that is broken, remove the retaining rings holding the sprockets on, followed by the chain and sprockets assembly. Install the new sprocket into the chain and reassemble onto the shafts and reinstall the retaining rings. For pulleys, remove the belt – some models will have a tensioner you can loosen to remove the belt. Models without a tensioner, you will have to pry the belt off the pulleys and then walk it off. Remove the but, or set screw, holding the pulley on. Install a new keyway and reinstall the pulley. Reinstall the belt. For models without a tensioner, start the belt on the smaller pulley first and then use a screwdriver to pry it over the larger pulley. Place the tip of the screwdriver on the pulley nut only to avoid damaging the planer. Once the belt is back on, reinstall the gear box cover and side covers. ... Read more
To replace one that is broken, remove the retaining rings holding the sprockets on, followed by the chain and sprockets assembly. Install the new sprocket into the chain and reassemble onto the shafts and reinstall the retaining rings. For pulleys, remove the belt – some models will have a tensioner you can loosen to remove the belt. Models without a tensioner, you will have to pry the belt off the pulleys and then walk it off. Remove the but, or set screw, holding the pulley on. Install a new keyway and reinstall the pulley. Reinstall the belt. For models without a tensioner, start the belt on the smaller pulley first and then use a screwdriver to pry it over the larger pulley. Place the tip of the screwdriver on the pulley nut only to avoid damaging the planer. Once the belt is back on, reinstall the gear box cover and side covers. ... Read more
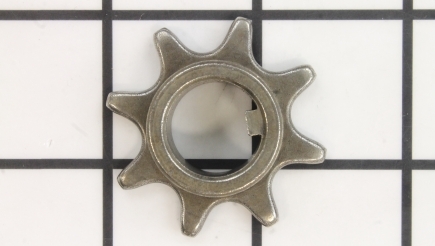
Sprockets
Some models will use a chain and sprockets to drive everything, instead of having a belt drive the cutter head separately. To examine the sprockets, remove the side cover and gear box cover. Examine the sprockets for any reason as to why they cannot transfer power. You’re looking for signs, such as broken teeth or a broken key, if the key is part of the sprocket. To replace broken sprockets, remove the retaining rings holding the sprockets onto the shafts and remove the sprockets and chain together. Install the new sprocket into the chain and reposition the sprocket and chain onto the shafts, aligning the keyways. Reinstall the retaining rings to hold the sprockets on the shafts. Reinstall the gear box cover and side cover. ... Read more