

Miter Saw: Won't Turn on
If your miter saw won't turn on, this doesn't mean it is the end of it's life. Check the switch, carbon brushes, button, armature, field, and power cord. Our guide has been created by experts to provide step by step solutions to repairing your miter saw and getting it back up and running in no time.

Armatures
An inoperative armature can be the culprit to an electric motor not powering up. To inspect the armature, remove the end cap to the motor, slide the tension springs over and pull the brushes out. Remove the belt cover and walk the belt off of the pulleys. Some models will have screws securing a sliding bracket in place – loosen these screws only. Loosen the belt tensioning screw at the back.
Remove the belt, followed by the dust bag bracket. Detach the armature housing from the saw and tap on the end with a rubber mallet, or brass hammer, to free the lower armature bearing from the housing. Do not use a regular hammer as this will cause damage to the armature.
Clean the armature only with electrical contact cleaner and wipe dry. If you notice any burn marks at this time, this is an indicator of excessive sparking, which can lead to overheating and cause the armature to burn out. Look for melted insulation on the windings as well. Any of these signs, replace the armature.
There are three tests you can use, when checking an armature. The first is a continuity test. With the armature removed from the unit, stand it up on a bench. Attach one end of the ohmmeter to the shaft, for ground, and the other to the bar on the commutator. Move the probe to each bar on the commutator, checking all the bars. If the ohmmeter shows a reading on one of the bars, this will indicate a short and a bad armature.
The second test is a bar-to-bar test, to determine resistance. Attach one probe to a bar on the commutator and the other probe on the bar right beside it. There will be a specific reading for this, depending on the design of the armature. But, most importantly, you do not want a large fluctuation here between values, indicating fault. If there is an increase in resistance, this will indicate there is a broken, or burned out, wire in the coil. If the resistance drops, then there is a short. Move around the commutator, checking each bar.
The third test is the 180-degree test. Attach the two ends of the ohmmeter on the commutator bars, directly across from each other. There will be a specific set of readings for this, depending on the design of your unit. Once again, what is most important is that there is not a large fluctuation in values, which would indicate a fault. If there is an increase in resistance, that would indicate a broken or burnt wire. If the resistance drops, that would indicate that there is a short. Continue this test on all the bars. If the armature fails any of these tests, it is recommended that you replace it.
Install the armature into the armature housing and tap it in place to seat the lower bearing. Make sure you tap on the pulley screw and not the armature, to avoid damage. Reattach the motor housing to the saw. Reattach the dust bag bracket and reinstall the belt and the belt cover.
If your models allows you to adjust tension on the belt, do not over tighten as this can damage the bearings. Reinsert the carbon brushes and reassemble the motor end cap. ... Read more

Buttons
Some models have a safety button that needs to be installed in order to activate the power switch for the miter saw to turn on. If this safety button was missing, damaged or not inserted completely, the miter saw will remain off. Install a new safety switch and it will solve the problem.
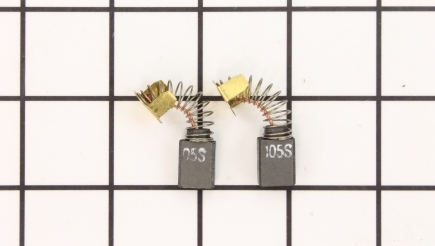
Carbon Brushes
The carbon brushes ride on the commutator, supplying power to the armature. Since the carbon brushes are in constant contact, they will wear down over time. When worn bad enough, or completely worn down, they cannot deliver electricity to the commutator, causing the motor to remain off. You will have to inspect the brushes for their condition. Remove the motor end cap and slide the tension spring off of the brushes. Remove the brushes and inspect. If they are 1/8 of an inch, or less, then replace them immediately and always in pairs. If they have abnormal wear, replace them as well. Install the new brushes and reapply the tension springs. Reinstall the motor end cap. Some models will have caps on the side of the motor for easy access to the carbon brushes. These can easily be removed with a screwdriver. ... Read more

Fields
A burned out field will conduct electricity. To access the field to check the condition/perform tests, remove the end cap to the motor and slide the tension springs to the side. Remove the carbon brushes from the commutator. Remove the belt cover and walk the belt off the pulley. Some models will have screws holding a sliding bracket in place – loosen these screws only. Loosen the belt tensioning screw at the back and remove the belt. Remove the dust bag bracket and the armature housing from the saw. Remove the screws securing the field in the housing.
Take a photo of the electrical connections for easier reassemble purposes. Once you have your photo, disconnect all electrical connections and remove the field from the housing. Clean the field only with electrical contact cleaner, wipe clean and inspect the field for burn marks, melted insulation or anything else out of the ordinary. If you notice any of these conditions, replace the field.
You can verify the conditions of the field with a multimeter, if it looks good, to verify its continuity. Set the multimeter to an ohmmeter and place a lead on each end of the coil in the field. You will have to perform this test for each coil in the field. If the reading is infinity for one, or more, of the coils, then the field is bad and requires replacement. If there is a major variance between the coils, then the field needs to be replaced.
To install a new field, connect the wires connections – referencing your photo. Install into the housing and secure it in place. Reinstall the armature assembly to the miter saw and tighten the screws. Reinstall the brushes, the motor end cap and the dust bag bracket. Reinstall the belt and reapply the tension. Reinstall the belt cover. If your model allows you to adjust the belt tension, do not over tighten as this will damage the bearings. ... Read more

Power Cords
The power cord delivers electricity to the miter saw. If the miter saw has no power, first examine the cord to make sure it is receiving power. Look for any cracks, splits, frays or anything else out of the ordinary. A damaged cord can also be a safety issue. If you notice any damage to the cord, replace it.
Remove the string relief on the power cord and then any cord clips, securing the cord to the miter saw. Remove the upper handle, followed by the top portion of the handle where the switch is located. Remove the switch from the handle and detach the wires from the power cord at the switch. Detach the other wire from the power cord at its connection point. Remove the power cord from the saw and install a new. If the new cord does not come already stripped at the ends, you will have to do it. Cut about 1/4 of an inch of insulation from the ends of the wires. If you miter saw requires crimped ends on the wire ends, crimp them into the wire.
Install the power cord back into the handle. Tuck all wires into their appropriate channels to avoid damaging the wires. Reinstall the top portion of the hand and the upper handle. Reinstall any cord clips and remove the slack in the cord before tightening. Reinstall the power cord’s string relief. ... Read more

Switches
The switch controls the flow of electricity to the motor, when activated. To access the switch, remove the top portion of the handle where the switch is located. Remove the switch from the handle and detach the wires from the switch. You can determine if the switch is bad by using a multimeter set to an ohmmeter. Attach each lead from the ohmmeter to each lead on the switch. With the switch in the ON position, the ohmmeter should give you a reading. In the OFF position, you should not receive a reading as the circuit is open. If it does not give you a reading in the ON position, the switch is defective. Install a new switch into the handle and reassembly the top portion of the handle. ... Read more