

Miter Saw: Motor Gets Hot
If the motor of your miter saw gets hot, this might be an indication that either the carbon brushes, bearings, armature, field or fan needs to be replaced. To help determine which part is causing the issue, check out our repair guide for tips on what to look for and how to fix it.

Armatures
If the armature is shorting out, it will produce more sparks and overheat. Also, if there is a heavy build up of dirt on the armature, this can also allow it to overheat.
To inspect the armature, remove the motor end caps and pull the brushes off of the commutator. Remove the belt cover and walk the belt off of the pulleys. Some models have screws securing a sliding bracket in place – loosen these screws only. Loosen the belt tensioning screw at the back and remove the belt. Remove the dust bag bracket and then detach the armature housing from the saw. Tap on the end of the armature to free it from the housing. Use a rubber mallet, or a brass hammer, so you do not damage the armature shaft when tapping it free. If the armature is really dirty, this could be the cause of your miter overheating.
Clean the armature only with electrical contact cleaner and wipe dry. Clean the fan on the armature as well as a clogged fan will not be able to cool down the motor. If the armature looks to be in good shape, you can reinstall it or you can test it to verify if it is in good working order. If you notice any burn marks at this time, this is an indicator of excessive sparking, which can also lead to overheating.
There are three tests to use when checking an armature. The first is a continuity test. With the armature removed from the unit, stand it up on a bench. Attach one end of the ohmmeter to the shaft, for ground, and the other to the bar on the commutator. Move the probe to each bar on the commutator, checking all the bars. If the ohmmeter shows a reading on one of the bars, this will indicate a short and a bad armature.
The second test is a bar-to-bar test, to determine the resistance. Attach one probe to the bar on the commutator and the other probe on the bar right beside it. There will be a specific reading for this, depending on the design of the armature. But, most importantly is that there is not a large fluctuation here between the values, which would indicate a fault. If there is an increase in resistance, this will indicate there is a broken or burnt out wire in the coil. If the resistance drops, there is a short. Move around the commutator, checking each bar.
The third test is the 180-degree test. Attach the two ends of the ohmmeter on the commutator bars directly across from each other. There will be a specific set of readings for this, depending on the design of your unit. Once again, what is most important is that there is not a large fluctuation in vales, which would indicate a fault. If there is an increase in resistance, that would indicate a broken or burnt wire. If the resistance drops, that would indicate that there is a short. Continue this test on all the bars. If the armature fails any of these tests, it is recommended that you replace it.
Install the armature into the armature housing and tap it in place to seat the lower bearing. Reattach the motor housing to the saw. Reattach the dust bag bracket and reinsert the carbon brushes. Reassemble the motor end cap. ... Read more
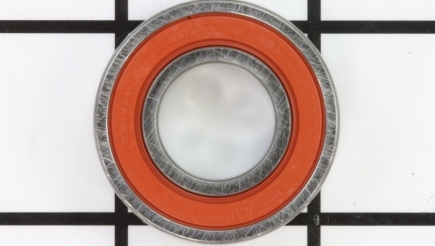
Bearings
A worn, or seized, bearing on the armature shaft will produce more friction and cause the motor to overheat. Bearings will make a gling, or grinding, noise when they are worn or seized.
To check the condition of the motor’s bearings, remove the end cap to the motor and take out the brushes. Remove the belt cover and walk the belt off of the pulleys. Some models will have a screw holding a sliding bracket in place – loosen these screws. Loosen the belt tensioning screw at the back and remove the belt. Remove the motor housing from the saw and using a rubber mallet, or a brass hammer, tap on the armature shaft on the opposite end to free the armature from the housing.
With the armature out of the housing, spin the bearings to see if they are seized or partially seized. When bearings overheat, they can also become discolored. When spinning a bearing, they should move freely and quietly. A seized bearing will not spin and partially-seized bearing will have some resistance, spin rough and make a noise.
To replace the lower bearing, you can use a bearing puller to remove it from the shaft. Then, install the new bearing and tap it in place with a hammer and socket that only makes contact with the bearings inner race to avoid damage.
To replace the upper bearing, remove the pulley screw and heat the pulley up to remove it from the shaft. Remove the keyway, with the pulley. The fan may be too close on some models to use a bearing or separator. In this situation, you will have to score the outer race of the bearing with a cut off wheel on both sides. Do not damage the fan as the fan is not sold separately – if you damage it, you will be required to replace the entire armature shaft. Once the outer race has been scored, place the bearing in a bench vice and tighten until the outer race breaks off and then use pliers to remove the cage and balls. Now, you can place the bearing separator under the inner race and use a bearing puller to remove the inner race.
Clean the shaft and install the new bearing by tapping it into place with a hammer and socket that only makes connect with the inner race of the bearing to avoid damage to the bearing. Heat the pulley back up and slide it back onto the shaft and install the keyway. Now, install the pulley screw. Slide the armature back into the motor housing and tap gently on the pulley screw to seat the lower bearing In place. Reattach the motor assembly to the miter saw and reattach the belt and belt cover. Reinstall the brushes and motor end cap. ... Read more
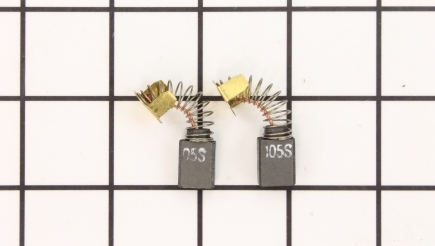
Carbon Brushes
Carbon brushes ride on the commutator, supplying power to the armature. Over time, the carbon brushes will wear out. When this happens, they will produce more sparks and dust, causing the motor to over heat. If you are noticing more sparks that normal, check the brushes. Remove the motor end cap and slide the tension spring off of the brushes. Remove the brushes and inspect. If they are 1/8 of an inch, or less, then replace them immediately and always in pairs. If they have abnormal wear, replace them as well. Install the new brushes and reapply the tension springs and then the motor end cap. Some models will have caps on the side of the motor for easy access to the carbon brushes – these can be easily removed with a screwdriver. ... Read more

Fans
The fan is mounted on the armature shaft and keeps the motor cool. If the fan has a heavy build-up of debris on it, it will impact the ability of the fan to keep the motor cool. Should the fan have any broken or missing fan blades, this also will impact the performance of the fan.
To check the condition of the fan and to make any repairs, remove the end cap to the motor and take out the carbon brushes. Remove the belt cover and walk the belt off the pulleys. Some models have screws holding a sliding bracket – loosen these screws. Loosen the belt tensioning screw at the back and take out the belt. Remove the dust bag bracket and then the armature housing from the saw. Tap on the end of the armature with a rubber mallet, or brass hammer, to free it from the housing.
Inspect the fan – if it is dirty, just clean and reinstall it. If the fan has broken fan blades, or some are missing, it will need to be replaced to keep the motor cool.
On some models, the fan is not sold separately, therefore you will have to replace the armature assembly. If the fan is sold separately for your model, remove the pulley screw and then the pulley by heating it up. Remove the keyway. Use a bearing separator, or puller, to remove the bearing.
On some models, you may have to score each side of the bearing with a cut off wheel and then break the bearing by inserting it into a bench vice and tightening it until it breaks off. Next, you will need to remove the cage and balls with pliers. Then, you can remove the inner race with a separator and puller. Take out the retaining ring and pull the fan off of the armature shaft. Install the new fan.
Reinstall the retaining ring and reinstall the bearing using a socket that only makes contact with the inner bearing of the race, to avoid damage. Heat the pulley back up and reinstall onto the shaft with the keyway. Reinstall the pulley screw and then slide the armature back into the housing. Tap on the pulley screw to seat the lower bearing into the housing. Do not tap on the armature shaft as this will damage it. Reattach the armature housing to the saw and install the belt and cover. Reinstall the dust bracket, the carbon brushes and motor cap. ... Read more

Fields
If the field is shorting out, or is covered in a heavy build-up of dust and debris, it can cause the motor to overheat. To inspect, clean and test the field, remove the end cap to the motor and remove the carbon brushes from the commutator. Remove the belt cover and walk it off the pulleys. Some models will have screws holding a sliding bracket in place – loosen these screws. Loosen the belt tensioning screw at the back and remove the belt. Remove the dust bag bracket and then the armature housing from the saw. Take out the screws securing the field in the housing.
At this point, take a photo of the electrical connections for easier reassembly purposes. Once you have your photo, disconnect all electrical connections and remove the field from the housing.
Clean the field only with electrical contact cleaner, wipe clean and inspect the field for burn marks, insulation melting or anything else out of the ordinary. If there are burn marks on the field or the insulation on the windings is melted, then replace the field.
You can also verify the condition of the field with a multimeter, if it looks good to verify its continuity. Set the multimeter to the ohmmeter and place a lead on each end of the coil in the field. You will have to perform this test for each coil in the field. If the reading is infinity for one, or more, of the coils, then the field is bad and requires replacement. If there a major variance between the coils, then the field needs to be replaced.
To install a new field, connect the wire connections referring to your photo. Install into the housing and secure it in place. Install the armature assembly to the miter saw and tighten the screws. Reinstall the brushes, the motor end cap and the dust bag bracket. Reinstall the belt and reply the tension. Reinstall the belt cover. ... Read more