

Hammer Drill: Excessive Sparks From the Motor
Excessive sparks coming from the motor of your hammer drill may be alarming, but it is something that you can fix on your own, with some help from us. Check these parts for signs of damage: carbon brushes, holder, armature, field, and springs. Once you determine the part that is causing the problem, follow our expert repair advice for easy to follow in structions on completing a DIY repair.
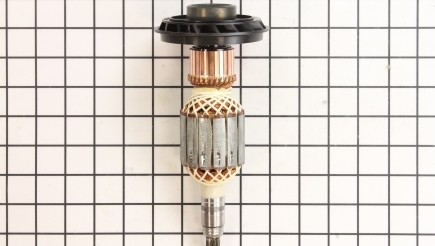
Armatures
The armature is the power-producing unit of the motor, located inside the field, and is the rotating part of the motor. A shorted-out armature or heavy debris build-up in the commutator can both lead to excessive sparking. To test, replace or clean the armature, remove the handle and the screws securing the case of the drill together and then separate. This will vary on makes and models.
Locate the brush holders and remove them by gently pulling the wire up – maybe using a small screwdriver on the other side for even lifting. On some models, remove the clip on the holder to remove the brush. The holder stays in the case. Remove the spindle and chuck assembly from the drill. There may be a secondary shaft to remove on some models. Lift the motor assembly up and slide the armature out of the field. Clean the armature with electrical contact cleaner. Inspect for any burn marks, indicating a short and sparking. If you notice any burn marks, replace the armature.
Check the commutator for missing bars and if there are, replace with new bars. Clean the commutator with 600-grit aluminum oxide sandpaper by rotating the armature in the travel of direction, to provide a smooth, even surface. Use a plastic scribe to clean in between the bars on the commutator.
To check for a bad armature, you can perform the 180-degree test. With the armature removed from the unit, stand it up on a bench. With an ohmmeter, attach the two ends to both sides of the commutator to measure the resistance of the windings. As you move it around the commutator, the reading number is not important. You are looking for a consistent reading, indicating all the windings are good. If it varies, radically reading zero, or open circuit, then the armature is no good. Another test is reading. If the ohmmeter reads zero, or open circuit, then that indicates a bad armature. The last test is a bar to ground test, which is done by placing one lead of the ohmmeter to the tip of the shaft of the armature and the other to the commutator. If the armature is bad, install a new one.
Slide the armature back in the field and reinstall the brush holders. Or, on other models, reinsert the brushes back in the holder and apply the clip. Reinstall the spindle/chuck assembly, and any other shafts, and reattach the hammer drill case with the handle. ... Read more

Carbon Brushes
The brushes ride on the commutator, supplying electricity to the motor. When the brushes become worn, or wear unevenly, they can cause excessive sparking. To check the brushes, remove the handles and open up the case of the hammer drill. This will vary on models as they are different. Locate the brush holders and remove them by gently by pulling the wire up – maybe using a small screwdriver on the other side for even lifting.
On some models, you do not have to take out the entire holder. Unclip the holder to access the spring and brush. Push the tab on the brush holder to remove the brush. The brushes should not be 1/8 of an inch, or less, from the wire lead. If they are, or are getting close, they need to be replaced. On some models, the brush and holder are an all-in-one-unit. Insert the new brush in the holder. When reinstalling back in the drill, use a small-blade screwdriver to hold the brush down, giving you clearance, allowing you to reinstall it. Ensure all wires are back inside the channels and out of the way, then reassemble the case back together. Reattach the handle. ... Read more
On some models, you do not have to take out the entire holder. Unclip the holder to access the spring and brush. Push the tab on the brush holder to remove the brush. The brushes should not be 1/8 of an inch, or less, from the wire lead. If they are, or are getting close, they need to be replaced. On some models, the brush and holder are an all-in-one-unit. Insert the new brush in the holder. When reinstalling back in the drill, use a small-blade screwdriver to hold the brush down, giving you clearance, allowing you to reinstall it. Ensure all wires are back inside the channels and out of the way, then reassemble the case back together. Reattach the handle. ... Read more

Fields
A field coil is an electromagnet used to generate a magnetic field in an electro-magnetic machine. Over time, this part can build up a lot of heavy dirt, causing over-heating and melting the insulation in field, resulting in excessive sparking and a shorting-out field.
To check the field, begin by removing the handle. Remove the screws securing the case of the drill together and open the case. This will be different as all cases go together differently. Remove the brush holders by gently pulling the wire up. On some models, you will have to unclip the brush holder to take out the brush. You do not have to remove the holder as it will stay in the case. Use a small screwdriver on the other side, if needed, to assist in lifting it out. Remove the spindle/chuck assembly. There may also be a secondary gear shaft on some models that you will have to remove. Disconnect the spade connectors on the motor and lift the motor assembly out of the case. Pull the armature from the field. Clean the field with electrical contact cleaner and then inspect the field for burn marks, indicating sparking.
Use a multimeter to check the field for continuity to see if it has shorted. Set the multimeter to an ohmmeter and place a lead on each end of the field. If the reading is infinity, the field is bad and requires replacement.
Install the armature into the new field, or the same one if it is good. The field will have a notch on it, indicating the front. Place the motor back into the drill, reattaching the spade connectors. Install the spindle/chuck assembly back in the case. Reinstall the secondary shaft, if applicable. Reinstall the brush holders, using a small-blade screw driver to hold the brush down, giving you clearance of the commutator. On other models, reinsert the brush and spring in the holder and reapply the clip. Ensure all wires are tucked inside the channel and are out of the way. Close the case back together and secure it tight with the fasteners. Reattach the handle. ... Read more
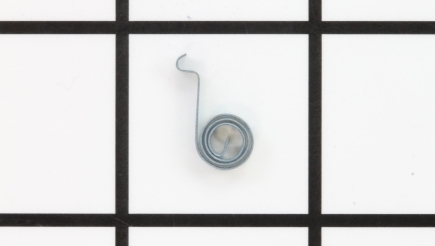
Springs
The springs apply pressure to the carbon brushes to keep it firmly applied to the commutator, allowing them to ride up and down. Collapsed, or weak, springs will not be able to apply adequate pressure, leading to the brush sparking excessively. On some models, the springs and brushes are an all-in-one- unit. You will have to open the hammer drill case to access the springs – this will vary on models.
First, detach the handle then open the case. The springs are housed inside the brush holders. Gently pull the brush holders up, press the tab on the side of the holder, and then remove the brush and spring. On some models, in order to remove the brush and spring, you will have to unclip the holder to access them. The holder will remain in the case. Replace the spring, or spring and brush assembly, and install into the brush holder. Place the brush holder back in the drill casing. You may need a small screwdriver to hold the brush down, giving you clearance of the commutator during the installation process. On other models, slide the spring and brush assembly into the holder and snap down the hold down clip. Reassemble the case back together and reattach the handle. ... Read more
First, detach the handle then open the case. The springs are housed inside the brush holders. Gently pull the brush holders up, press the tab on the side of the holder, and then remove the brush and spring. On some models, in order to remove the brush and spring, you will have to unclip the holder to access them. The holder will remain in the case. Replace the spring, or spring and brush assembly, and install into the brush holder. Place the brush holder back in the drill casing. You may need a small screwdriver to hold the brush down, giving you clearance of the commutator during the installation process. On other models, slide the spring and brush assembly into the holder and snap down the hold down clip. Reassemble the case back together and reattach the handle. ... Read more

Holder
The holders support the tension spring for the brush and also holds the brush in place on the commutator. Any physical damage to the holder, or a heavy build up of dirt on the inside, can interfere with the free motion of the brush and may result in sparking. Since the commutators are not always perfectly round, the brushes must move in and out of their holders to maintain effective contact.
A visual inspection and testing of the free action of the brush with the fingers are sufficient to reveal the proper operation of the holder. Remove the handle and then open the case of the hammer drill – this will vary on all models. Locate the brush holders and remove them by gently pulling the wire up – maybe using a small screwdriver on the other side for even lifting. Inspect for any damage. Check that the brushes are free to move up and down. If they do not move freely, push the tab on the brush holder to remove the brush. On some units, the brush holder and the brushes are an all-in-one unit and cannot be taken apart to fix. Instead, they are replaced as an entire unit.
Clean the inside, including the brush, with electrical contact cleaner (if dirty) and inspect for damage. Replace the holder if there is noticeable damage. Disconnect the wire on the brush and attach it to the new holder. Install the brush on the holder and ensure the tab locks in place. Use a small-blade screwdriver to hold the brush down for clearance on the commutator, allowing you to reinstall it back on the drill. Make sure all wires are tucked inside the channels and are out of the way. Finally, reassemble the case back together and reattach the handle back on the hammer drill. ... Read more