

Engine Parts: Blows black smoke from exhaust
Check the ring, spark plug, oil seals, valve, gasket, and air filter if your engine is blowing blue or black smoke from the exhaust. Although this is a rare symptom, following our repair guide will help you find the most appropriate part to replace. Our repair information is a general guide to help you, but for more specific repair information related to your model, check your owner's manual.

Valves
Every engine contains at least one intake and one outtake valve. The intake valve will be the larger of the two. These valves control the flow of the air/fuel mixture entering the combustion chamber as well and allow the exhaust gases to exit. Over time, these valves can wear down, and this can lead to problems like oil entering the combustion chamber. To remove and install new valves on an OHV engine, first remove the carburetor, muffler, and the valve cover from the engine, then remove the spark plug. Rotate the piston to top dead-center making sure the magnets on the flywheel are in line with the ignition coil. Remove the jam nuts securing the pivots, then disconnect the rocker arm pivots and remove the arms. Next, remove the push rods and rocker arm studs, then pull out the guide plate. Remove the cylinder head bolts in a diagonal pattern so you do not warp the cylinder head, and place the cylinder head on a bench. Use pliers to remove the valve spring retainers and the springs, then remove the valve from the cylinder head. On older non-OHV engines, you will have to remove the access panel on the side of the engine to expose the valves. Then, insert the spring compressor inside to compress the spring. Next, rotate the valve around the retainer to pull it out. Use the valve lapping compound on the valve seat and cylinder head to get the new valves to seat properly. Insert the valves into the head and use a lapping tool to seat them by rotating the lapping tool in your hands back and forth. Remove the valves, and clean the lapping compound off both the valve and cylinder head. Now, lubricate the valve stems with oil and insert them into the cylinder head. Install the new seal on the valve, install the spring and retainer, and lock the retainer into position on the valve. Clean off the surfaces that the new head gasket will seal, then re-install the cylinder head back onto the engine. Tighten the bolts down in an alternating pattern to avoid warping the cylinder head, and ensure they are tightened to manufacturer specifications. Re-install the guide plate and rocker arms studs, and torque down to the manufacturer’s specifications. Insert the push rod, slide on the rocker arms, and thread the pivots loosely. Use a feeler gauge to gap the rocker arms 3 to 5 thousandths of an inch from the valves then thread the jam nuts and tighten them down. Re-install the spark plug, install a new valve cover gasket, and re-install the valve cover. Tighten the bolts in an alternating pattern, to the manufacturer’s specifications. Now, re-install the muffler and the carburetor with the air filter housing and filter. ... Read more
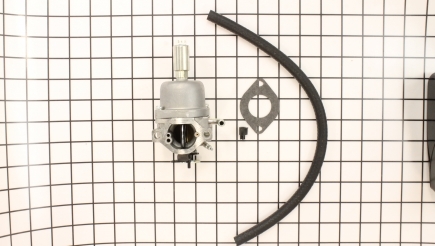
Carburetors
The purpose of the carburetor is to mix air and fuel to the proper ratio for combustion. If the engine has had any work done to the piston rings, the head gasket, or if it has been overfilled with oil, it can cause a pressure build-up inside the crank case. This will result in oil being forced out into the carburetor, and this will cause black smoke to be emitted. When this happens, your carburetor will need to be cleaned, or you can purchase a carburetor kit and rebuild the inside. To do this, first remove the carburetor from the engine. Then, remove the fuel line and disconnect the linkage. Next, disassemble the carburetor and give the inside a good internal cleaning. It is wise to take pictures to remember where all the parts go when it is time to re-assemble the carburetor. Once the carburetor has been cleaned, you can put it back together and re-attach it to the engine, then reset the settings. To adjust the carb, turn both the L screw (low) and H screw (high) inward to shut off the flow of fuel, then back it off 2 turns. Now you can start the engine and let it idle for 5 minutes. This will allow the engine to reach operating temperature. Continue adjusting the carb by turning the L screw clockwise, to add more fuel and set the idle. Next, at full throttle, turn the H screw clockwise to set the high idle. When you have the engine running at peak performance, your repair is complete. ... Read more
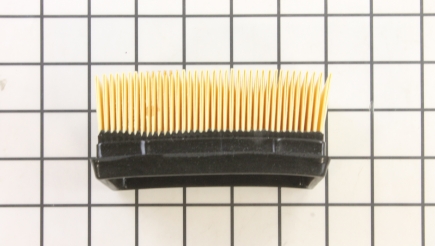
Air Filters
The purpose of the air filter is to provide clean air in the engine for combustion. A badly clogged air filter will starve the engine of much-needed air. If you overfill your engine with oil, it can force some of the excess oil into the carburetor and soak the air filter. This will not only add oil to the air/fuel mixture but it will clog your air filter as well. You will need to drain any excess oil and remove the air cleaner housing. Clean it out well and re-install with new filter. While you're completing this repair, it is recommended to spray your carburetor with carburetor cleaner, and use a soft bristle brush to clean the inside. If the smoke you see is black rather than blue, it is an indicator that the engine is running rich. The air filter prevents all contaminants from entering the engine. Over time, the air filter will become dirty and if it is left unchanged, it will become clogged and your engine will run rich. Check and replace the air filter if it is dirty, as part of your routine maintenance. ... Read more

Gaskets
The head gasket creates the seal between the engine block and cylinder head that allows for compression. It also provides a tight seal for oil not to leak. To check for a blown head gasket, simply perform a compression test. You will also need to remove spark plug, and check to see if it is oily. If so, then you have oil entering the cylinder and the head gasket will need to be replaced. To make this repair, first drain all fluids. Next, remove the carburetor and muffler from the cylinder head. Then, remove the valve cover bolts and cover, and pull the valve cover off. Locate the bolts holding the cylinder head to the engine block, and remove them along with the cylinder head. Now you can remove the old head gasket. Clean both the surfaces off the engine block and cylinder head with a soft cloth, but be careful not to damage this area, or you may not be able to get a tight seal with the new gasket. Install the new gasket and re-assemble. It's worth nothing that it is best to replace all the cylinder head bolts with new ones, as they should be used only once, considering the amount of pressure and abuse they take. This will help prevent the new gasket from premature failure. Check manufacturer specifications for the bolt tightening sequence, to provide an even compression for this gasket. Next, re-install the carburetor, air filter housing with filter, muffler, and the valve cover with new valve cover gasket. Finally, tighten down the bolts in an alternating pattern to manufacturer specifications. ... Read more

Oil Seals
The oil seals on top of the valve stems prevent oil from leaking down the top of the engine and into the combustion chamber. If these seals become badly worn, they will allow oil to pass through and it will end up inside the combustion chamber. This will cause your engine to emit blue smoke. To remove and install new oil seals, start by removing the carburetor, muffler, and valve cover from the engine. Then, remove the spark plug from the cylinder head. Rotate the piston to top dead-center making sure the magnets on the flywheel are in line with the ignition coil. Next, remove the jam nuts, securing the pivots, and remove the rocker arm pivots and the arms themselves. Remove the push rods and the rocker arm studs, then remove the guide plate. Next, remove the cylinder head by un-screwing the bolts in a diagonal pattern to prevent the cylinder head from warping. Use pliers to remove the valve spring retainers and the springs, then remove the oil seal from the valve stem. On older non-OHV engines, you will have to remove the access panel on the side of the engine, exposing the valves, and insert the spring compressor inside to compress the spring. Rotate the valve around the retainer to lift the valve and remove and replace the oil seal. Install the new seal onto the valve stem, then re-install the spring with the retainer ring, locking the retainer into position on the valve. Clean off the surfaces for the new head gasket, then re-install the cylinder head back onto the engine. Be sure to tighten the bolts down in an alternating pattern to avoid warping the cylinder head, and make sure they are tightened to manufacturer specifications. Re-install the guide plate with the rocker arm studs and torque down to manufacturer’s specifications. Next, insert the push rod, slide on the rocker arms, and thread the pivots loosely. Use a feeler gauge to gap the rocker arms 3 to 5 thousandths of an inch from the valves. Now, thread the jam nuts and tighten them down. Re-install the spark plug, install a new valve cover gasket, and re-install the valve cover. Then, tighten the bolts in an alternating pattern to the manufacturer’s specifications. Finally, re-install the muffler and the carburetor with the air filter housing and filter. ... Read more
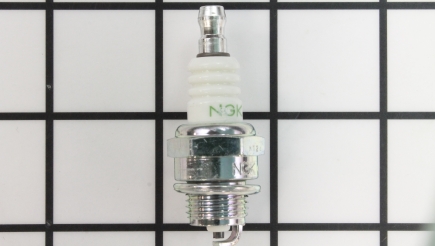
Spark Plugs
The spark plugs produce the spark that ignites the air/fuel mixture. The spark plugs can develop deposits over time due to excess oil consumption, and this can result in a rough-running engine. The spark plug itself will not be the source of the burning oil, so you will have to investigate the cause of the oil burning, repair it, and then replace the spark plugs. Changing the spark plugs alone will not solve the problem of oil entering the combustion chamber.

Piston Rings
The purpose of a piston ring is to provide a tight seal between the piston and the cylinder wall, creating a seal for compression, and keeping oil out of combustion chamber. When these rings become worn, engine oil can get past the rings, enter the combustion chamber, and create black smoke. When this occurs, you will need to replace the piston rings. A compression test can also indicate bad rings. If the cylinder is reading low, you should inject some oil, which will fill the gap between the rings and the cylinder wall. Now, do a second compression test. If the pressure has increased, it indicates worn rings. After you have determined the rings are bad, you will need to replace them. You can begin this repair by draining all fluids and removing the air filter and air filter housing. Next, remove the spark plug wire and spark plug, the exhaust manifold or muffler from the cylinder head, and the carburetor from the cylinder head. Now, pull the valve cover off with the gasket. Rotate the piston to the bottom, remove the rocker arm nuts and remove the push rods. Next, remove all the bolts holding the cylinder head to the engine block in an alternating pattern (to prevent warping the cylinder head) and remove the head. Next, pull off the old head gasket. Clean the surfaces of the engine block and cylinder head with a soft cloth. Next remove the crank case bolts, and wiggle it off, or tap it off lightly with a hammer. There may even be a key way on the crankshaft that will have to be removed, depending on your model. Remove the camshaft by simply pulling it out. Remove the camshaft tappets, connecting rod bolts and the bottom part of the rod bearing, and rotate the crankshaft to the top. Then, reach in and push the piston out with your fingers. Now you can remove the old piston rings. Clean all the parts you are going to reuse with parts cleaner and dry them thoroughly. Install new rings onto piston, positioning the ring gaps a 1/3 interval around the ring to prevent blow by (make sure the oil ring is on the bottom). Use a piston ring installer to line everything up, then gently tap the piston into the cylinder. Be sure to lubricate the cylinder with fresh motor oil beforehand. With the piston at top dead center and contacting the crankshaft, rotate together by pushing down on the piston so you can reattach to the connecting rod bearing. They only go in one way. Lubricate the camshaft tappets and reinstall, next install the camshaft by making sure the timing marks are in line. Be sure to lubricate all moving parts with motor oil or white grease before you install them. Next, re-install the crank cover with a new gasket. Then, re-install the cylinder head with a new gasket, and torque down in an alternating pattern to manufacturer specifications to prevent warping the cylinder head. Re-install the push rods, rotate the rocker arms back into place, and hand tighten the pivots. Set the gap between the rocker arms and valves from 3 to 5 thousandths of an inch, then tighten down the jam nuts to secure. Re-install the valve cover with a new gasket in an alternating pattern to manufacturer specifications to prevent warping. Install a new spark plug with the gap set to manufacturer specifications. Finally, re-attach the carburetor, air filter housing (with filter), and muffler back to the cylinder head. ... Read more