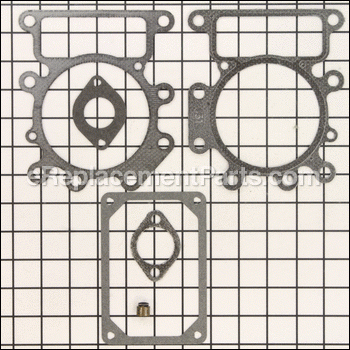
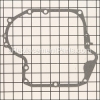
This gasket set-valve is supplied by the original equipment manufacturer for use with Briggs and Stratton engines commonly installed on lawn and garden equipment. It helps to distribute the pressure evenly and provide an air-tight seal for the cylinder head. Over time components may wear out and begin to crack eventually requiring replacements. For the exact locations and the correct applications, please refer to the appropriate diagrams of your model. This high-quality set includes five composite material gaskets and one valve seal. You will need a wrench set to remove and reattach the cylinder head to perform this repair.
Gasket Set-valve 794152
OEM part for: Briggs and Stratton, Toro
Part Number: 794152
7 - 12 business days
Jump To:
Frequently Purchased Together ?
Compatibility
This part will fit the following 1374 machines
Toro
Briggs and Stratton
This item works with the following types of products:
- Lawn Tractor Parts
- Engine Parts
This part replaces obsolete part #: 690190
Customer Part Reviews ?
- 1
Questions & Answers ?
Our customer Service team is at the ready daily to answer your part and product questions.

Ask our Team
We have a dedicated staff with decades of collective experience in helping customers just like you purchase parts to repair their products.
Does this fit my product?Questions & Answers for Gasket Set-valve
Customer Repair Instructions ?
All our customer repair instructions are solicited directly from other customers just like you who have purchased and replaced this exact part.
Blown head gasket
Tool Type
Lawn Tractor
Difficulty
Hard
Time
More than 2 hours
Tools Used
Screwdriver, Pliers, Power Drill, Socket set
Parts Used
Engine was using oil, smoking. Blown head gasket.
Tool Type
Lawn Tractor
Difficulty
Medium
Time
1-2 hours
Tools Used
Screwdriver, Socket set, Wrench Set, Feeler gauge to set valve clearance, Torque wrench
Parts Used
2. Removed pushrods.
3. Removed exhaust and intake manifolds.
4. Removed head.
5. Cleaned all mating surfaces.
6. Polished head and cylinder mating surfaces with hard Arkansas stone.
7. Installed head gasket.
8. Installed head.
9. Torqued to 220 in. lbs.
10. Installed intake and exhaust gaskets and manifolds.
11. Installed pushrods.
12. Measured valve clearances (.003" - .005" intake) (.005" - .007" exhaust)
13. Installed valve cover gasket and cover. Torqued mounting bolts.
14. Installed spark plug.
15. Started engine. Runs, no smoke.
16. Put tools away, cleaned work area.
The gasket set comes with two head gaskets and the instructions say to use a single gasket. With one head gasket the engine will not turn over. With two head gaskets the engine started. I did not know
Tool Type
Lawn Tractor
Difficulty
Easy
Time
30-60 minutes
Tools Used
Socket set, Torgue wrench and feeler gage.
Parts Used
Blown head gasket.
Tool Type
Lawn Tractor
Difficulty
Easy
Time
1-2 hours
Tools Used
Screwdriver, Socket set, Wrench Set, Allen wrench
Parts Used
2. Removed the air cleaner cover and the air cleaner.
3. Removed the top engine cover.
4. Disconnected the intake manifold.
5. Removed the exhaust pipe.
6. Removed the valve cover.
7. Removed the bracket that mounts the engine cover.
8. Removed the head.
9. Cleaned the head gasket surfaces.
10. Removed carbon build up on the piston top and the combustion chamber.
11. Reinstalled everything in the reverse order of steps above and adjusted the valve clearance.
Blown head gasket
Tool Type
Lawn Mower
Difficulty
Medium
Time
More than 2 hours
Tools Used
Pliers, Socket set, Wrench Set, Gasket scraper, torque wrench,wire brush
Parts Used
2. Removed engine cowling and air filter
3. Removed intake and exhaust
4. Removed the head bolts and the head
5 Cleaned the head and gasket surfaces
6. Re-assembled with new gaskets and torqued the head bolts
Note : Check to be sure the push rods are seated before the torque procedure
Blown head gasket
Tool Type
Lawn Tractor
Difficulty
Easy
Time
1-2 hours
Tools Used
Socket set, Nutdriver
Parts Used
2. Removed the head.
3. Replaced the old gasket with the new gasket.
4. Reassembled.
CARB THROTTLE PLATE SCREWS WERE SUCKED INTO CYLINDER.
Tool Type
Lawn Tractor
Difficulty
Medium
Time
1-2 hours
Tools Used
Screwdriver, Power Drill, Socket set, Wrench Set, feeler gauge, valve compressor, torque wrench, plastic scrap
2. Removed carb & intake manifold from engine.
3. Removed old throttle plate & shaft; replaced with new parts.
4. Removed ignition wire & spark plug.
5. Removed valve cover, loosened rocker arms and removed push rods.
6. Removed exhaust manifold, cylinder head bolts & head.
7. Cleaned gasket surfaces on head & valve cover. Cleaned top of piston & inside cylinder head combustion chamber. Checked intake & exhaust valves for leaks with carb cleaner. Removed exhaust valve spring & valve & lapped to correct leak, then re-installed in head.
8. Installed new head gasket, & replaced cylinder head; torqued bolts to spec.
9. Installed push rods, rotated piston to proper position, set valves to spec. Replaced valve cover gasket & valve cover.
10. Installed new exhaust manifold gasket & manifold, spark plug & wire, & intake manifold gasket & manifold/carb.
11. Replaced engine covers & air filter.
12. Started engine & set carb idle speed.
13. Replaced hood & body panels.
Damaged intake valve
Tool Type
Lawn Tractor
Difficulty
Expert
Time
More than 2 hours
Tools Used
Screwdriver, Pliers, Socket set, Wrench Set, Nutdriver
Parts Used
Blown head gasket
Tool Type
Lawn Tractor
Difficulty
Easy
Time
More than 2 hours
Tools Used
Screwdriver, Socket set, Torque wrench
Parts Used
Lawn mower engine dropped a valve.
Tool Type
Lawn Tractor
Difficulty
Medium
Time
More than 2 hours
Tools Used
Screwdriver, Pliers, Socket set, Wrench Set, Gap gauge
2. Loosened rocker arms.
3. Removed push rods.
4. Removed head.
5. Removed broken valve.
6. Installed new valve.
7. Installed head.
8. Installed push rods.
9. Adjusted valves.
10. Installed valve cover.
OEM stands for Original Equipment Manufacturer and means the part you’re buying is sourced directly from the manufacturer who made your product. At eReplacementParts, we sell only genuine OEM parts, guaranteeing the part you’re purchasing is of better design and of higher quality than aftermarket parts.
Our product descriptions are a combination of data sourced directly from the manufacturers who made your product as well as content researched and curated by our content & customer service teams. This content is edited and reviewed internally before being made public to customers.
Our customer service team are at the ready daily to answer your part and product questions. We have a dedicated staff with decades of collective experience in helping customers just like you purchase parts to repair their products.
All our part reviews are solicited directly from other customers who have purchased this exact part. While we moderate these reviews for profanity, offensive language or personally identifiable information, these reviews are posted exactly as submitted and no alterations are made by our team.
All our customer repair instructions are solicited directly from other customers just like you who have purchased and replaced this exact part. While we moderate these reviews for profanity, offensive language or personally identifiable information, these reviews are posted exactly as submitted and no alterations are made by our team.
Based on data from past customer purchasing behaviors, these parts are most commonly purchased together along with the part you are viewing. These parts may be necessary or helpful to replace to complete your current repair.
All our installation videos are created and produced in collaboration with our in-house repair technician, Mark Sodja, who has helped millions of eReplacementParts customers over the last 13 years repair their products. Mark has years of experience in selling and repairing both commercial and residential products with a specialty in gas-powered equipment.
This data is collected from customers who submitted a repair instruction after replacing this exact part. Customers can rate how easy the repair was to complete and how long it took. We aggregate this data to provide a repair rating that allows customers to quickly determine the difficulty and time needed to perform their own repair.

