


Why Read This Article?
Finish Nailer Repair - Replacing the Driver Guide (Ridgid Part # 79004001022)
Article Breakdown
Finish Nailer Repair - Replacing the Driver Guide (Ridgid Part # 79004001022)
Video

Tools & Materials
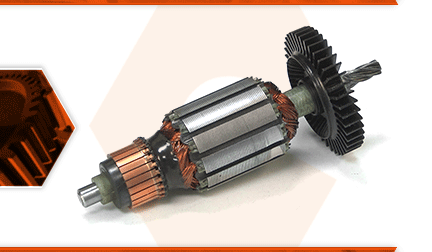
The armature is the central part of your tool's motor. It consists of windings, the commutator, a cooling fan, and the drive gear. The armature, along with the field, create a magnetic field that causes the armature to spin. The carbon brushes transfer electricity to the commutator. Over time, the commutator will wear from this constant contact. If the tool is overloaded, the armature can overheat and the insulation around the windings will burn away, creating a short-circuit. When this occurs, there will be excessive sparking from the motor brushes, and smoke or a burning smell from the motor.
Let's get started.
REMOVING THE ARMATURE 1. Remove the handle cover.
a. Remove the (3) screws securing the handle cover to the motor housing.
b. Remove the handle cover from the unit.
2. Remove the motor brushes.
a. Use a small pick to lift and pivot the brush spring away from the back of the motor brush. b. Remove the motor brush from the brush holder.
c. Release the brush spring.
d. Repeat this step to remove the motor brush from the opposite side of the motor.
3. Remove the gear case.
a. Remove the (3) screws securing the gear case to the motor housing.
b. Separate the gear case from the motor housing.
c. Remove the gasket from the gear case (or from the gear case cover).
4. Remove the armature assembly.
a. Use a small screwdriver to remove the fiber washer from the pinion gear.
b. Use a large screwdriver to carefully pry the gear case cover away from the motor housing.
c. Slide the armature assembly (and the gear case cover) out of the motor housing.
5. Remove the gear case cover from the armature.
a. Place the armature assembly between the open jaws of a vise. Open the vise jaws wide enough to allow the armature to pass freely between them, but narrow enough to prevent the motor case from passing through. (Rest the motor case against the top of the vise jaws.)
b. Use a rubber mallet to tap the armature assembly away from the gear case cover.
6. Remove the bearing sleeve.
a. Use a small screwdriver (if needed) to pry the bearing sleeve away from the armature bearing.
7. Remove the armature bearing(s).
While the ball bearings on both sides of the armature are identical; only one of the bearings (on the commutator-side) can be easily removed. The bearing on the fan-side of the armature is recessed into the fan, making it very difficult to remove without damaging the fan (and sometimes the bearing itself). As such, we recommend installing a new (fan-side) armature bearing on the new armature.
a. Use a bearing separator to remove the commutator-side ball bearing from the armature.
INSTALLING THE NEW ARMATURE
8. Install the armature bearings.
a. Slide the new (fan-side) armature bearing over the drive gear on the new armature.
b. Use a socket (with the same diameter as the inner race of the new bearing) and a rubber mallet to tap the new bearing onto the armature shaft.
c. Position the (commutator-side) armature bearing on the armature shaft.
d. Use a socket (with the same diameter as the inner race of the bearing) and a rubber mallet to tap the bearing onto the armature shaft.
9. Install the bearing sleeve.
a. Install the bearing sleeve onto the commutator-side bearing.
10. Install the gear case cover onto the armature.
a. Position the gear case cover across the open jaws of a vise.
b. Align the fan-side armature bearing with the gear case cover.
c. Use a rubber mallet to tap the new armature assembly into the gear case cover.
11. Install the armature assembly.
a. Install the new armature assembly into the motor housing.
b. Use a rubber mallet to tap the armature assembly into the motor housing (to seat the bearing and sleeve in the inner housing).
REASSEMBLING THE UNIT
12. Reinstall the gear case.
a. Install the fiber washer onto the armature (pinion) gear.
b. Install the gear case gasket onto the gear case.
c. Install the gear case assembly onto the motor housing.
d. Secure the gear case to the motor housing with the (3) screws.
13. Reinstall the motor brushes.
a. Use a small pick to lift and pivot the brush spring away from the brush holder.
b. Install the motor brush into the brush holder.
c. Reposition the brush spring onto the back of the motor brush.
d. Repeat this step to install the second motor brush.
14. Reinstall the handle cover.
a. Install the handle cover.
b. Secure the handle cover with the (3) screws.
