


Why Read This Article?
Finish Nailer Repair - Replacing the Driver Guide (Ridgid Part # 79004001022)
Article Breakdown
Finish Nailer Repair - Replacing the Driver Guide (Ridgid Part # 79004001022)
Video

Tools & Materials
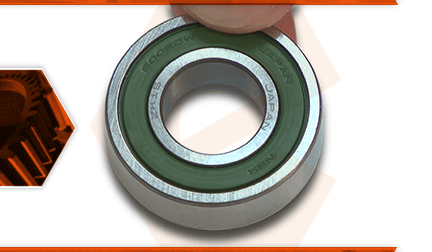
Power tools use many bearings to allow various components to rotate. Over time, a ball bearing will wear and begin to fail. A bearing that is failing will usually give warning, often with a squeaking or squealing sound.
Let's get started.
REMOVING THE BEARING 1. Remove the motor brushes.
a. Use a screwdriver to remove the brush caps from the motor housing.
b. Remove the motor brushes from the brush holders.
2. Remove the gear case.
a. Remove the (4) screws securing the gearbox to the motor housing.
b. Separate the gearbox from the motor housing.
3. Remove the baffle plate.
a. Remove the baffle plate from the gear case.
b. Remove the armature assembly from the gear case.
4. Remove the bearing.
a. Use a bearing separator to remove the (fan-side) bearing from the armature.
INSTALLING THE NEW BEARING
5. Install the bearing.
a. Install the spacer (washer) onto the armature shaft.
b. Install the new bearing onto the armature shaft.
c. Use a socket and a hammer to seat the new bearing onto the armature shaft.
REASSEMBLING THE UNIT
6. Reinstall the armature assembly.
a. Install the armature into the gear case.
b. Rotate the armature as necessary to align the end gear with the gears in the case.
c. Press the armature firmly into the gear case to seat the bearing.
d. Tap the end of the armature with a rubber mallet to ensure that the bearing is fully seated in the gear case.
e. Install the baffle plate.
7. Reinstall the gear case.
a. Reconnect the gear case (and armature assembly) with the motor housing.
b. Secure the gear case to the motor housing with the (4) screws.
8. Reinstall the motor brushes.
a. Install the motor brushes into the brush holders.
b. Secure the motor brushes with the brush caps.
