


Why Read This Article?
Finish Nailer Repair - Replacing the Driver Guide (Ridgid Part # 79004001022)
Article Breakdown
Finish Nailer Repair - Replacing the Driver Guide (Ridgid Part # 79004001022)
Video

Tools & Materials
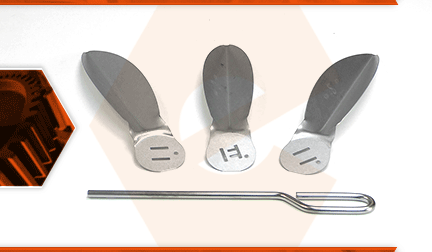
The one-touch cleaning kit both cleans the ash from the bottom of the bowl and allows you to control the airflow to the grill. The kit consists of three fins, a handle, and the fittings needed to install it. Over time, the components can corrode (and eventually break). The fins can be damaged if they become stuck, and are then forced open.
Let's get started.
REMOVING THE CLEANING KIT 1. Remove the lid.
a. Lift the lid away from the bowl assembly.
2. Remove the grates.
a. Remove the cooking grate from the bowl.
b. Remove the briquet holders from the bowl.
c. Remove the charcoal grate from the bowl.
3. Remove the catch pan.
a. Lift and slide the lock-lever (handle) of the ash catcher pan (counterclockwise) to disengage it from the upper ring.
b. Remove the catch pan from the grill.
4. Remove the one-touch cleaning kit.
a. Pass a large screwdriver through the side of the ash catcher ring toward the center of the bowl (on its underside).
b. Insert the screwdriver between the two hub lobes at the center of bowl (beneath the H-washer; above the cleanout lever).
c. Rotate the screwdriver while simultaneously rotating the cleanout lever, until the tab on the cleanout lever aligns with the slot on the hub lobes.
d. Slide the cleanout lever out of the assembly.
e. Remove the damper assembly (the fins and hub hardware) from inside the bowl.
INSTALLING THE NEW CLEANING KIT
5. Assemble the cleaning fins (the damper assembly).
a. Note that the new cleaning fins are numbered 1, 2, and 3.
b. Install the mounting bracket onto the first fin (number 1). The lobes of the bracket should pass through the fin and point away from the apex of the fin.
c. Install the second fin (number 2) beneath the first fin.
d. Install the third fin (number 3) beneath the second fin, and press the three fins together tightly against the bracket. (The third fin will lock the assembly in place.)
6. Install the cleaning kit.
a. Install the damper assembly (the fins) into the bowl. (Fin number 1 should point toward the back of the grill.)
b. Place something heavy (such as your tool kit) in the center of the grill to temporarily hold the damper in place.
c. Install the H-washer onto the lobes of the center mounting bracket (on the underside of the bowl).
d. Install the new cleanout handle through the ash catcher ring and through the openings on the lobes of the center mounting bracket. (Be sure to align the tab on the cleanout handle with the slot on the bracket, or the handle wont pass through both of the lobes.)
e. Rotate the cleanout handle to lock the assembly in place. (You can usually hear or feel the assembly snap as it engages.)
REASSEMBLING THE UNIT
7. Reinstall the ash catcher pan.
a. Install the ash catcher pan onto the ring.
b. Verify that the handle of the ash catcher pan engages the locking slot on the ring.
8. Reinstall the grates.
a. Install the charcoal grate.
b. Install the briquet holders.
c. Install the cooking grate.
9. Reinstall the lid.
a. Install the lid onto the bowl assembly.
