


Why Read This Article?
Finish Nailer Repair - Replacing the Driver Guide (Ridgid Part # 79004001022)
Article Breakdown
Finish Nailer Repair - Replacing the Driver Guide (Ridgid Part # 79004001022)
Video

Tools & Materials
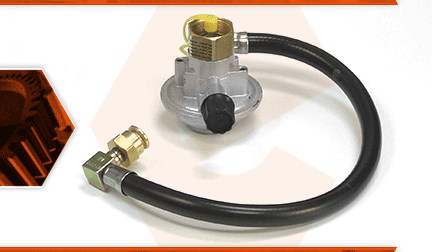
The regulator allows you to attach disposable propane cylinders to your grill for the propane ignition system. The regulator controls the flow of propane from the high-pressure cylinders. A rubber hose attaches to the regulator on one end, and has a jet attached to the other. The jet sprays the propane into the burner tube. Over time, the regulator can become clogged, restricting the flow of propane. The rubber hose can crack, and the jet can be clogged.
Let's get started.
REMOVING THE REGULATOR 1. Remove the charcoal bin.
a. Pivot the charcoal bin to the open position.
b. Disengage the locking clip from the back of the charcoal bin.
c. Disengage the lower shelf from the bottom of the charcoal bin.
d. Remove the charcoal bin from the grill.
2. Remove the table.
a. Remove the (4) screws securing the table to the grill.
b. Lift the table assembly away from the grill.
3. Disconnect the ignition.
a. Use long-nosed pliers to disconnect the two ignition wires from the igniter assembly.
4. Disconnect the regulator from the burner tube.
a. Use long-nosed pliers to remove the retainer clip securing the orifice to the burner tube.
b. Disconnect the orifice assembly from the burner tube.
5. Remove the regulator.
a. Remove the two screws securing the regulator to the grills frame.
b. Remove the regulator assembly from the grill.
INSTALLING THE NEW REGULATOR
6. Install the regulator.
a. Install the new regulator onto the grills frame.
b. Secure the new regulator with the two screws.
c. Install the orifice assembly into the burner tube.
d. Secure the orifice with the retainer clip.
REASSEMBLING THE UNIT
7. Reconnect the ignition wires.
a. Connect the white ignition wire to the white terminal on the igniter.
b. Connect the black ignition wire to the black terminal on the igniter.
8. Reinstall the table.
a. Install the table onto the grill.
b. Secure the table with the four screws.
9. Reinstall the charcoal bin.
a. Install the charcoal bin onto the lower shelf.
b. Reconnect the locking clip to the top (back) of the charcoal bin.
