


Why Read This Article?
Finish Nailer Repair - Replacing the Driver Guide (Ridgid Part # 79004001022)
Article Breakdown
Finish Nailer Repair - Replacing the Driver Guide (Ridgid Part # 79004001022)
Video

Tools & Materials
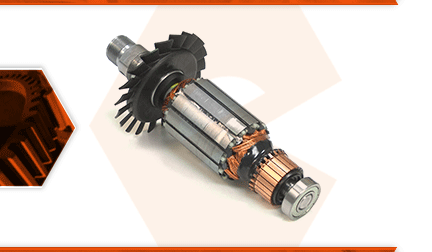
The armature is the central part of your router's motor. It consists of windings, the commutator, a cooling fan, the drive shaft, and the end bearing. The armature, along with the field, create a magnetic field that causes the armature to spin. The carbon brushes transfer electricity to the commutator. Over time, the commutator will wear from this constant contact. If the tool is overloaded, the armature can overheat and the insulation around the windings will burn away.
Let's get started.
REMOVING THE ARMATURE AND BEARING 1. Remove the cord.
a. Unscrew the quick-connect collar on the power cord.
b. Disconnect the cord from the router.
2. Remove the fixed base.
a. Disengage the locking latch.
b. Depress the two lock tabs on the sides of the base.
c. Lift the motor assembly away from the fixed base.
3. Remove the end cap.
a. Remove the four screws securing the end cap to the motor.
b. Lift the end cap away from the motor.
4. Disengage the motor brushes.
a. Use a pick to lift the brush springs away from the backs of the motor brushes.
b. Use a pick to disengage the motor brushes from the commutator (on the armature).
c. Remove the screw securing the ground wire to the motor housing.
5. Separate the two halves of the motor.
a. Use two screwdrivers to pry the plastic brush ring assembly away from the motor housing.
b. Using a rubber mallet, strike the motor housing while holding the top portion of the motor assembly. Repeat this step until the field and brush ring can be freely removed from the lower motor housing.
c. Use two screwdrivers to pry the plastic field housing (sleeve) from the lower motor housing.
6. Remove the armature.
a. Use an impact driver to remove the clamp nut securing the armature to the lower motor housing.
b. Use a rubber mallet to tap the armature out of the motor housing.
7. Remove the lower bearing.
a. Remove the three screws securing the lower armature bearing to the motor housing.
b. Remove the lower bearing from the motor housing.
INSTALLING THE NEW ARMATURE AND BEARING
8. Install the armature.
a. Install the new bearing into the motor housing.
b. Secure the bearing with the three screws.
c. Install the new armature into the motor housing.
d. Use a rubber mallet to tap the motor housing onto the armature (and seat the bearing onto the armature shaft).
e. Install and tighten the clamp nut.
REASSEMBLING THE UNIT
9. Reassemble the motor.
a. Slide the plastic field housing (sleeve) onto the field. (The long tabs inside the plastic sleeve should align with the flat portions of the field.)
b. Install the field assembly (and sleeve) into the motor housing. (The metal grounding eyelet should align with its connection point on the metal housing.)
c. Use a hammer and punch to tap the field assembly fully into the housing (as needed).
10. Reconnect the ground wire.
a. Thread the screw through the eyelet terminal on the ground wire.
b. Secure the ground wire to the motor housing with the screw.
11. Engage the motor brushes.
a. Press each of the motor brushes tightly against the commutator.
b. Use a small pick to reposition the brush springs onto the backs of the motor brushes.
12. Reinstall the end cap.
a. Install the end cap.
b. Secure the end cap with the four screws.
13. Reinstall the fixed base.
a. Install the motor onto the fixed base assembly.
b. Secure the motor with the locking latch.
c. Reconnect the power cord to the router.
