


Why Read This Article?
Finish Nailer Repair - Replacing the Driver Guide (Ridgid Part # 79004001022)
Article Breakdown
Finish Nailer Repair - Replacing the Driver Guide (Ridgid Part # 79004001022)
Video

Tools & Materials
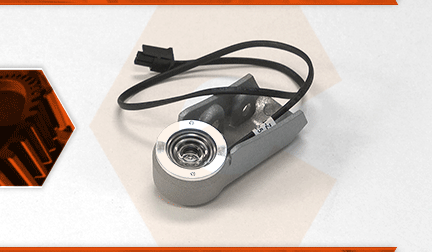
The cut-line work light both lights up the base of the saw (for better visibility) and provides accurate blade alignment for cuts. At the heart of the cut-line is an LED light. It is secured in a housing with a lens and a wiring harness that connects it to the power supply. Over time, the LED will burn out and the work light will need to be replaced.
Let's get started.
REMOVING THE WORK LIGHT 1. Unplug the saw.
a. Before making any repairs on your miter saw, make sure the power cord is unplugged.
2. Remove the carrying handle.
a. Remove the screw securing the carrying handle to the trigger handle.
b. Remove the carrying handle from the saw.
3. Remove the top half of the trigger handle.
a. Remove the screws securing the top half of the trigger handle.
b. Remove the screws securing the power supply to the lower half of the trigger handle.
c. Move the power supply away from the handle (the wires will still be connected at this stage).
d. Remove the top half of the trigger handle.
4. Remove the work light.
a. Remove the two screws securing the work light wiring harness cover to the saw.
b. Remove the wiring harness cover.
c. Remove the two screws securing the work light assembly to the saw.
d. Disconnect the (work light) wiring harness from the power supply.
e. Remove the work light (and wiring harness) from the saw.
INSTALLING THE NEW WORK LIGHT
5. Install the work light.
a. Install the new work light onto the saw.
b. Secure the work light with the two screws.
c. Route the wires from the new work light along the top of the guard assembly and into the handle.
d. Install the plastic wire cover over the wire set.
e. Secure the top wire cover with the screws.
f. Route the wiring harness (from the work light) beneath the wires from the power cord (in the lower handle).
g. Tuck (all of) the wires into the channels on the lower handle assembly.
h. Connect the wiring harness (from the work light) to the power supply.
REASSEMBLING THE UNIT 6. Reinstall the top half of the trigger handle.
a. Install the top half of the trigger handle.
b. Secure the handle with the screws.
7. Reinstall the power supply.
a. Install the power supply onto the handle.
b. Secure the power supply with the screws.
8. Reinstall the carrying handle.
a. Install the carrying handle.
b. Secure the carrying handle with the screw.
