


Why Read This Article?
Finish Nailer Repair - Replacing the Driver Guide (Ridgid Part # 79004001022)
Article Breakdown
Finish Nailer Repair - Replacing the Driver Guide (Ridgid Part # 79004001022)
Video

Tools & Materials
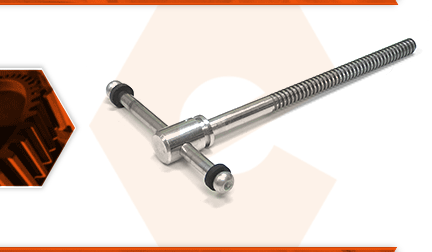
The spindle assembly consists of the handle, the threaded screw, the screw washer, the locking ring, and the screws that are used to secure the assembly. After many years of use, the threads on the spindle can wear down. This will cause excessive lash in the screw. Eventually, the threads can fail completely and the vise will not be able to lock. If this occurs, the spindle assembly will need to be replaced.
Let's get started.
REMOVING THE SPINDLE ASSEMBLY 1. Separate the two halves of the vise.
a. Unscrew the spindle until the two halves of the vise are nearly separated.
b. As the two halves of the vise begin to separate, maintain a firm grip on the front jaw assembly (which is quite heavy) and continue rotating the spindle handle.
c. Separate the two halves of the vise.
2. Remove the spindle from the jaw.
a. Remove the three screws securing the spindle ring (and spindle) to the jaw.
b. Remove the spindle from the vise jaw.
c. Remove the washer from the spindle (or from the inside of the vise jaw).
INSTALLING THE NEW SPINDLE ASSEMBLY
3. Install the spindle.
a. Grease the threads on the new spindle assembly. (You can use a bearing/chassis grease.) Apply just one line of grease down one side of the threads on the new spindle.
b. Install the new washer onto the new spindle.
c. Install the new spindle into vise jaw.
d. Install the new retaining ring.
e. Secure the retaining ring (and spindle) with the three screws.
REASSEMBLING THE UNIT
4. Reassemble the two halves of the vise.
a. Slide the two vise jaws together until resistance is felt.
b. Rotate the spindle handle slowly until the threads engage.
c. Continue rotating the spindle handle to close the vise jaws.
