


Why Read This Article?
Finish Nailer Repair - Replacing the Driver Guide (Ridgid Part # 79004001022)
Article Breakdown
Finish Nailer Repair - Replacing the Driver Guide (Ridgid Part # 79004001022)
Video

Tools & Materials
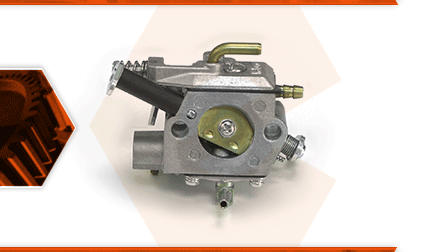
The saw's carburetor is used to combine fuel and air in the perfect ratio for combustion inside the engine's cylinder. The carburetor has many small passageways that route fuel through it. If debris or corrosion clogs the passageways, the engine will run poorly or possibly not start at all. The carburetor can be cleaned and rebuilt, but often it is a better use of time and money to simply replace the carburetor as a whole.
Let's get started.
REMOVING THE CARBURETOR 1. Remove the top cover.
a. Loosen the thumbscrew on the top of the cover.
b. Remove the top cover (along with the pre-filter) from the saw.
2. Remove the filter cover.
a. Remove the screws securing the filter cover to the motor housing.
b. Lift the filter cover away from the saw.
3. Remove the air cleaner assembly.
a. Remove the air filter (and the mesh inner filter) from the air cleaner assembly.
b. Remove the screw securing the throttle grip cover to the handle.
c. Remove the throttle grip cover from the handle.
d. Remove the two screws securing the air cleaner base to the housing.
e. Remove the air cleaner base from the saw.
4. Remove the Carburetor.
a. Clamp off the fuel line to prevent a fuel leak.
b. Disconnect the throttle linkage from the throttle lever.
c. Remove the fuel lines. (It is recommended to make note of the positions of the lines and carburetor connections to ensure the lines are reconnected in the correct location on the new carburetor.)
d. Remove the choke linkage from the carburetor.
e. Remove the carburetor from the unit.
INSTALLING THE NEW CARBURETOR
5. Install the carburetor.
a. Connect fuel lines and linkages to the new carburetor.
b. Transfer the throttle linkage from the old carburetor to the new.
c. Connect the choke linkage.
d. Attach the fuel lines. (This can be done in the order they were removed or by using any notes made when the lines were removed from the old carburetor.)
e. Attach the new carburetor to the carburetor mount.
f. Remove the fuel line clamp.
g. Reconnect the throttle linkage to the throttle lever.
REASSEMBLING THE UNIT
6. Reinstall the air cleaner assembly.
a. Install the air cleaner base and ensure that the series of internal connections are properly aligned and well-connected.
b. Secure the air cleaner base with the two screws.
c. Install the throttle grip cover onto the handle (the tabs at the front of the grip cover should seat into the grooves in the handle).
d. Secure the throttle grip cover with the screw.
e. Place the mesh inner-filter into the air filter and install the assembly onto the air cleaner base. (Make sure the air filter assembly seals evenly along all sides.)
7. Reinstall the filter cover.
a. Reinstall the filter cover.
b. Secure the filter cover with the screws.
8. Reinstall the top cover.
a. Install the top cover (along with the pre-filter).
b. Secure the top cover with the thumbscrew.
