


Why Read This Article?
Finish Nailer Repair - Replacing the Driver Guide (Ridgid Part # 79004001022)
Article Breakdown
Finish Nailer Repair - Replacing the Driver Guide (Ridgid Part # 79004001022)
Video

Tools & Materials
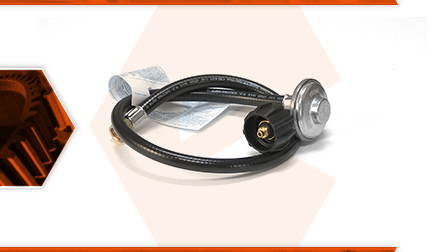
The regulator and hose assembly connects the propane bottle to the grill. It reduces the high-pressure gas coming from the bottle to the correct pressure needed for the grills burners. There are a few problems that can occur to your regulator and hose assembly. Propane bottles should only be filled to 80 percent of capacity. If overfilled, liquid propane can enter the regulator and plug it. The regulator may fail and allow too much or too little gas to enter the grill. The hose can crack after years of use, and the bottle fitting can wear out or crack.
Let's get started.
REMOVING THE HOSE AND REGULATOR 1. Remove the hose and regulator.
a. The rubber propane hose connects to the grill in the very back of the grill cabinet (inside).
b. Locate the two bolts on the (outside) back of the cabinet that secure the hose connections.
c. Remove the bracket and bring the assembly toward the front of the grill.
d. Use two adjustable wrenches to remove the rubber hose from the connection on the bracket.
e. Pull the rubber hose through the ring inside the cabinet to remove the assembly.
INSTALLING THE NEW HOSE AND REGULATOR 2. Install the hose and regulator.
a. Thread the rubber hose through the ring in the back of the grill cabinet.
b. Reconnect the regulator and hose assembly to the bracket.
c. Secure the hose using two adjustable wrenches.
d. Check the connection for leaks by reattaching the regulator to the bottle and turning the propane ON. e. Apply soapy water to the fitting. If there are any propane leaks, the soap will begin to bubble.
REASSEMBLING THE UNIT 3. Reinstall the bracket.
a. It is best to have two people for this job: One person will hold the bracket, and one will secure the fasteners.
b. If working alone, you will need to remove the door.
c. To remove the door, place a screwdriver on the lever (through the opening on the cabinet door) and pull down on the lever. Lift the door away from the cabinet.
d. With the door removed, you should be able to reach around the grill to secure the bracket with two bolts.
e. Reattach the door.
