Why Read This Article?
Finish Nailer Repair - Replacing the Driver Guide (Ridgid Part # 79004001022)
Article Breakdown
Finish Nailer Repair - Replacing the Driver Guide (Ridgid Part # 79004001022)
Tools & Materials

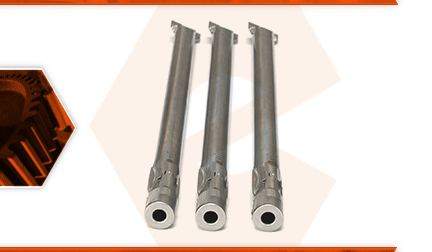
Inconsistent flame or no flame coming from your burners? You might need a new burner tube set. The burner tube set consists of three burner tubes and the mounting screws. The burner tubes are attached to each of the manifold valves and receive metered gas from the orifices. The igniters are attached to the front of the burner tubes. The most common problem with the burner tubes is corrosion or other debris clogging the burner openings.
Let's get started.
REMOVING THE BURNER TUBES 1. Access the burner tubes.
a. Remove the warming rack.
b. Remove the grill grates.
c. Remove the flavorizer bars. 2. Disconnect the ignitor.
a. Unscrew the igniter button and remove the battery.
b. Remove the lock ring behind the ignitor.
c. Push the igniter through the housing and remove it from the front panel. 3. Remove the control knobs.
a. Gently pull the control knobs away from the valves. 4. Remove the cabinet doors.
a. Insert a screwdriver into the small opening located on the upper-inside corner of the cabinet door.
b. Depress the screwdriver to disengage the locking hinge pin and release the cabinet door.
c. Remove the cabinet door from the grill.
d. Repeat this step to remove the second cabinet door. 5. Remove the wind deflector.
a. Remove the screws securing the wind deflector to the front of the grill.
b. Remove the wind deflector. 6. Remove the control panel.
a. Remove the two screws securing the control panel to the front of the grill.
b. Remove the control panel. 7. Disconnect the ignition wires.
a. Disconnect the (3) black wires from the ignition box.
b. Disconnect the white wires from each burner tube. 8. Remove the burner tubes from the grill.
a. Remove the screws securing the burner tubes to the mounting shoulders in the back of the grill box.
b. Slide the burner tube away from the manifold assembly (toward the rear of the grill).
c. Lift the burner out of the grill.
d. Repeat this step to remove all of the burner tubes. 9. Remove the igniters from the burner tubes.
a. Slide the ignitor (and wire) away from the igniter bracket on the burner tube.
b. Use a small screwdriver to depress the locking tab on the ignitor bracket.
c. Slide the ignitor bracket toward the rear of the burner tube.
d. Remove the igniter bracket from the burner tube.
e. Repeat this step to remove the ignitors and brackets from the remaining burner tubes. INSTALLING THE NEW BURNER TUBES 10. Install the igniters.
a. Reinstall the igniter brackets onto the new burner tubes (the wire tabs should face the front of the burner tubes).
b. Thread the igniter wires (starting with the connectors) through the openings on the igniter brackets (from the front of the tube toward the rear).
c. Snap the igniters into the ignitor brackets. 11. Install the burner tubes.
a. Compare the new burner tube assemblies and arrange them in their approximate positions, based on the length of the igniter wires. (The burner tube containing the longest igniter wire will be installed at the farthest distance from the ignitor box.)
b. Thread the igniter wires through the openings in the grill box (from the inside toward the outside).
c. Install the front side of the burner tubes onto the valve stems.
d. Install the notched (rear) portion of each new burner tube onto the mounting shoulders at the back of the grill box.
e. Secure the burner tubes to the mounting shoulders with the new screws. 12. Connect the ignition wires.
a. Route the ignition wires (from each burner tube) to the igniter box.
b. Snap the ignition wires into the holders along the front of the grill.
c. Install the white wire (from the ignition box) onto the tab on the middle burner tube.
d. Install the (black) ignition wires onto the ignition box.
e. Reconnect the black ignition wires to the ignition box (the wire connectors are color-coded to indicate their position on the ignition box). REASSEMBLING THE UNIT 13. Reinstall the control panel.
a. Install the control panel onto the front of the grill (the top edge of the panel attaches to hooks on either side of the frame).
b. Secure the control panel to the grill with the screws. 14. Reinstall the igniter.
a. Install the igniter assembly (from the back of the control panel).
b. Secure the igniter assembly with the locking collar.
c. Install the igniter battery.
d. Install the ignitor button. 15. Reinstall the wind deflector.
a. Install the wind deflector (the tabs on the front of the wind deflector slide over the metal on the bottom on the control panel).
b. Secure the wind deflector with the screws. 16. Reinstall the cabinet doors.
a. Align the bottom of the door with the adjustable hinge.
b. Depress the locking pin lever with a screwdriver.
c. Align the (pin) on the cabinet door with the opening on the grill.
d. Release the locking pin lever to engage the locking pin and secure the cabinet door.
e. Check the doors to see if hinge adjustments are necessary.
f. Repeat steps to remove the doors and adjust the hinge positions as necessary to ensure the best fit. 17. Reattach the control knobs.
a. Align the D-shaped valve stems with the D-shaped openings on the control knobs.
b. Press the control knobs onto the valve stems. 18. Reinstall the grill grates.
a. Install the flavorizer bars.
b. Install the grill grates.
c. Install the warming rack.


