


Why Read This Article?
Finish Nailer Repair - Replacing the Driver Guide (Ridgid Part # 79004001022)
Article Breakdown
Finish Nailer Repair - Replacing the Driver Guide (Ridgid Part # 79004001022)
Video

Tools & Materials
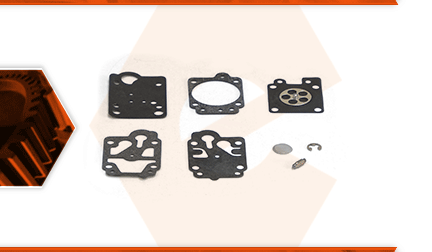
Modern gasoline can break down gaskets and other rubber components in the carburetor, making it necessary to rebuild and install new gaskets and other parts that make up the carburetor. The repair kit includes the needed items to rebuild your carburetor. The kit consists of the gaskets, reed valve, the diaphragm, internal filter, metering needle, and an e-clip. The carburetor can become clogged by debris or corrosion. When this occurs, you will need to disassemble the carburetor and carefully clean it. The kit includes the parts of the carburetor that will require maintenance or that may become damaged during disassembly (such as the gaskets).
Let's get started.
REMOVING THE CARBURETOR 1. Remove the air cleaner.
a. The air cleaner cover is secured by two thumb screws, which can be removed by hand.
b. With the cover removed, lift the air filter out of the air cleaner base.
c. Remove the air cleaner base to expose the carburetor. 2. Remove the carburetor.
a. Disconnect the throttle cable.
b. Disconnect the fuel lines. (You may want to note the position of the incoming and return lines to be sure they are reinstalled in their correct position.) DISASSEMBLING THE CARBURETOR 3. Remove the primer cover.
a. Use a screwdriver to remove the four screws that secure the primer's cover. (It is important to keep all of the components of the carburetor organized when disassembling, to make reassembling the carburetor easier.)
b. Remove the primer cover and bulb.
c. Remove the check valve.
4. Remove the diaphragm.
a. Remove the diaphragm and gasket from the metering base.
5. Remove the metering base.
a. Separate the metering base from the carburetor assembly.
b. Remove the (single) screw from the face of the base and gently tap out the needle and lever.
c. On the opposite side of the metering base, remove the gasket and the reed valve.
d. Remove the internal filter. (You may need to tap this out or use a small pin to pry the filter out of the assembly). 6. Remove the passage plate and gasket.
a. Remove the passage plate from the carburetor body. (If necessary, gently pry the assembly apart using a small screwdriver).
b. Remove the gasket from the passage plate. CLEANING THE CARBURETOR 7. Using a carburetor cleaning aerosol or ultrasonic cleaner.
a. If using the spray, be sure to clean through all the small fuel passageways.
8. Clean the metering needle lever and spring.
a. The needle itself does not need to be cleaned, because it will be replaced (and is included in this kit). REASSEMBLING THE UNIT 9. Rebuild the carburetor using the parts included in the kit.
a. Install the new gasket on the body of the carburetor and align the base.
b. Install the reed valve.
c. Install the reed valve gasket.
d. Reinstall the metering needle onto the metering base. (Install the new metering needle into the lever, and place the spring back into the base. Carefully align the needle with the base, and install the lever; hold this in place and install the screw.)
e. Turn the base over and install the new internal filter. (Place the filter over the hole in the base and press the filter into the hole using a small screwdriver.)
f. Install the metering base onto the carburetor.
g. Install the diaphragm gasket.
h. Install the diaphragm.
i. Install the primer bulb check valve onto the back of the diaphragm.
j. Install the primer bulb onto the check valve.
k. Install the cover onto the primer bulb.
l. Secure the cover with the four screws.
10. Reinstall the carburetor.
a. Install the fuel lines.
b. Install the throttle cable.
c. Align the carburetor with the isolator and boot.
d. Reinstall the rubber boot to the upper portion of the carburetor intake.
11. Reinstall the air cleaner assembly.
a. Secure the carburetor with the air cleaner base and fasten by tightening the two thumb screws.
b. Install the air filter and the air filter cover.
