Spark Plug 870174001 - OEM Homelite - eReplacementParts.com
eReplacementParts.com
877-346-4814
Ryobi Parts

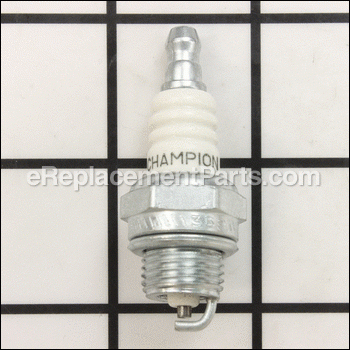
Spark Plug 870174001

OEM part for: Homelite, Ryobi, Toro

Part Number: 870174001


Install
Videos!
Grid squares measure 1x1 inch
In Stock
Ships within 1 business day
Easy 15-30 minutes (45 rated repairs)?
OEM: Original Equipment Manufacturer ?
HomeliteRyobiToro
Does this fit my product?

Product Description ?

This is a genuine OEM replacement part, it is sold individually.
A spark plug is used to deliver electric current from an ignition system to an internal combustion engine.

Over time spark plugs will become dirty or fouled.
It is a good idea to replace the spark plug once this happens.
You will need to gap your spark plug according to the owners manual of the tool you have.

  • Classification: Part
  • Weight: 0.02 lbs.
  • Also Known As: Flame Igniter
  • Shipping: Ships Worldwide

Compatibility

This Spark Plug will fit the following 582 machines. Confirm this part works with your model, and view the detailed model diagrams and repair help we have to offer.

Ryobi

Homelite

Toro

Show More Compatible Models
Don't see yours? Try searching our site for :

This item works with the following types of products:

  • Blower Parts
  • Vacuum Parts
  • Trimmer Parts
  • Hedge Trimmer Parts
  • Pruner Parts
  • Cultivator Parts
  • Chain Saw Parts
  • Saw Parts
  • Edger Parts

This part replaces obsolete part #: 88217, 8714402, 98217S, PS02227, UP05875, UP04093

Repair Videos ?

Watch the Repair Video for Spark Plug

Customer Part Reviews ?

5
Average Rating (out of 5):
12 Reviews
Click to filter by ratings:
5 stars
12
4 stars
0
3 stars
0
2 stars
0
1 stars
0
  • Highest Rating
  • Most Recent
< PREV
  • 1
  • 2
NEXT >
  • Right part
    Right part worked well
    Guest - June 17, 2023 Verified Purchase
    Chainsaw
    Parts fit perfectly
    Guest - November 7, 2022 Verified Purchase
    Nice timing and the part I ordered
    Nice timings and good service
    Guest - March 11, 2022 Verified Purchase
    Works fine
    Arrived on time
    JERRY - October 7, 2021 Verified Purchase
    Spark Plug / Primer Bulb
    Parts showed up quickly repair was simple and leaf blower is working Great again!!!
    Guest - April 7, 2021 Verified Purchase
    Right part
    Was exactly what I ordered. Website is very easy to use.
    James - May 5, 2020 Verified Purchase
    Exact replacement part
    Worked perfectly
    Guest - November 7, 2019 Verified Purchase
    All good. Working like new
    All goo
    charles - October 18, 2019 Verified Purchase
    Happy custumer
    Customer service was great,parts are of good quality, very good price as well.im satisfied!!.thanks.
    Jesus - September 18, 2019 Verified Purchase
    Plug and Play
    Worked well. It was gapped correctly for my product
    Guest - August 23, 2019 Verified Purchase

    Questions & Answers ?

    Our customer Service team is at the ready daily to answer your part and product questions.

    photo of team member
    Ask our Team

    We have a dedicated staff with decades of collective experience in helping customers just like you purchase parts to repair their products.

    Does this fit my product?

    Questions & Answers for Spark Plug


    My line trimmer I checked for spark and I don't have spark is there other ignition parts other than the coil
    Scott for model number UT21566 asked on 2022-04-01
    Hello Scott, thank you for contacting us. There are three major parts that comprise the ignition system on a string trimmer: a magnet, which is located on the flywheel, a spark plug and the trimmer's ignition coil. We hope that helps. If you need help placing an order, our customer service is open 7 days a week. Please feel free to give us a call. We look forward to hearing from you!
    eReplacementParts Team April 01, 2022
    what oil do I use?
    JOSEPH for model number RYOBI 890V BRUSHCUTTER asked on 2023-04-04
    Hi Joseph, Thank you for your question. Ryobi uses SAE 20W-5- 4-cycle oil. If you have any questions, please let us know. We look forward to hearing from you!
    eReplacementParts Team April 04, 2023
    MY RYOBI spark plug is 2 3/4 inches from top to bottom of electrode.treaded section is 1/2 inch. ENGRAVING IS A 4RTP. WHAT PLUG DO i BUY?
    JOSEPH for model number RYOBI 890V BRUSHCUTTER asked on 2023-04-04
    Hi Joseph, Thank you for your question. Before we can provide you with information on the spark plug, we will need the model number from the brushcutter. The model number will be found on a warning label with the Ryobi logo in the upper left-hand corner. The model number will be to the right of the logo. If you could resubmit your question with this information, we would be happy to help you. We look forward to hearing from you!
    eReplacementParts Team April 04, 2023
    My weed eater homelite mighty lite 26VT does not have any spark
    Scott for model number UT21566 asked on 2022-04-01
    Hello Scott, Thank you for contacting us. We have researched the model you have provided and have found the part you are looking for is Part Number: 870174001. If you need help placing an order, customer service is open 7 days a week. Please feel free to give us a call. We look forward to hearing from you!
    eReplacementParts Team April 01, 2022

    Customer Repair Instructions ?

    All our customer repair instructions are solicited directly from other customers just like you who have purchased and replaced this exact part.

    Easy 15-30 minutes (45 rated repairs)?

    Replace the Primer Bulb and spark plug on a Homelite trimmer

    Ernie - May 26, 2016
    👍 13 of 16 people found this instruction helpful
    Tool Type

    Trimmer

    Difficulty

    Easy

    Time

    Less than 15 minutes

    Tools Used

    Screwdriver

    Parts arrived quickly, and were correct replacements for the worn parts. A flat bladed screwdriver removed the screws for the primer bulb, and a spark plug socket was used for the plug, then gapped the plug at 0.025 . The only recommendation I have is to buy the gasket that seals the primer bulb assembly to the carburetor - I would have felt much more secure with the fix had I replaced the gasket, which will be exposed when you remove the two screws holding in the primer bulb retainer.
    Did you find this story helpful?
    Thanks for voting and helping fellow customers!

    Worn parts.

    Richard - May 10, 2017
    👍 4 of 5 people found this instruction helpful
    Tool Type

    Edger

    Difficulty

    Easy

    Time

    15-30 minutes

    Tools Used

    Screwdriver, Pliers, Socket set

    1. Remove 4 screws for the fuel tank with a small Torx wrench
    2. Remove 2 rubber tubes (feed and return) coming from the tank to the carburetor.
    3. Screw the new tank in its place using the same screws.
    4. From the new tank, find which of the 2 tubes has the filter inside the tank (the CLEAR one)
    5. Attach that one to the carb input, the pipe on the carb that feeds the primer bulb (the thing you press 7 times before starting.) It's the pipe closest to the bulb.
    6. Attach the other tube (the fuel return tube) to the other pipe on the carb.
    7. Fuel it and fire it up.
    Did you find this story helpful?
    Thanks for voting and helping fellow customers!

    Needed a new spark plug

    Stephen - October 11, 2017
    👍 2 of 2 people found this instruction helpful
    Tool Type

    Trimmer

    Difficulty

    Easy

    Time

    Less than 15 minutes

    Tools Used

    Socket set

    Removed the old spark plug. Gapped the new one 0.025 and installed it.
    Did you find this story helpful?
    Thanks for voting and helping fellow customers!

    No power, stalling, hard to start

    John - September 4, 2018
    👍 1 of 1 people found this instruction helpful
    Tool Type

    Blower

    Difficulty

    Easy

    Time

    15-30 minutes

    Tools Used

    Pliers, Wrench Set

    This blower is a back pack blower and is about six years old. I refuse to buy a new one cause this is light weight and really has good power. I had trouble starting and when I did get it started I had to keep holding the throttle so it wouldn't stall out. bought a new carburetor, spark plug and I had some new 1/8" fuel line. I took the gas tank off and flushed and pulled new fuel lines through, installed new carburetor and spark plug. I primed the bulb turned choke on and pulled three times and it started right up. I turned the choke off and it idled perfect. I placed the blower on my back and it was like I bought it brand new and the power was all there again. I was one happy camper for about a $30 repair.
    Did you find this story helpful?
    Thanks for voting and helping fellow customers!

    Preventive maintenance and gas tank leaked

    Michael - June 29, 2018
    👍 1 of 1 people found this instruction helpful
    Tool Type

    Trimmer

    Difficulty

    Easy

    Time

    Less than 15 minutes

    Tools Used

    Screwdriver, Pliers

    Spark plug and air filter simple replacement. Gas tank was a great fit and aligned perfectly with existing holes. Had to adjust the fuel line length by simply pulling more line out of the tank to hook up. Easy job.
    Did you find this story helpful?
    Thanks for voting and helping fellow customers!

    Ignition module, filters, spark plug.

    Jerry - April 3, 2018
    Tool Type

    Blower

    Difficulty

    Easy

    Time

    30-60 minutes

    Tools Used

    Screwdriver, Pliers, Nutdriver

    Removed all necessary components to get to ignition coil and replaced with new part.
    Replaced the fuel filter and the spark plug.
    Did you find this story helpful?
    Thanks for voting and helping fellow customers!

    Purge bulb cracked, hard to start.

    Stephen - January 19, 2018
    Tool Type

    Chain Saw

    Difficulty

    Easy

    Time

    15-30 minutes

    Tools Used

    Screwdriver, Pliers, Socket set

    Removed the purge bulb with a screwdriver (small), held the hoses out to connect the new one. Then, pushed in place with tabs in. Changed the spark plug with a socket wrench.
    Did you find this story helpful?
    Thanks for voting and helping fellow customers!

    Hard to start and needed half choke to run. Low power.

    Gerald - October 30, 2017
    Tool Type

    Blower

    Difficulty

    Easy

    Time

    15-30 minutes

    Tools Used

    Pliers, Socket set

    1. Removed air intake cover.
    2. Removed two fasteners holding carburetor to engine.
    3. Disconnected throttle cable and fuel lines.
    4. Cleaned general area and replaced gasket.
    5. Installed new carburetor and connected throttle cable and fuel lines.
    6. Installed new spark plug.
    7. Installed air intake cover.
    8. Followed original start instructions. Starts and runs as new.
    Did you find this story helpful?
    Thanks for voting and helping fellow customers!

    The blower was rough running. acted like not getting enough gas. Slight misfire with mild sputter at full throttle.

    Stephen - October 23, 2017
    Tool Type

    Blower

    Difficulty

    Easy

    Time

    1-2 hours

    Tools Used

    Screwdriver, Pliers, Socket set, small putty knife

    After inspecting the carb. found the carb gasket was torn. Further inspection found that the heat dam was broken. Pulled the spark plug to find it somewhat fouled. Both carb bolts were damaged. After removing the intake filter box, removing the carb ***careful of the throttle bar on the left*** remove the carb gasket, remove the heat dam via torx head screws. The heat dam gasket might need to be removed with a putty knife if it was saturated with fuel. Reinstall all the parts in order. Heat dam, gasket, Carb bolts in heat dam with threads outward, heat dam with two torx screws (alignment is tricky) and tighten the torx heads without breaking heat dam, carb gasket (long flat of gasket between engine and gas tank, install the carb with primer bulb on top and don't forget the throttle bar, install the filter box and tighten both nuts onto the bolts to ensure a tight fit of carb gasket. Very straight forward with just a bit of a tight area. Last item is the spark plug.Once together, prime and start.
    Did you find this story helpful?
    Thanks for voting and helping fellow customers!

    Purge bulb split leaking gas

    Jeffrey - October 2, 2017
    Tool Type

    Cultivator

    Difficulty

    Medium

    Time

    15-30 minutes

    Tools Used

    Screwdriver, Pliers, Socket set

    Removed air filter cover.
    Remove fuel tank cap to release any pressure.
    Use T25 Torx screwdriver to remove (2) carburetor assembly screws .
    Remove fuel line to tank from purge bulb.
    Use needle nose pliers to remove fuel line from carburetor to purge bulb.
    From back of the assembly, use needle nose pliers to squeeze tabs of purge bulb and remove from carburetor assembly.
    Press new purge bulb into assembly housing. Note the orientation of the tabs.
    Reattach fuel lines and assembly to engine.
    Replaced spark plug with socket wrench.

    Did you find this story helpful?
    Thanks for voting and helping fellow customers!

    OEM stands for Original Equipment Manufacturer and means the part you’re buying is sourced directly from the manufacturer who made your product. At eReplacementParts, we sell only genuine OEM parts, guaranteeing the part you’re purchasing is of better design and of higher quality than aftermarket parts.

    Our product descriptions are a combination of data sourced directly from the manufacturers who made your product as well as content researched and curated by our content & customer service teams. This content is edited and reviewed internally before being made public to customers.

    Our customer service team are at the ready daily to answer your part and product questions. We have a dedicated staff with decades of collective experience in helping customers just like you purchase parts to repair their products.

    All our part reviews are solicited directly from other customers who have purchased this exact part. While we moderate these reviews for profanity, offensive language or personally identifiable information, these reviews are posted exactly as submitted and no alterations are made by our team.

    All our customer repair instructions are solicited directly from other customers just like you who have purchased and replaced this exact part. While we moderate these reviews for profanity, offensive language or personally identifiable information, these reviews are posted exactly as submitted and no alterations are made by our team.

    Based on data from past customer purchasing behaviors, these parts are most commonly purchased together along with the part you are viewing. These parts may be necessary or helpful to replace to complete your current repair.

    All our installation videos are created and produced in collaboration with our in-house repair technician, Mark Sodja, who has helped millions of eReplacementParts customers over the last 13 years repair their products. Mark has years of experience in selling and repairing both commercial and residential products with a specialty in gas-powered equipment.

    This data is collected from customers who submitted a repair instruction after replacing this exact part. Customers can rate how easy the repair was to complete and how long it took. We aggregate this data to provide a repair rating that allows customers to quickly determine the difficulty and time needed to perform their own repair.

    eReplacementParts.com
    7174 South 400 West
    Suite 5
    Midvale, UT 84047
    visa mastercard discover american express PayPal