
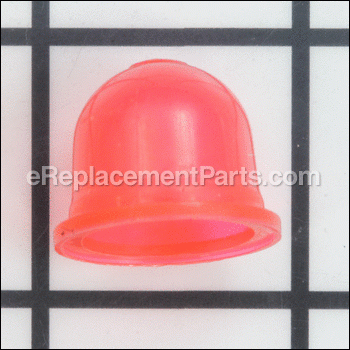


This genuine OEM sourced part is specially produced for use with Poulan, Weed Eater and Husqvarna handheld lawn and garden equipment. By pressing on the purge bulb, it will force all of the air out of the carburetor, and bring fuel from the tank into the carburetor chamber. Once the carburetor is full, the excess fuel will be forced back into the tank through the return line. Unfortunately, over time the primer will lose its elasticity or crack eventually requiring a replacement. Keep in mind this high-quality component is made of durable rubber and is sold individually.
NOTE: Here is the link to our article on
Purge Bulb 530058709
OEM part for: Poulan, Weed Eater, Husqvarna, Jonsered
Part Number: 530058709
$7.46
In Stock
Jump To:
Product Description ?
- Classification: Part
- Weight: 0.01 lbs.
- Also Known As: Air Purge, Plunger, Purge Bubble, Purger Bulb, Primer Bulb
- Shipping: Ships Worldwide
Frequently Purchased Together ?


Compatibility
This part will fit the following 156 machines
Poulan
P1500 Gas Trimmer View Diagrams & Manuals
P2500 Gas Trimmer View Diagrams & Manuals
P3500 Gas Trimmer View Diagrams & Manuals
P4500 Gas Trimmer View Diagrams & Manuals
PP025 Gas Trimmer View Diagrams & Manuals
PP125 Gas Trimmer View Diagrams & Manuals
PP325 Gas Trimmer View Diagrams & Manuals
PP258TP (Type 1) Pole Pruner View Diagrams & Manuals
PP258TP (Type 2) Pole Pruner View Diagrams & Manuals
SM705 (Type 1) Gas Trimmer View Diagrams & Manuals
SM705 (Type 2) Gas Trimmer View Diagrams & Manuals
PP25E Gas Trimmer View Diagrams & Manuals
PP125E (967112801) Trimmer View Diagrams & Manuals
PP26E Gas Trimmer View Diagrams & Manuals
SM706 (Type 1) Gas Trimmer View Diagrams & Manuals
SM706 (Type 2) Gas Trimmer View Diagrams & Manuals
PP 258 TP (Type 1)(2008-12) Pole Saw View Diagrams & Manuals
PP 258 TP (Type 2)(2008-12) Pole Saw View Diagrams & Manuals
PP 28 PD (967228701)(2014-09) Pole Saw View Diagrams & Manuals
PP 28 PDT (967288702)(2014-09) Pole Saw View Diagrams & Manuals
P 1500 (952711930)(2010-04) String Trimmer View Diagrams & Manuals
P 2500 (952711931)(2010-08) String Trimmer View Diagrams & Manuals
PP 125 (Type 1) String Trimmer View Diagrams & Manuals
PP 125 (Type 1)(2009-03) String Trimmer View Diagrams & Manuals
PP 125 (Type 2) String Trimmer View Diagrams & Manuals
PP 125 (Type 2)(2009-03) String Trimmer View Diagrams & Manuals
PP 25 (Type 1) String Trimmer View Diagrams & Manuals
PP 25 (Type 2) String Trimmer View Diagrams & Manuals
PP 25 SFA (967185701)(2013-06) String Trimmer View Diagrams & Manuals
PP 28 CD (967228301)(2014-09) String Trimmer View Diagrams & Manuals
PP 28 LD (967228401)(2014-09) String Trimmer View Diagrams & Manuals
PP 28 RJ (967228601)(2014-09) String Trimmer View Diagrams & Manuals
PP 325 (Type 1)(2008-12) String Trimmer View Diagrams & Manuals
PP 325 (Type 2)(2008-12) String Trimmer View Diagrams & Manuals
XT 260 (Type 1)(2009-03) String Trimmer View Diagrams & Manuals
XT 260 (Type 1)(952711795)(2009-03) String Trimmer View Diagrams & Manuals
XT 260 (Type 2)(2009-03) String Trimmer View Diagrams & Manuals
XT 260 (Type 2)(952711795)(2009-03) String Trimmer View Diagrams & Manuals
Weed Eater
Featherlite SST 25 Gas Trimmer View Diagrams & Manuals
FL23 Gas Trimmer View Diagrams & Manuals
FX26 Type 1 Gas Trimmer View Diagrams & Manuals
FX26 Type 2 Gas Trimmer View Diagrams & Manuals
FX26S Type 1 Gas Trimmer View Diagrams & Manuals
MX550 Gas Trimmer View Diagrams & Manuals
MX557 Gas Trimmer View Diagrams & Manuals
TE475 Gas Trimmer View Diagrams & Manuals
TE475Y Gas Trimmer View Diagrams & Manuals
XT260 Type 1 Gas Trimmer View Diagrams & Manuals
XT260 Type 2 Gas Trimmer View Diagrams & Manuals
XT700 Gas Trimmer View Diagrams & Manuals
FB25 Handheld Blower View Diagrams & Manuals
XT260 (Type 2) String Trimmer View Diagrams & Manuals
FL25C Gas Trimmer View Diagrams & Manuals
FL20C Gas Trimmer View Diagrams & Manuals
FX26SC Gas Trimmer View Diagrams & Manuals
SST25C (Type 1) Gas Trimmer View Diagrams & Manuals
SST25C (Type 2) Gas Trimmer View Diagrams & Manuals
SST25C (Type 3) Gas Trimmer View Diagrams & Manuals
SST25C (Type 4) Gas Trimmer View Diagrams & Manuals
FX26S Type 2 Gas Trimmer View Diagrams & Manuals
FX265 Featherlite Xtreme 16" 5cc Gas Trimmer View Diagrams & Manuals
SST25FEATHERLITE Gas Trimmer View Diagrams & Manuals
Husqvarna
125 E (2005-09) Edger View Diagrams & Manuals
125 E (2006-03) Edger View Diagrams & Manuals
125 E (2008-01) Edger View Diagrams & Manuals
125 E (2006-01) Edger View Diagrams & Manuals
128LD 952711969 2010-06 Trimmer/Edger View Diagrams & Manuals
128C (2010-08) Trimmer/Edger View Diagrams & Manuals
125C (2005-06) Trimmer View Diagrams & Manuals
125C (2007-04) Trimmer View Diagrams & Manuals
125C (2005-09) Trimmer View Diagrams & Manuals
128CD 28cc Gas Line Lawn Trimmer View Diagrams & Manuals
125R (2006-03) Brushcutter View Diagrams & Manuals
125R (2006-10) Brushcutter View Diagrams & Manuals
125R (2007-10) Brushcutter View Diagrams & Manuals
125R (2008-06) Brushcutter View Diagrams & Manuals
125RJ (2007-04) Brushcutter View Diagrams & Manuals
125RJ (2008-06) Brushcutter View Diagrams & Manuals
128R (2010-08) Brushcutter View Diagrams & Manuals
125L (2007-04) Trimmer View Diagrams & Manuals
GBV345 (2010-05) Blower View Diagrams & Manuals
FB25 (952711937) (2009-04) Handheld Trimmer View Diagrams & Manuals
FL20 (Type 2) (2009-03) Handheld Trimmer View Diagrams & Manuals
FL20 (Type 2) (952711794) (2009-03) Handheld Trimmer View Diagrams & Manuals
FL23 (2008-03) Handheld Trimmer View Diagrams & Manuals
FX26 (Type 1) (2008-06) Handheld Trimmer View Diagrams & Manuals
FX26 (Type 2) (2008-06) Handheld Trimmer View Diagrams & Manuals
FX26S (Type 1) (2009-03) Handheld Trimmer View Diagrams & Manuals
FX26S (Type 2) (2009-03) Handheld Trimmer View Diagrams & Manuals
MX550 (2009-03) Handheld Trimmer View Diagrams & Manuals
P1500 (2007-10) Handheld Trimmer View Diagrams & Manuals
P2500 (2007-10) Handheld Trimmer View Diagrams & Manuals
P3500 (2007-10) Handheld Trimmer View Diagrams & Manuals
P4500 (2009-04) Handheld Trimmer View Diagrams & Manuals
P4500F (2009-01) Handheld Trimmer View Diagrams & Manuals
PP025 (Type 1) (2008-12) Handheld Trimmer View Diagrams & Manuals
PP025 (Type 2) (2008-12) Handheld Trimmer View Diagrams & Manuals
PP125 (Type 1) (2009-03) Handheld Trimmer View Diagrams & Manuals
PP125 (Type 2) (2009-03) Handheld Trimmer View Diagrams & Manuals
PP25E (2009-01) Handheld Trimmer View Diagrams & Manuals
PP325 (Type 1) (2008-12) Handheld Trimmer View Diagrams & Manuals
PP325 (Type 2) (2008-12) Handheld Trimmer View Diagrams & Manuals
SM706 (Type 1) (2008-12) Handheld Trimmer View Diagrams & Manuals
SM706 (Type 2) (2008-12) Handheld Trimmer View Diagrams & Manuals
SST25 (952711796) (2009-03) Handheld Trimmer View Diagrams & Manuals
SST25 (2009-03) Featherlite View Diagrams & Manuals
475 (2009-03) Te Handheld Trimmer View Diagrams & Manuals
475Y (2009-03) Te Handheld Trimmer View Diagrams & Manuals
TE475 (952711797) (2009-03) Handheld Trimmer View Diagrams & Manuals
XT260 (Type 1) (2009-03) Handheld Trimmer View Diagrams & Manuals
XT260 (Type 2) (2009-03) Handheld Trimmer View Diagrams & Manuals
XT260 (Type 1) (952711795) (2009-03) Handheld Trimmer View Diagrams & Manuals
XT260 (Type 2) (952711795) (2009-03) Handheld Trimmer View Diagrams & Manuals
XT700 (2009-03) Handheld Trimmer View Diagrams & Manuals
XT700 (952711798) (2009-03) Handheld Trimmer View Diagrams & Manuals
PP258TP (Type 1) (2008-12) Pole Pruner View Diagrams & Manuals
PP258TP (Type 2) (2008-12) Pole Pruner View Diagrams & Manuals
124 R (2010-08) Brushcutter View Diagrams & Manuals
128 RJ (952715759) (2011-08) Row Brushcutter View Diagrams & Manuals
128 RJ (952715754) (2010-08) Brushcutter View Diagrams & Manuals
128 RJ (952711950) (2010-08) Brushcutter View Diagrams & Manuals
124 C (952715671) (2010-08) Trimmer View Diagrams & Manuals
124 C (952715639) (2010-06) Trimmer View Diagrams & Manuals
124 C (2010-06) Trimmer View Diagrams & Manuals
124 L (2010-06) Us Can View Diagrams & Manuals
124 L (2008-06) Trimmer View Diagrams & Manuals
125 LDX (2008-06) Trimmer View Diagrams & Manuals
125 LDX (2007-04) Trimmer View Diagrams & Manuals
128 DJX (966712501) (2012-05) Trimmer View Diagrams & Manuals
128 DJX (966712501) (2011-01) Trimmer View Diagrams & Manuals
128 L (952715755) (2010-08) Row Trimmer View Diagrams & Manuals
128 L (952715750) (2010-08) Eu Au View Diagrams & Manuals
128 L (952711946) (2010-08) Us Can View Diagrams & Manuals
128 LD (952711969) (2010-08) Us Can View Diagrams & Manuals
128 LD (952711953) (2010-08) Us Lowes View Diagrams & Manuals
128LDX (966589201) (2010-06) Us Can View Diagrams & Manuals
128 LDX (952715757) (2012-01) Row Trimmer View Diagrams & Manuals
128 LDX (952715753) (2012-01) Eu Au View Diagrams & Manuals
128 LDX (952711948) (2010-08) Us Can View Diagrams & Manuals
128 LDX (545192137) (2010-08) Row Trimmer View Diagrams & Manuals
Jonsered
BC2128 CAN - 952711959 (2010-08) Brushcutter View Diagrams & Manuals
BC2128 EU AU - 952715763 (2010-08) Brushcutter View Diagrams & Manuals
CC2126 ROW (2010-08) Brushcutter View Diagrams & Manuals
CC2128 CAN - 952711960 (2010-06) Brushcutter View Diagrams & Manuals
CC2128 EU AU - 952715764 (2010-08) Brushcutter View Diagrams & Manuals
CC2128 US - 952711957 (2010-06) Brushcutter View Diagrams & Manuals
GC2126 C (2007-03) Trimmer View Diagrams & Manuals
GC2126 C (2008-06) Trimmer View Diagrams & Manuals
GC2128 US CAN - 952711955 (2010-08) Trimmer View Diagrams & Manuals
GC2128C CAN - 952711958 (2010-06) Trimmer View Diagrams & Manuals
GC2128C EU AU - 952715762 (2011-04) Trimmer View Diagrams & Manuals
GC2128C US - 952711956 (2011-03) Trimmer View Diagrams & Manuals
GT2126 (2007-04) Trimmer View Diagrams & Manuals
GT2126 (2008-06) Trimmer View Diagrams & Manuals
GT2128 EU AU - 952715761 (2010-06) Trimmer View Diagrams & Manuals
GT2128 US CAN (2010-06) Trimmer View Diagrams & Manuals
Show More Compatible Models
This item works with the following types of products:
- Trimmer Parts
- Edger Parts
- Pruner Parts
- Blower Parts
Repair Videos ?
Watch the Repair Video for
Purge Bulb

Articles:
|
Replacing primer bulbs in small engines is one of the most common types of tool repairs, and this article explains profe...
June 25, 2010
|

|
Step-by-step instructions for removing and installing the purge bulb on your Weed Eater blower....
March 08, 2018
|

Customer Part Reviews ?
Average Rating (out of 5):
Click to filter by ratings:
5 stars
12
4 stars
1
3 stars
0
2 stars
0
1 stars
0
< PREV
- 1
- 2
Fast Shipping, Runs Like New.
I ordered a magneto for my weed eater. I put it in and started on the 2nd pull.Goo for another 15 years I hope. Watched the video and had it running in no time. Thankyou
Guest -
May 25, 2023
Verified Purchase
Replacement parts
Received the right part in just a matter of days. Thanks
Guest -
May 19, 2023
Verified Purchase
Easy repair
Shipping was very quick with upgraded mailing charge. Parts were exactly what I needed for my light weight weedeater. Easy repairs.
Susan -
July 19, 2021
Verified Purchase
Great part
Part arrived quickly, perfect fit.
David -
July 9, 2021
Verified Purchase
Easy peezy
Parts arrived promptly, got my WeedEater started. Was so easy placing my order. Great service
Guest -
May 22, 2020
Verified Purchase
Average Guy
The diagram used on web site was easy to understand and shown me the exact parts I needed. Once ordered, it arrived within a few days. Which is amazing considering how backed up the delivery systems are at this time. Parts were the exact replacements I needed.
Guest -
April 27, 2020
Verified Purchase
Exact PART!
Fast delivery and PART fit EXACTLY
Guest -
April 6, 2020
Verified Purchase
Easy replacement and works great.
Arrived on time was easy to replace and works great.
Guest -
November 11, 2019
Verified Purchase
Exact replacement
Good part.
Robert -
October 1, 2019
Verified Purchase
Perfect fit on my edger good job 🏃 like new thanks
Thanks the parts fit perfectly on my edger machine 🏃 like new got it on time good shipping and handling.
Guest -
August 2, 2019
Verified Purchase
t
t
t -
t days ago
Verified Purchase
eReplacementParts Team
t
Questions & Answers ?
Our customer Service team is at the ready daily to answer your part and product questions.

Ask our Team
We have a dedicated staff with decades of collective experience in helping customers just like you purchase parts to repair their products.
Does this fit my product?Questions & Answers for Purge Bulb
No questions have been asked yet
Customer Repair Instructions ?
All our customer repair instructions are solicited directly from other customers just like you who have purchased and replaced this exact part.
Bulb was leaking air wouldn't prime fuel
david - June 12, 2016
👍 9 of 9 people found this instruction helpful
Tool Type
Blower
Difficulty
Easy
Time
15-30 minutes
Tools Used
Screwdriver
Parts Used
Removed two screws on bulb retainer, removed old bulb and replaced it with the new bulb. Reattach bulb retainer and check for priming. Started blower, it works perfectly.
Did you find this story helpful?
Thanks for voting and helping fellow customers!
Hole in purge zama
Jollie - September 6, 2016
👍 6 of 6 people found this instruction helpful
Tool Type
Trimmer
Difficulty
Easy
Time
Less than 15 minutes
Tools Used
Screwdriver
Parts Used
Take off the one 2 screws, remove old purge zama, place new part align base plate and secure with 2 screws. EASY
Did you find this story helpful?
Thanks for voting and helping fellow customers!
Fuel cap was leaking. Bulb was ruptured.
Richard - November 10, 2016
👍 2 of 2 people found this instruction helpful
Tool Type
Trimmer
Difficulty
Easy
Time
15-30 minutes
Tools Used
Screwdriver, Knife
1. Remove the screws from the primer bulb cover and remove the old primer bulb.
2. Insert the new primer bulb in the cover and screw it to the carburetor.
3. Remove the old fuel cap and install the new one.
2. Insert the new primer bulb in the cover and screw it to the carburetor.
3. Remove the old fuel cap and install the new one.
Did you find this story helpful?
Thanks for voting and helping fellow customers!
Purge bulb cracked and leaked
Kenneth - August 28, 2017
👍 1 of 1 people found this instruction helpful
Tool Type
Trimmer
Difficulty
Easy
Time
Less than 15 minutes
Tools Used
Screwdriver
Parts Used
Removed the screws from the purge bulb retaining plate
Removed the old bulb and inserted the new bulb
Screwed the new bulb and retaining plate back on the carburetor
Removed the old bulb and inserted the new bulb
Screwed the new bulb and retaining plate back on the carburetor
Did you find this story helpful?
Thanks for voting and helping fellow customers!
Fuel filter was clogged, fuel line leaked, primer/purge bulb was cracked
Glenn - May 30, 2017
👍 1 of 1 people found this instruction helpful
Tool Type
Trimmer
Difficulty
Easy
Time
Less than 15 minutes
Tools Used
Screwdriver
1. Pried and pulled off the fuel line and fuel purge line from the nipples on the trimmer. Be sure to note which line from the fuel tank goes to which nipple prior to removing them.
2. Removed 2 torx screw that hold the fuel tank to the trimmer. Disposed of the old fuel tank after removing old fuel in the tank. (The fuel was fresh so I simply poured it into the new fuel tank.)
3. Removed 2 slotted/phillips screws from the plate holding the cracked primer/purge bulb.
4. Carefully pulled off the plate and removed the cracked primer/purge bulb.
5. Carefully lifted the gasket off of the plate. Inspected the gasket for integrity and wiped clean with a lint-free cloth.
6. Wiped clean with a lint-free cloth both metal surfaces the gasket mates with to ensure a good seal when reassembling.
7. While depressing the throttle, placed gasket back in position, positioned the new primer/purge bulb in the recess, positioned the metal plate on top of the gasket with the new bulb protruding through it and firmly screwed in the 2 slotted/phillips screws. (Note: Throttle must be depressed to ensure proper alignment of all these parts which is necessary to get a good fuel seal.)
8. Attached the new fuel tank with the 2 torx screws removed earlier. Tightened screws firmly.
9. Pushed the fuel line and the fuel purge line onto the nipples as far as they would go. (Make sure the lines are attached in the exact same manner as they were with the old fuel tank.)
10. Put fuel in the fuel tank and pressed the primer/purge bulb several times until fuel fills the bulb. Checked for fuel leaks.
11. Started the trimmer per normal process. Checked for fuel leaks, again, after running the trimmer for a couple of minutes.
Overall, a very simple repair that took less than 15 minutes from start to finish. And the best part is my 7 yr old trimmer now run like it was brand new!
Did you find this story helpful?
Thanks for voting and helping fellow customers!
Cracked primer bulb
dale - January 9, 2017
👍 1 of 1 people found this instruction helpful
Tool Type
Blower
Difficulty
Easy
Time
Less than 15 minutes
Tools Used
Screwdriver
Parts Used
Removed 2 screws from the primer cover
Removed the old primer
Installed the new primer in the cover
Screwed the new primer and cover to the carburetor
Removed the old primer
Installed the new primer in the cover
Screwed the new primer and cover to the carburetor
Did you find this story helpful?
Thanks for voting and helping fellow customers!
Fuel line problem.
Stephen - June 26, 2018
Tool Type
Trimmer
Difficulty
Medium
Time
30-60 minutes
Tools Used
Screwdriver
Fuel line was getting hard and cracking. So replaced both fuel and purge lines. Changed the primer bulb as well. Also cleaned up the fuel screen in the carburetor.
Did you find this story helpful?
Thanks for voting and helping fellow customers!
Primer bulb was cracked
Frank - June 20, 2018
Tool Type
Trimmer
Difficulty
Easy
Time
Less than 15 minutes
Tools Used
Screwdriver
Parts Used
1 Removed 2 screws
2 Removed plate holding bulb
3 Replaced new bulb in holding plate
4 Put the 2 screws back and tighten them
5 Pushed bulb pulled cord and started trimmer
2 Removed plate holding bulb
3 Replaced new bulb in holding plate
4 Put the 2 screws back and tighten them
5 Pushed bulb pulled cord and started trimmer
Did you find this story helpful?
Thanks for voting and helping fellow customers!
Purge bulb had cracked due to use would not draw gas from tank due to air leak
walter - May 31, 2018
Tool Type
Trimmer
Difficulty
Easy
Time
15-30 minutes
Tools Used
Screwdriver
Parts Used
Removed two screws on either side of plate used to hold bulb in place and seat bulb in groove to make air tight seal. install new bulb on first attempt bulb didn't seat properly, removed and reset bulb reinstalled mounting plate and tightened screws..success bulb maintained seal
Did you find this story helpful?
Thanks for voting and helping fellow customers!
Old broken fuel line and purge lune. Primer bulb was hardened.
Richard - April 27, 2018
Tool Type
Trimmer
Difficulty
Easy
Time
Less than 15 minutes
Tools Used
Screwdriver, Allen wrench
Removed gas tank and old hoses. Removed bulb. Removed carburator. Cleaned up and installed new fuel and purge line. Installed new primer bulb. Primed carb and started trimmer.
Did you find this story helpful?
Thanks for voting and helping fellow customers!
Load More Install Stories
OEM stands for Original Equipment Manufacturer and means the part you’re buying is sourced directly from the manufacturer who made your product. At eReplacementParts, we sell only genuine OEM parts, guaranteeing the part you’re purchasing is of better design and of higher quality than aftermarket parts.
Our product descriptions are a combination of data sourced directly from the manufacturers who made your product as well as content researched and curated by our content & customer service teams. This content is edited and reviewed internally before being made public to customers.
Our customer service team are at the ready daily to answer your part and product questions. We have a dedicated staff with decades of collective experience in helping customers just like you purchase parts to repair their products.
All our part reviews are solicited directly from other customers who have purchased this exact part. While we moderate these reviews for profanity, offensive language or personally identifiable information, these reviews are posted exactly as submitted and no alterations are made by our team.
All our customer repair instructions are solicited directly from other customers just like you who have purchased and replaced this exact part. While we moderate these reviews for profanity, offensive language or personally identifiable information, these reviews are posted exactly as submitted and no alterations are made by our team.
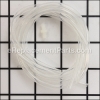
Based on data from past customer purchasing behaviors, these parts are most commonly purchased together along with the part you are viewing. These parts may be necessary or helpful to replace to complete your current repair.
All our installation videos are created and produced in collaboration with our in-house repair technician, Mark Sodja, who has helped millions of eReplacementParts customers over the last 13 years repair their products. Mark has years of experience in selling and repairing both commercial and residential products with a specialty in gas-powered equipment.
This data is collected from customers who submitted a repair instruction after replacing this exact part. Customers can rate how easy the repair was to complete and how long it took. We aggregate this data to provide a repair rating that allows customers to quickly determine the difficulty and time needed to perform their own repair.