
This is a genuine Honda replacement part, it is sold individually.
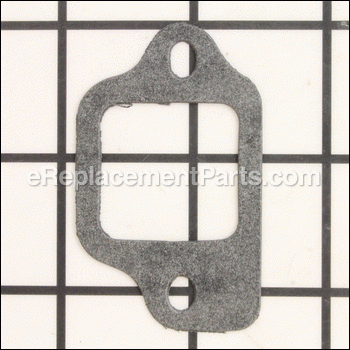
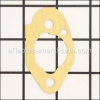
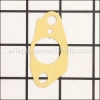
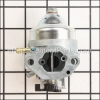
The Honda Insulator Gasket is installed between the Cylinder housing and the Carburetor Insulator ( Or Heat Dam).
Its purpose is to create a seal so that air cannot enter the cylinder causing the engine to operate poorly.
It also keeps other debris from entering the engine and damaging it.
If this part becomes cracked or worn it should be replaced ASAP.
Insulator Gasket 16212-ZL8-000
OEM part for: Honda, Toro, Lawn Boy
Part Number: 16212-ZL8-000
$7.97
In Stock
Jump To:
Product Description ?
- Classification: Part
- Weight: 0.02 lbs.
- Also Known As: Carburetor Gasket, Intake Gasket, Mounting Gasket
- Shipping: Ships Worldwide
Frequently Purchased Together ?


Compatibility
This Insulator Gasket will fit the following 377 machines. Confirm this part works with your model, and view the detailed model diagrams and repair help we have to offer.
Honda
Toro
Lawn Boy
Show More Compatible ModelsThis item works with the following types of products:
- Engine Parts
- Lawn Mower Parts
- Snowblower Parts
This part replaces obsolete part #: 16561-ZE1-810
Customer Part Reviews ?
Average Rating (out of 5):
Click to filter by ratings:
5 stars
7
4 stars
0
3 stars
0
2 stars
0
1 stars
0
< PREV
- 1
Right part, easy repair.
The carburetor and gasket for mu UH700 mower were a perfect match, fast delivery. Mower runs great now.
Guest -
September 7, 2020
Verified Purchase
Order was Perfect
The order, just like all previous orders was handled perfectly. I got the part I wanted. It was also delivered very promptly. This is the best place to order parts.
Guest -
September 25, 2019
Verified Purchase
Authentic parts and great service
The parts are genuine Honda, so they fit perfectly. Service and shipping was excellent. I'll be a customer next time I need something.
Guest -
September 23, 2019
Verified Purchase
Just what I needed, easy to find part.
I try other sites, difficult to find right part, so easy here. And the ship quick.
Michael -
September 19, 2019
Verified Purchase
Great part
My pressure washer is working fine.
Guest -
September 16, 2019
Verified Purchase
Fast service, exact match
Great service. Parts were exact replacements. Will continue to use erelacement parts.
Guest -
August 23, 2019
Verified Purchase
Get it running
Have always used eReplacementParts for my small engine repairs. They have always had what I needed and all parts fit like the original.
Guest -
August 5, 2019
Verified Purchase
Questions & Answers ?
Our customer Service team is at the ready daily to answer your part and product questions.

Ask our Team
We have a dedicated staff with decades of collective experience in helping customers just like you purchase parts to repair their products.
Does this fit my product?Questions & Answers for Insulator Gasket
No questions have been asked yet
Customer Repair Instructions ?
All our customer repair instructions are solicited directly from other customers just like you who have purchased and replaced this exact part.
Honda GCV160 surging lawn mower
Michael - November 15, 2015
👍 6 of 6 people found this instruction helpful
Tool Type
Lawn Mower
Difficulty
Easy
Time
15-30 minutes
Tools Used
Socket set, Wrench Set, Nutdriver
Removed old carburetor and replaced with new one. Lawn mower runs great now and engine does not surge anymore. Took a look at a YouTube video on cleaning the carburetor for reference. Pretty easy to do even if you do not know much about small engines.
Did you find this story helpful?
Thanks for voting and helping fellow customers!
Running rough and rpms surging
Matthew - April 12, 2017
👍 3 of 3 people found this instruction helpful
Tool Type
Lawn Mower
Difficulty
Easy
Time
15-30 minutes
Tools Used
Screwdriver, Pliers, Socket set
1. I removed the old carburetor (three 10 mm bolts behind the air cleaner element), noting the order of the gaskets, the spacer, the shield plate and the linkage connections.
2. I disconnected the fuel line after moving the spring clip with pliers.
3. I connected the new carburetor to the two linkages and with new gaskets, reusing the spacer at the engine block. I also attached the fuel line and moved the spring clip back in place to secure the hose.
3. I tightened the 10 mm bolts that hold the carb in place.
4. I replaced the air cleaner element and then the spark plug (also changed the crankcase oil).
5. Runs great now!
Did you find this story helpful?
Thanks for voting and helping fellow customers!
It was not running properly
Gary - May 5, 2017
👍 1 of 1 people found this instruction helpful
Tool Type
Lawn Mower
Difficulty
Easy
Time
15-30 minutes
Tools Used
Socket set
I cleaned out the carburetor for spring and disassembled the carburetor. When I pulled out the two bolts that hold the air cleaner to the carburetor, the carburetor and all of the gaskets fell out. when I replaced them my mower did not run properly. I bought a workshop manual and all new gaskets to show me the orientation of the gaskets and it runs as good as the day I purchased it.
Did you find this story helpful?
Thanks for voting and helping fellow customers!
Water pump engine would not start.
mark - October 27, 2016
👍 1 of 1 people found this instruction helpful
Tool Type
Engine
Difficulty
Medium
Time
30-60 minutes
Tools Used
Screwdriver, Pliers, Socket set, Himostat for spring
I checked plug and it was getting fire. I then knew it was the fuel side that was not working. I removed carburetor and disassembled it . (Make sure and remove throttle return spring first or you may lose it.) I found trash inside carb. I cleaned it up and reassembled and installed it. Engine would start with choke out but would not run without choke. Suspecting a vacuum leak,I sprayed some carb cleaner at base of carb where it bolted to the head and had a big rpm change. I then knew it was a vacuum leak. I took my flashlight and found the plastic block between carb and head had a Crack down the center. I ordered another block and the gaskets for the carb mounting. put it all together and it runs like new.
Did you find this story helpful?
Thanks for voting and helping fellow customers!
Gas dripping from carb while running. Would only run on half choke
David - August 8, 2016
👍 1 of 1 people found this instruction helpful
Tool Type
Engine
Difficulty
Medium
Time
30-60 minutes
Tools Used
Socket set
Removed air breather. Carb and cleaned gasket areas. Assembled in reverse order. Starts and runs great
Did you find this story helpful?
Thanks for voting and helping fellow customers!
Carb. was foiled with ethanol crummy gas. Bought new carburetor locally but no gaskets included.
William - August 2, 2016
👍 1 of 1 people found this instruction helpful
Tool Type
Lawn Mower
Difficulty
Medium
Time
1-2 hours
Tools Used
Nutdriver, Pictorial of exploded view for gasket placement order.
1. Shut off gasoline line using valve and remove the hose from the carburetor. Using "gas" pliers.
2. Remove air filter cover and remove air filter.
3. Remove two mounting bolts behind the air filter. Using 10mm socket.
4. Remove throttle spring and governor bail from carburetor throttle lever.
5. Remove vacuum hose from the filter housing.
6. For reassembly insert the two mounting screws through the plastic air filter housing and assemble two gaskets paying attention to orientation per exploded view.
7. Place carburetor on the two bolts making sure it is oriented correctly with the controls on top.
8. Continue installing gaskets paying attention to orientation.
9. When ready to put the carburetor on the body of the engine make sure the governor spring and bail are installed. Also be sure that the choke control lever is all the way to the right. The choke lever on the carburetor needs to be to the left of the control lever. Make sure the vacuum hose is back in place on the back of the air cleaner housing. Install the gasoline hose.
10. Tighten the two 10mm hex-head bolts up snuggly. The sleeve inserts will protect the air cleaner housing from being crushed. Make sure they are in place.
Did you find this story helpful?
Thanks for voting and helping fellow customers!
Engine would surge while running
Tony - June 3, 2016
👍 1 of 1 people found this instruction helpful
Tool Type
Lawn Mower
Difficulty
Easy
Time
30-60 minutes
Tools Used
Screwdriver, Socket set
I watched the you tube video on replacing a Honda carburetor. After I watch it, I was able to replace all of the other parts that I had ordered. Here is a copy of the video that was so helpful to me. Enjoy. https://www.youtube.com/watch?v=D32zXNYSxmw
Did you find this story helpful?
Thanks for voting and helping fellow customers!
Would only run with the Choke. Air Guide Gasket Eroded. Running Lean.
Christopher - October 4, 2018
Tool Type
Lawn Mower
Difficulty
Easy
Time
30-60 minutes
Tools Used
, 10 mm socket. Ratchet. Scraper.
Removed (2) 10 mm bolts fastening Air Cleaner Housing, Carb, Carb Insulator and Gaskets to Engine Block. Scraped remaining Gasket from Intake Port and reassembled with New Parts. Runs Like Brand New.
Did you find this story helpful?
Thanks for voting and helping fellow customers!
Gaskets on carburetor needed replacement.
Eric - September 7, 2018
Tool Type
Lawn Mower
Difficulty
Easy
Time
15-30 minutes
Tools Used
Screwdriver, Pliers, Socket set, Adjustable Wrench, An Exacto knife
1. Removed two bolts securing carburetor and any springs necessary to free carb.
2. Removed float bowl.
3. Removed old gaskets from float bowl rim. I used the Exacto knife to scrape it out. It was pretty well stuck to the surface of the groove.
4. Clean float bowl components.
5. Removed old gaskets from carb.
6. Clean surfaces that the new gaskets will go.
7. Put on new gaskets.
8. Reconnect springs and re-insert bolts through carb and gaskets.
Did you find this story helpful?
Thanks for voting and helping fellow customers!
Lawnmower was running poorly.
James - August 29, 2018
Tool Type
Lawn Mower
Difficulty
Easy
Time
15-30 minutes
Tools Used
Socket set
I followed the video you guys made. Very well done. Thanks
Did you find this story helpful?
Thanks for voting and helping fellow customers!
Load More Install Stories
OEM stands for Original Equipment Manufacturer and means the part you’re buying is sourced directly from the manufacturer who made your product. At eReplacementParts, we sell only genuine OEM parts, guaranteeing the part you’re purchasing is of better design and of higher quality than aftermarket parts.
Our product descriptions are a combination of data sourced directly from the manufacturers who made your product as well as content researched and curated by our content & customer service teams. This content is edited and reviewed internally before being made public to customers.
Our customer service team are at the ready daily to answer your part and product questions. We have a dedicated staff with decades of collective experience in helping customers just like you purchase parts to repair their products.
All our part reviews are solicited directly from other customers who have purchased this exact part. While we moderate these reviews for profanity, offensive language or personally identifiable information, these reviews are posted exactly as submitted and no alterations are made by our team.
All our customer repair instructions are solicited directly from other customers just like you who have purchased and replaced this exact part. While we moderate these reviews for profanity, offensive language or personally identifiable information, these reviews are posted exactly as submitted and no alterations are made by our team.
Based on data from past customer purchasing behaviors, these parts are most commonly purchased together along with the part you are viewing. These parts may be necessary or helpful to replace to complete your current repair.
All our installation videos are created and produced in collaboration with our in-house repair technician, Mark Sodja, who has helped millions of eReplacementParts customers over the last 13 years repair their products. Mark has years of experience in selling and repairing both commercial and residential products with a specialty in gas-powered equipment.
This data is collected from customers who submitted a repair instruction after replacing this exact part. Customers can rate how easy the repair was to complete and how long it took. We aggregate this data to provide a repair rating that allows customers to quickly determine the difficulty and time needed to perform their own repair.